How to Install a Door Knob: A Step-by-Step Guide
Learn how to install a door knob with our simple step-by-step guide. From removing the old knob to securing the new one, we’ve got you covered for a hassle-free DIY project.
Installing a door knob might seem like a daunting task, but it’s actually one of the easier home improvement projects you can tackle. Whether you’re replacing an old, worn-out knob or upgrading your door hardware for a more modern look, you can install a door knob yourself in just a few easy steps. With the right tools and a bit of patience, you’ll have that new knob securely in place in no time.
In this How to Install a Door Knob: A Step-by-Step Guide, we’ll walk you through the process, breaking it down into simple steps that anyone can follow. Ready to upgrade your door hardware? Let’s get started!
Tools and Materials You’ll Need
Before diving into the installation, it’s essential to gather all the necessary tools and materials. Having everything at hand will make the process smoother and more efficient.
Here’s what you’ll need:
New door knob set (including the latch and strike plate)
Phillips-head screwdriver
Flathead screwdriver (optional)
Measuring tape (if adjustments are needed)
Pencil (for marking screw holes, if necessary)
Now that you’ve got your tools ready, let’s dive into the installation process.
How to Install a Door Knob: Step-by-Step Guide
Step 1: Remove the Old Door Knob
If you're replacing an existing door knob, the first step is to remove the old one, which is a simple process that should only take a few minutes. Start by locating the screws on the interior side of the knob and unscrewing them with a screwdriver. Once the screws are removed, you can easily pull both sides of the knob off the door. Be sure to also remove the latch mechanism from the door edge, clearing the way for your new door knob installation.
Steps to Remove the Old Knob:
Locate the Screws: Locate the screws on the interior side of the door knob, which are typically visible on the side facing inside the room. Most door knobs have two screws that secure the knob to the door. Use a screwdriver to remove these screws, loosening them until the door knob comes apart. If the screws are covered by a decorative plate, you may need to pop off the cover first to access them. Once removed, you can proceed with taking the knob off the door.
Unscrew the Knob: Using a Phillips-head screwdriver, carefully remove the screws from the interior side of the door knob. Turn the screws counterclockwise until they are completely out. Once the screws are removed, you can pull both sides of the door knob away from the door. This will separate the two halves of the knob, making it easy to fully detach the hardware. Be sure to set the screws aside in a safe place for later use, especially if you plan to reuse them with the new knob.
Remove the Latch: After removing the door knob, the next step is to remove the latch. Start by unscrewing the screws on the latch plate, which is the metal piece that sits flush against the edge of the door. Once the screws are loosened and removed, gently slide the latch mechanism out of the door. If it feels stuck, wiggle it slightly to free it from the door. With the latch removed, you’re now ready to install the new latch and door knob.

Step 2: Install the New Latch
With the old hardware removed, it's time to install the new latch from your door knob set. The latch is the key mechanism that allows the door to close and stay securely shut. Begin by sliding the new latch into the hole on the edge of the door, ensuring the angled side of the latch faces the door frame. Align the latch plate with the door edge, then use screws to fasten it securely in place. Make sure the latch moves smoothly before proceeding with the knob installation.
Steps to Install the Latch:
Insert the Latch: To insert the new latch, carefully slide it into the hole on the edge of the door, ensuring the curved or angled side of the latch faces the door jamb—the frame the door closes against. This positioning allows the latch to engage smoothly when the door is closed. Once inserted, check that the latch sits flush with the door edge. You can then align the latch plate with the door and secure it with screws, ensuring the latch operates properly before proceeding with the rest of the installation.
Align the Latch Plate: To align the latch plate, ensure it fits snugly into the mortise, the recessed area on the edge of the door. The plate should sit flush against the door, with no gaps or raised edges. If the latch plate doesn't sit flush, adjust its position until it lines up perfectly with the mortise. This ensures the door will close smoothly and the latch will function properly. Once aligned, secure the plate in place by tightening the screws into the pre-drilled holes.
Secure the Latch: To secure the latch, use your Phillips-head screwdriver to fasten the latch plate into place with the screws provided in your door knob kit. Insert the screws into the pre-drilled holes on the latch plate, and tighten them until the plate sits flush against the door edge. Make sure the latch mechanism is secure but not overly tight, as this could impede its movement. Once the latch is firmly in place, test its function by moving the latch to ensure it operates smoothly.
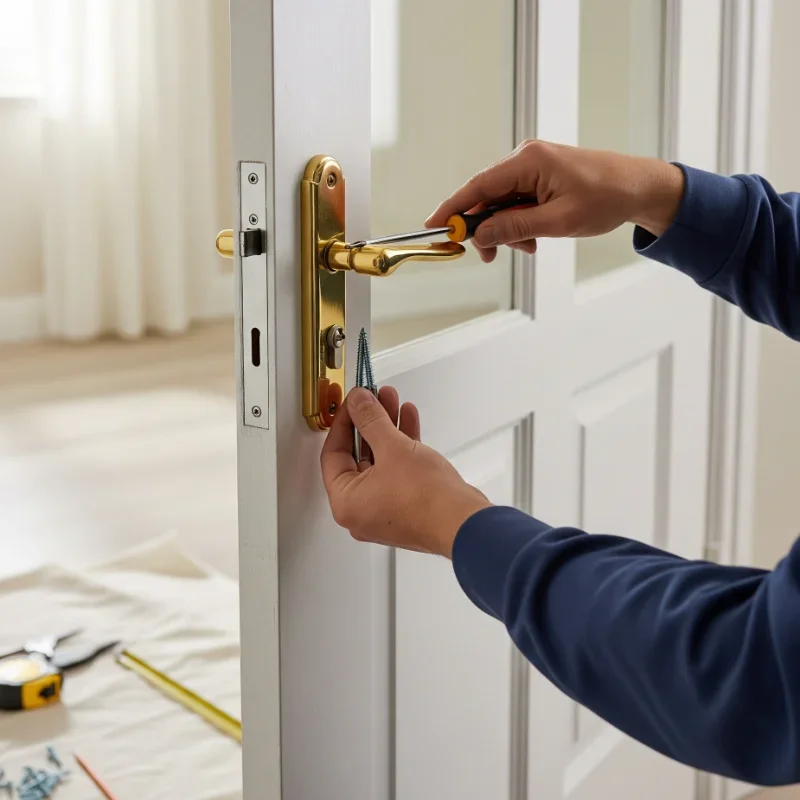
Step 3: Attach the Exterior and Interior Knobs
With the latch securely installed, it's time to attach the door knobs. You'll have two knobs—one for the exterior side of the door and one for the interior. Begin by inserting the exterior knob's spindle (the long metal rod) through the latch mechanism. Next, align the interior knob with the spindle, ensuring both knobs fit securely into place. Once aligned, press the knobs together, holding them firmly while preparing to secure them with screws, which will ensure the knobs function properly on both sides of the door.
Steps to Install the Door Knob:
Insert the Exterior Knob: To insert the exterior knob, carefully slide its spindle (the rod connected to the knob) through the latch mechanism on the door. Ensure the spindle goes straight through the center of the latch, allowing it to extend to the other side of the door. This spindle connects the two knobs and allows the latch to move when the knob is turned. Once the exterior knob is positioned correctly, hold it in place as you prepare to attach the interior knob and secure both sides together.
Line Up the Interior Knob: To line up the interior knob, position it on the opposite side of the door, ensuring the spindle from the exterior knob slides into the corresponding hole in the interior knob. Make sure both knobs are aligned and fit securely into place. The spindle should engage smoothly with the interior knob, allowing them to function as one unit. Hold the interior knob steady as you prepare to fasten the screws, ensuring the two knobs are properly connected for smooth operation.
Screw in the Interior Knob: To secure the interior knob, use the screws provided in your door knob kit and tighten them with a Phillips-head screwdriver. Insert the screws into the designated holes on the interior knob, ensuring the knobs are firmly connected. Tighten the screws until the knob is securely in place, but be careful not to over-tighten, as this could damage the door or the knob’s mechanism. Once tightened, test the knob to ensure it turns smoothly and the latch functions properly.
Step 4: Install the Strike Plate
The strike plate is the metal plate attached to the door jamb. It catches the latch when the door closes, ensuring it stays shut. Installing the strike plate is a crucial step for proper door knob function.
Steps to Install the Strike Plate:
Position the Strike Plate: To position the strike plate, place it over the existing hole in the door jamb where the latch will engage. Ensure the plate is properly aligned so that the latch fits smoothly into the hole when the door is closed. The curved or angled side of the strike plate should face the door, allowing the latch to glide in easily. Once aligned, hold the strike plate in place as you prepare to secure it with screws, ensuring the door closes and latches securely.
Secure the Strike Plate: To secure the strike plate, use the screws provided in your kit and fasten the plate to the door jamb. Ensure the plate sits flush with the frame, without any raised edges, as this ensures smooth operation of the latch when the door closes. Tighten the screws evenly, but avoid over-tightening to prevent damaging the door frame. Once the strike plate is securely in place, test the door to make sure the latch engages properly and the door closes and locks smoothly

Step 5: Test the Door Knob
With everything in place, it’s time for the moment of truth—testing your newly installed door knob!
How to Test:
Turn the Knob: After securing everything, turn the knob to test its operation. Ensure it turns smoothly and engages the latch properly. If the knob feels stiff or doesn’t turn easily, slightly loosen the screws on the interior knob and try turning it again. This can help alleviate any tightness or misalignment caused by over-tightening. Once adjusted, test the knob again to make sure it functions smoothly. A properly installed knob should turn effortlessly and allow the door to latch and unlatch without issues.
Check the Latch: After installing the knob and strike plate, open and close the door to check if the latch properly catches in the strike plate. The latch should slide smoothly into the strike plate hole, allowing the door to close securely. If you notice any sticking or misalignment, adjust the strike plate or latch until the door operates without resistance. The door should open and close effortlessly, with the latch engaging correctly each time to ensure a smooth and functional operation.
Adjust if Necessary: If the latch doesn’t align with the strike plate or the door doesn’t close properly, you may need to adjust the strike plate. Loosen the screws holding the strike plate and shift it slightly up, down, or side to side until the latch fits perfectly into the hole. Once aligned, re-tighten the screws securely. Test the door again to ensure it closes smoothly and the latch catches without sticking. Repeat the adjustments as needed for a seamless fit and smooth operation.
Conclusion
Installing a door knob is one of those DIY projects that might seem intimidating at first but is actually a breeze once you get started. With this How to Install a Door Knob: Easy Guide, you now have all the steps you need to swap out that old, worn-out knob or put in a fresh one for a more updated look. Whether you're working on interior or exterior doors, the process is straightforward and requires minimal tools.
So grab your screwdriver, and give your home a little refresh with a new door knob—it's a simple change that can make a big impact!
Frequently Asked Questions
Do I need any special tools to install a door knob?
No special tools are required. A Phillips-head screwdriver will usually do the trick. In some cases, you might need a flathead screwdriver or a measuring tape for adjustments, but nothing more advanced is necessary.
How long does it take to install a door knob?
Installing a door knob typically takes about 15–30 minutes, depending on your experience level. If you're removing an old knob first, that adds a few extra minutes to the process.
Can I replace just the door knob, or do I need to replace the latch and strike plate too?
While you can replace just the knob, it’s generally recommended to replace the latch and strike plate as well to ensure a proper fit and smooth function. Most door knob kits come with all three components.
What should I do if the latch doesn’t align with the strike plate?
If the latch doesn’t catch in the strike plate, try adjusting the strike plate’s position slightly. You can do this by loosening the screws and moving the plate up or down until it aligns perfectly with the latch.
Can I install a door knob on any door?
Yes! Door knobs can be installed on most interior and exterior doors. Just make sure the knob set you choose is appropriate for the thickness of your door and the door’s intended use (privacy knobs for bathrooms, passage knobs for closets, etc.).
Stay up to date with our latest ideas!