How to Remove a Recessed Light Bulb: Step-by-Step Guide
Learn how to remove a recessed light bulb safely and efficiently with our comprehensive, step-by-step guide. Brimming with practical tips, essential safety advice, FAQs, and a healthy dose of DIY spirit, this article is your go-to resource for brightening up your home improvement projects!
Ever found yourself staring up at that recessed light fixture, scratching your head and wondering how you’ll ever get that stubborn bulb out without turning your ceiling into a mini disaster zone? You’re definitely not alone! Removing a recessed light bulb might seem like a brain-teaser at first, but once you’ve got the hang of it, it’s as simple as pie. In this article, we’re taking you on a deep-dive journey through every step of the process, with a special focus on our "How to Remove a Recessed Light Bulb: Step-by-Step Guide."
We'll walk you through everything—from gathering the right tools and taking essential safety measures to the precise techniques for unscrewing and extracting that elusive bulb. So, grab your ladder, put on your safety goggles, and get ready to transform what seems like a daunting task into a rewarding DIY adventure. Let’s light the way to a brighter, safer home!
Tools and Safety Precautions
Before you even think about reaching up to that ceiling fixture, it’s crucial to arm yourself with the right tools and a solid safety plan. Trust me, nothing’s worse than a half-finished DIY project when you end up with a mishap. Here’s how to get started on the right foot.
Essential Tools Checklist
Make sure you have these items handy:
Ladder: A reliable, sturdy ladder is your best friend for reaching those high-up fixtures.
Safety Goggles and Gloves: Protect your eyes from any unexpected debris and keep your hands safe from burns.
Screwdriver or Utility Knife: Depending on your fixture, you might need a screwdriver to remove screws or a utility knife to gently pry off the cover.
Flashlight: Even with the power off, extra light helps you spot all the nooks and crannies.
Microfiber Cloth and Cleaning Solution: Perfect for dusting off any grime before or after bulb removal.
Replacement Bulb: If your goal is to swap out an old bulb for a new one, have the replacement ready to go.
Safety First, Always!
DIY projects can be a blast, but they also come with risks. Here’s how to keep things safe:
Power Down: Always start by switching off the circuit breaker for the room you’re working in. No shortcuts here—safety comes first!
Double-Check: Use a non-contact voltage tester to ensure there’s absolutely no electrical current running through the fixture.
Cool It Down: If the light was recently on, give the bulb time to cool down completely. You don’t want to burn your fingers on a hot bulb!
Steady as You Go: Use a ladder that’s both stable and tall enough. Avoid overreaching; your safety is way more important than finishing quickly.
Buddy System: If possible, have a friend nearby. An extra pair of eyes can catch potential issues and offer a helping hand if needed.
By following these precautions, you’ll not only protect yourself but also set the stage for a smooth and successful project.
How to Remove a Recessed Light Bulb: Step-by-Step Guide
Now that you’re all geared up, let’s dive into the heart of the matter with our "How to Remove a Recessed Light Bulb: Step-by-Step Guide." Follow these steps to safely and efficiently remove that stubborn bulb.
Step 1: Gather Your Tools
Before you climb that ladder, double-check that every tool on your checklist is within arm’s reach. Running back and forth for a missing item is a surefire way to disrupt your workflow—and your concentration.
Checklist Recap:
Ladder
Safety goggles and gloves
Screwdriver or utility knife
Flashlight
Cleaning supplies
Replacement bulb (if needed)
Step 2: Switch Off the Power
This is non-negotiable. Head over to your circuit breaker and flip the switch for the room with the recessed light fixture. Even if the light appears to be off, stray electricity can be lurking.
Action Points:
Locate the specific circuit breaker.
Switch it off and, if you’re unsure, consult your electrical panel diagram.
Confirm deactivation with a non-contact voltage tester.
Step 3: Allow the Bulb to Cool
If the light was on recently, give the bulb a few minutes to cool down. It’s a small step that can save you from an uncomfortable burn later on.
Tip: Patience is key—take a coffee break or plan your next DIY project while you wait!
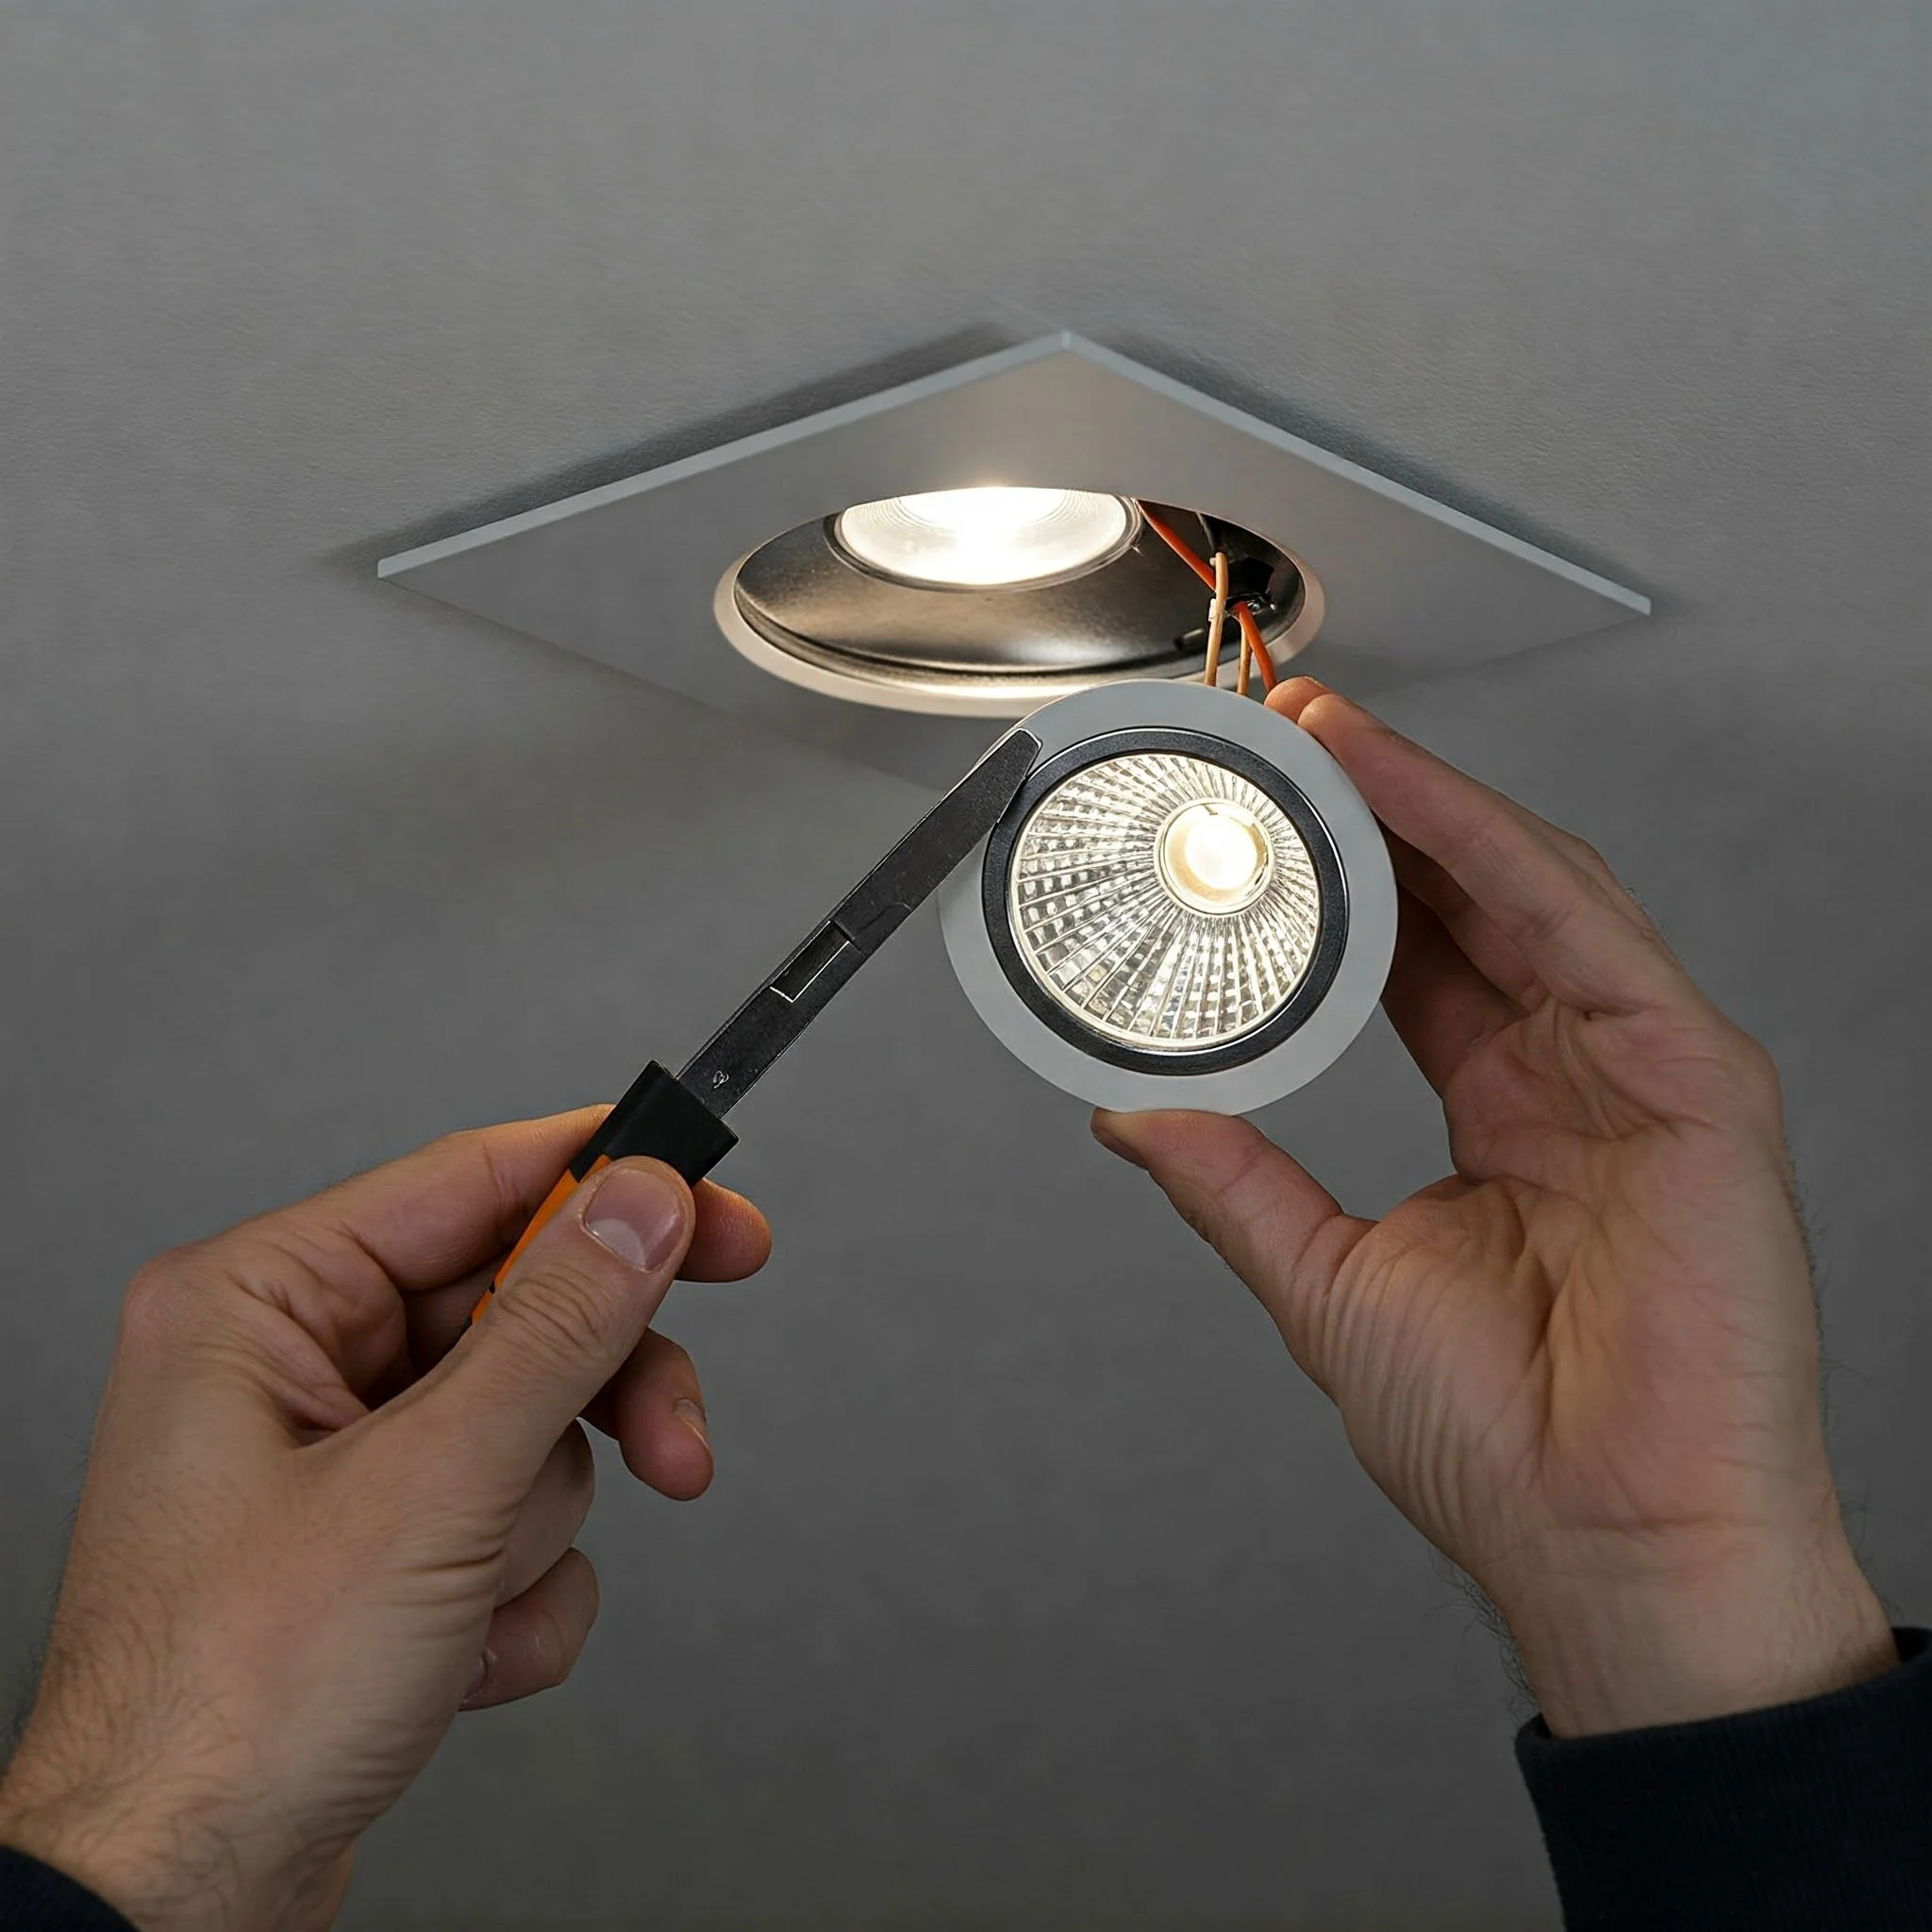
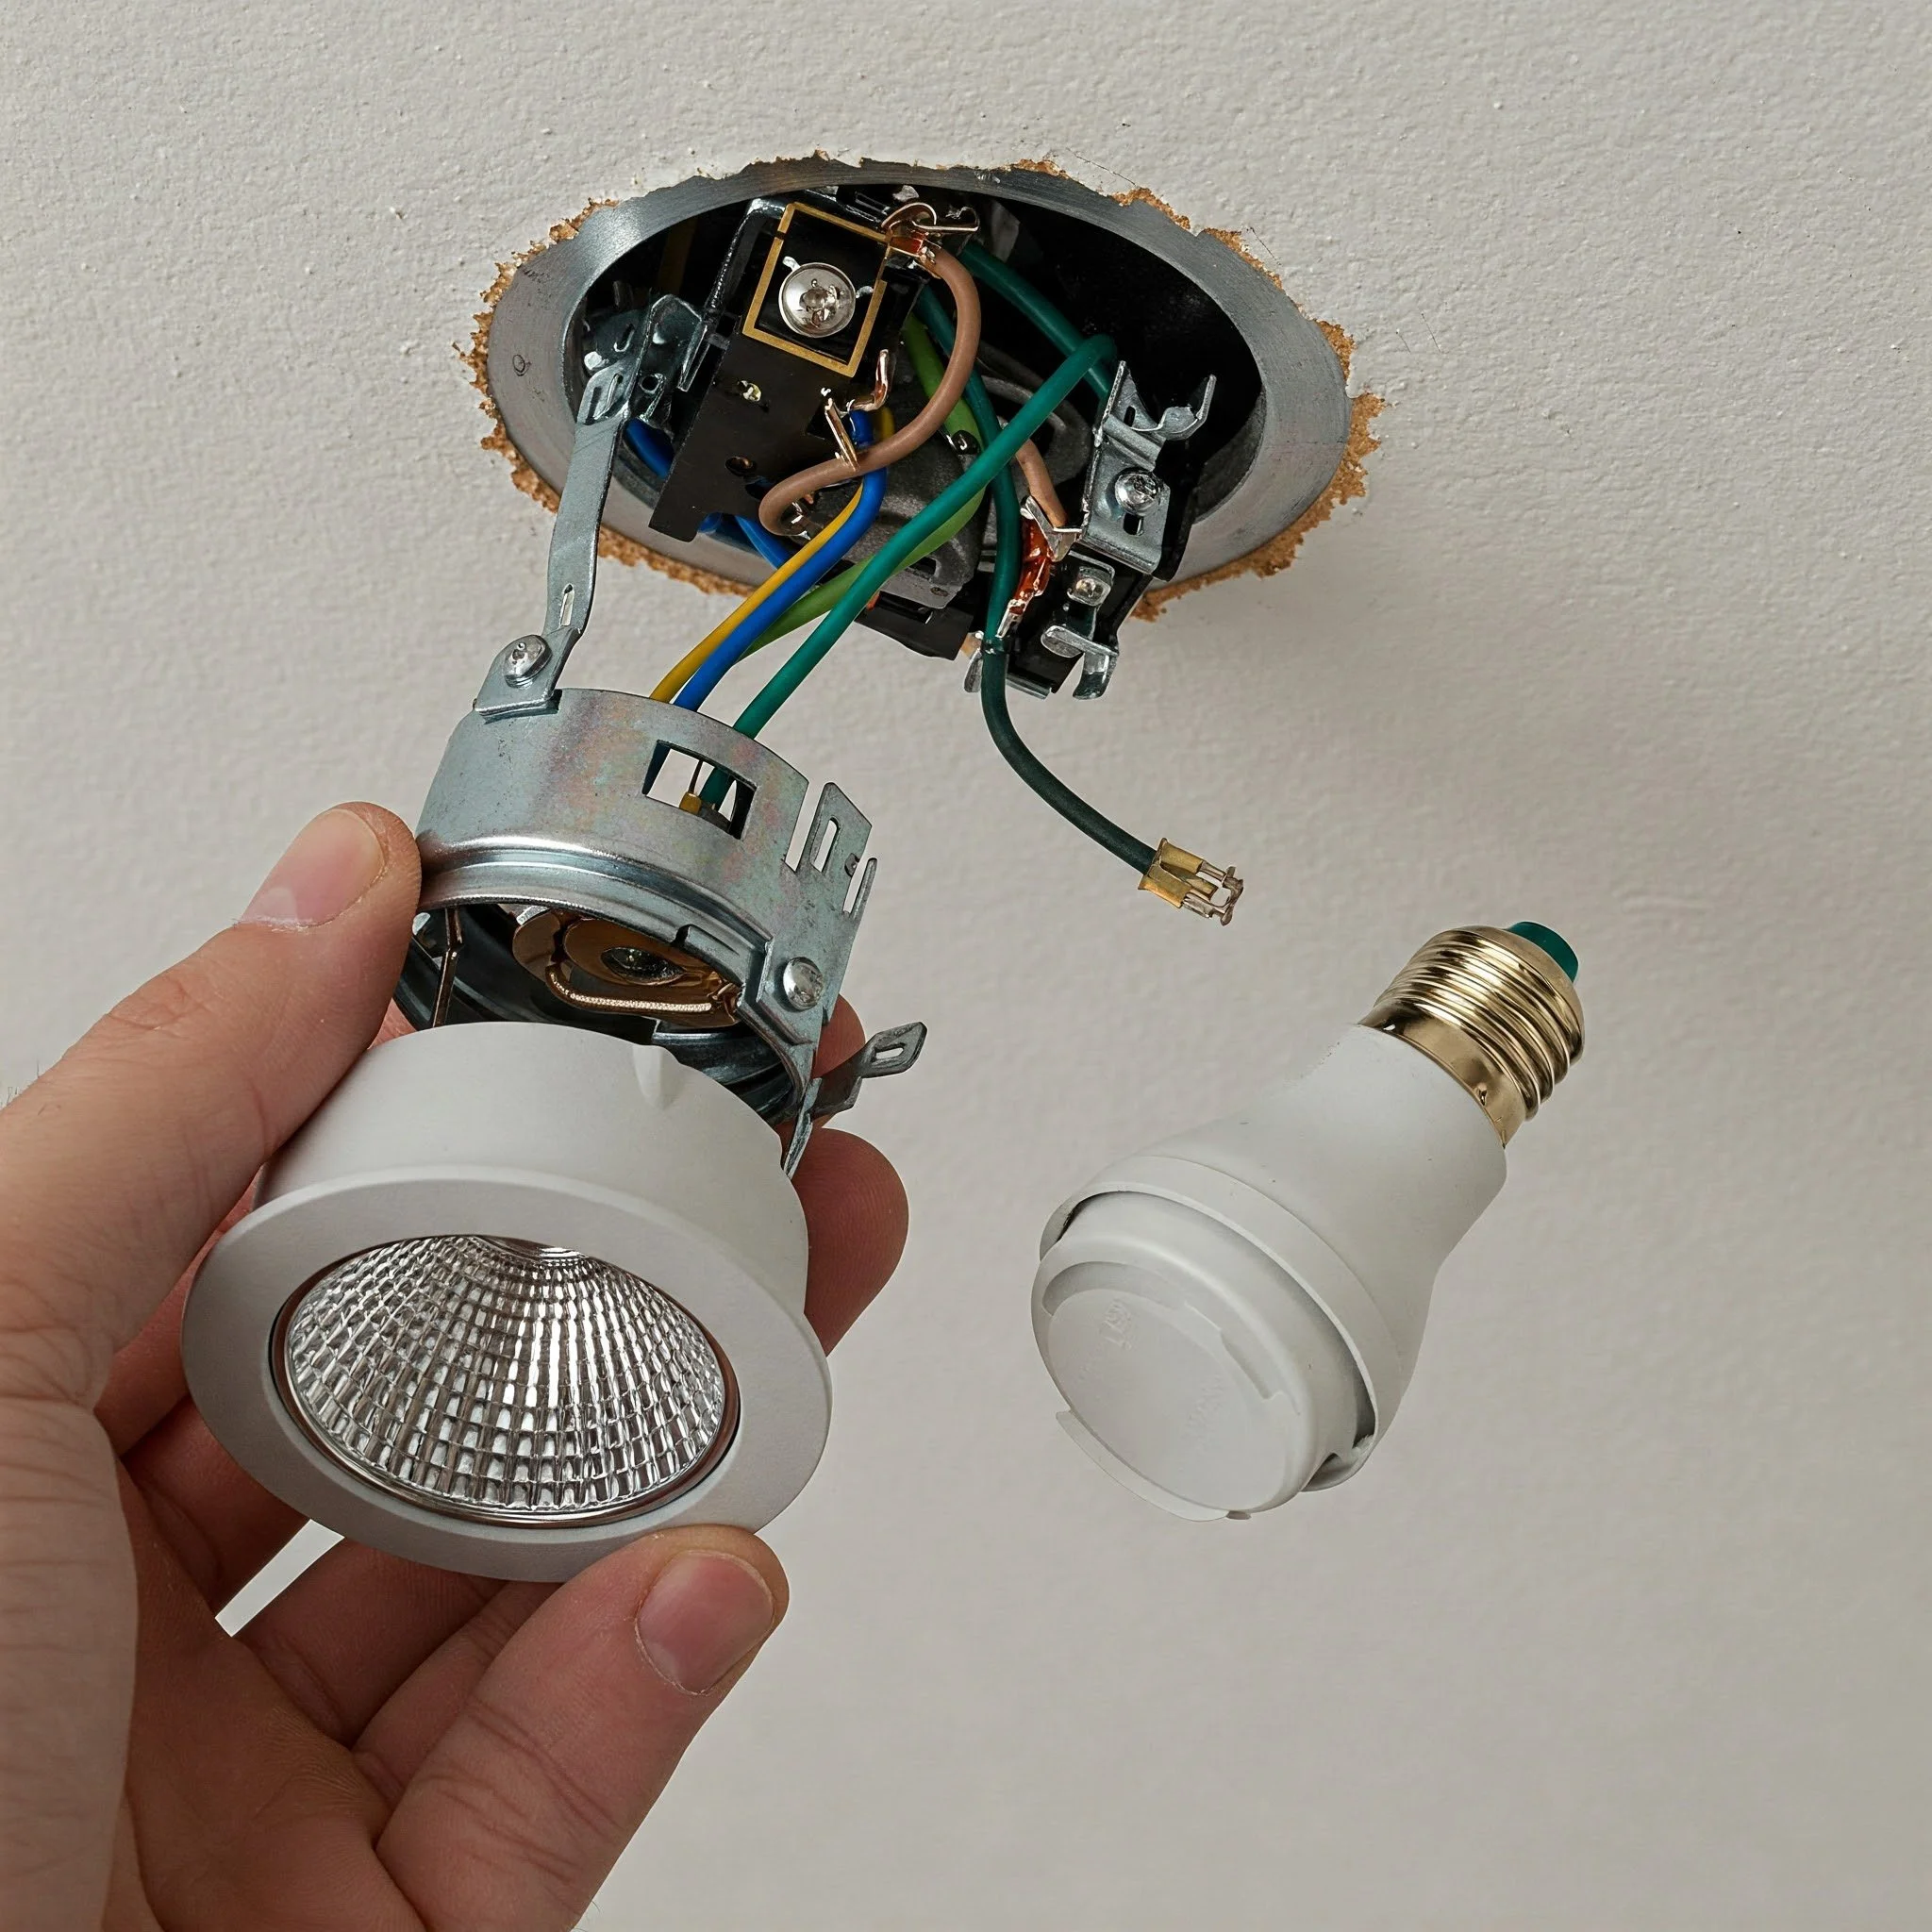
Step 4: Remove the Fixture Cover or Trim
Recessed light fixtures typically have a cover or trim that adds a decorative touch and protects the bulb. Here’s how to safely remove it:
Inspect the Cover: Examine how the cover is attached. Is it clipped in place, or are screws holding it down?
Use the Right Tool: If it’s screwed on, grab your screwdriver. If it’s clipped, a gentle pry with a utility knife or flathead tool should do the trick.
Proceed Gently: Work slowly and steadily—no need to force it, as that might damage the cover or the fixture itself.
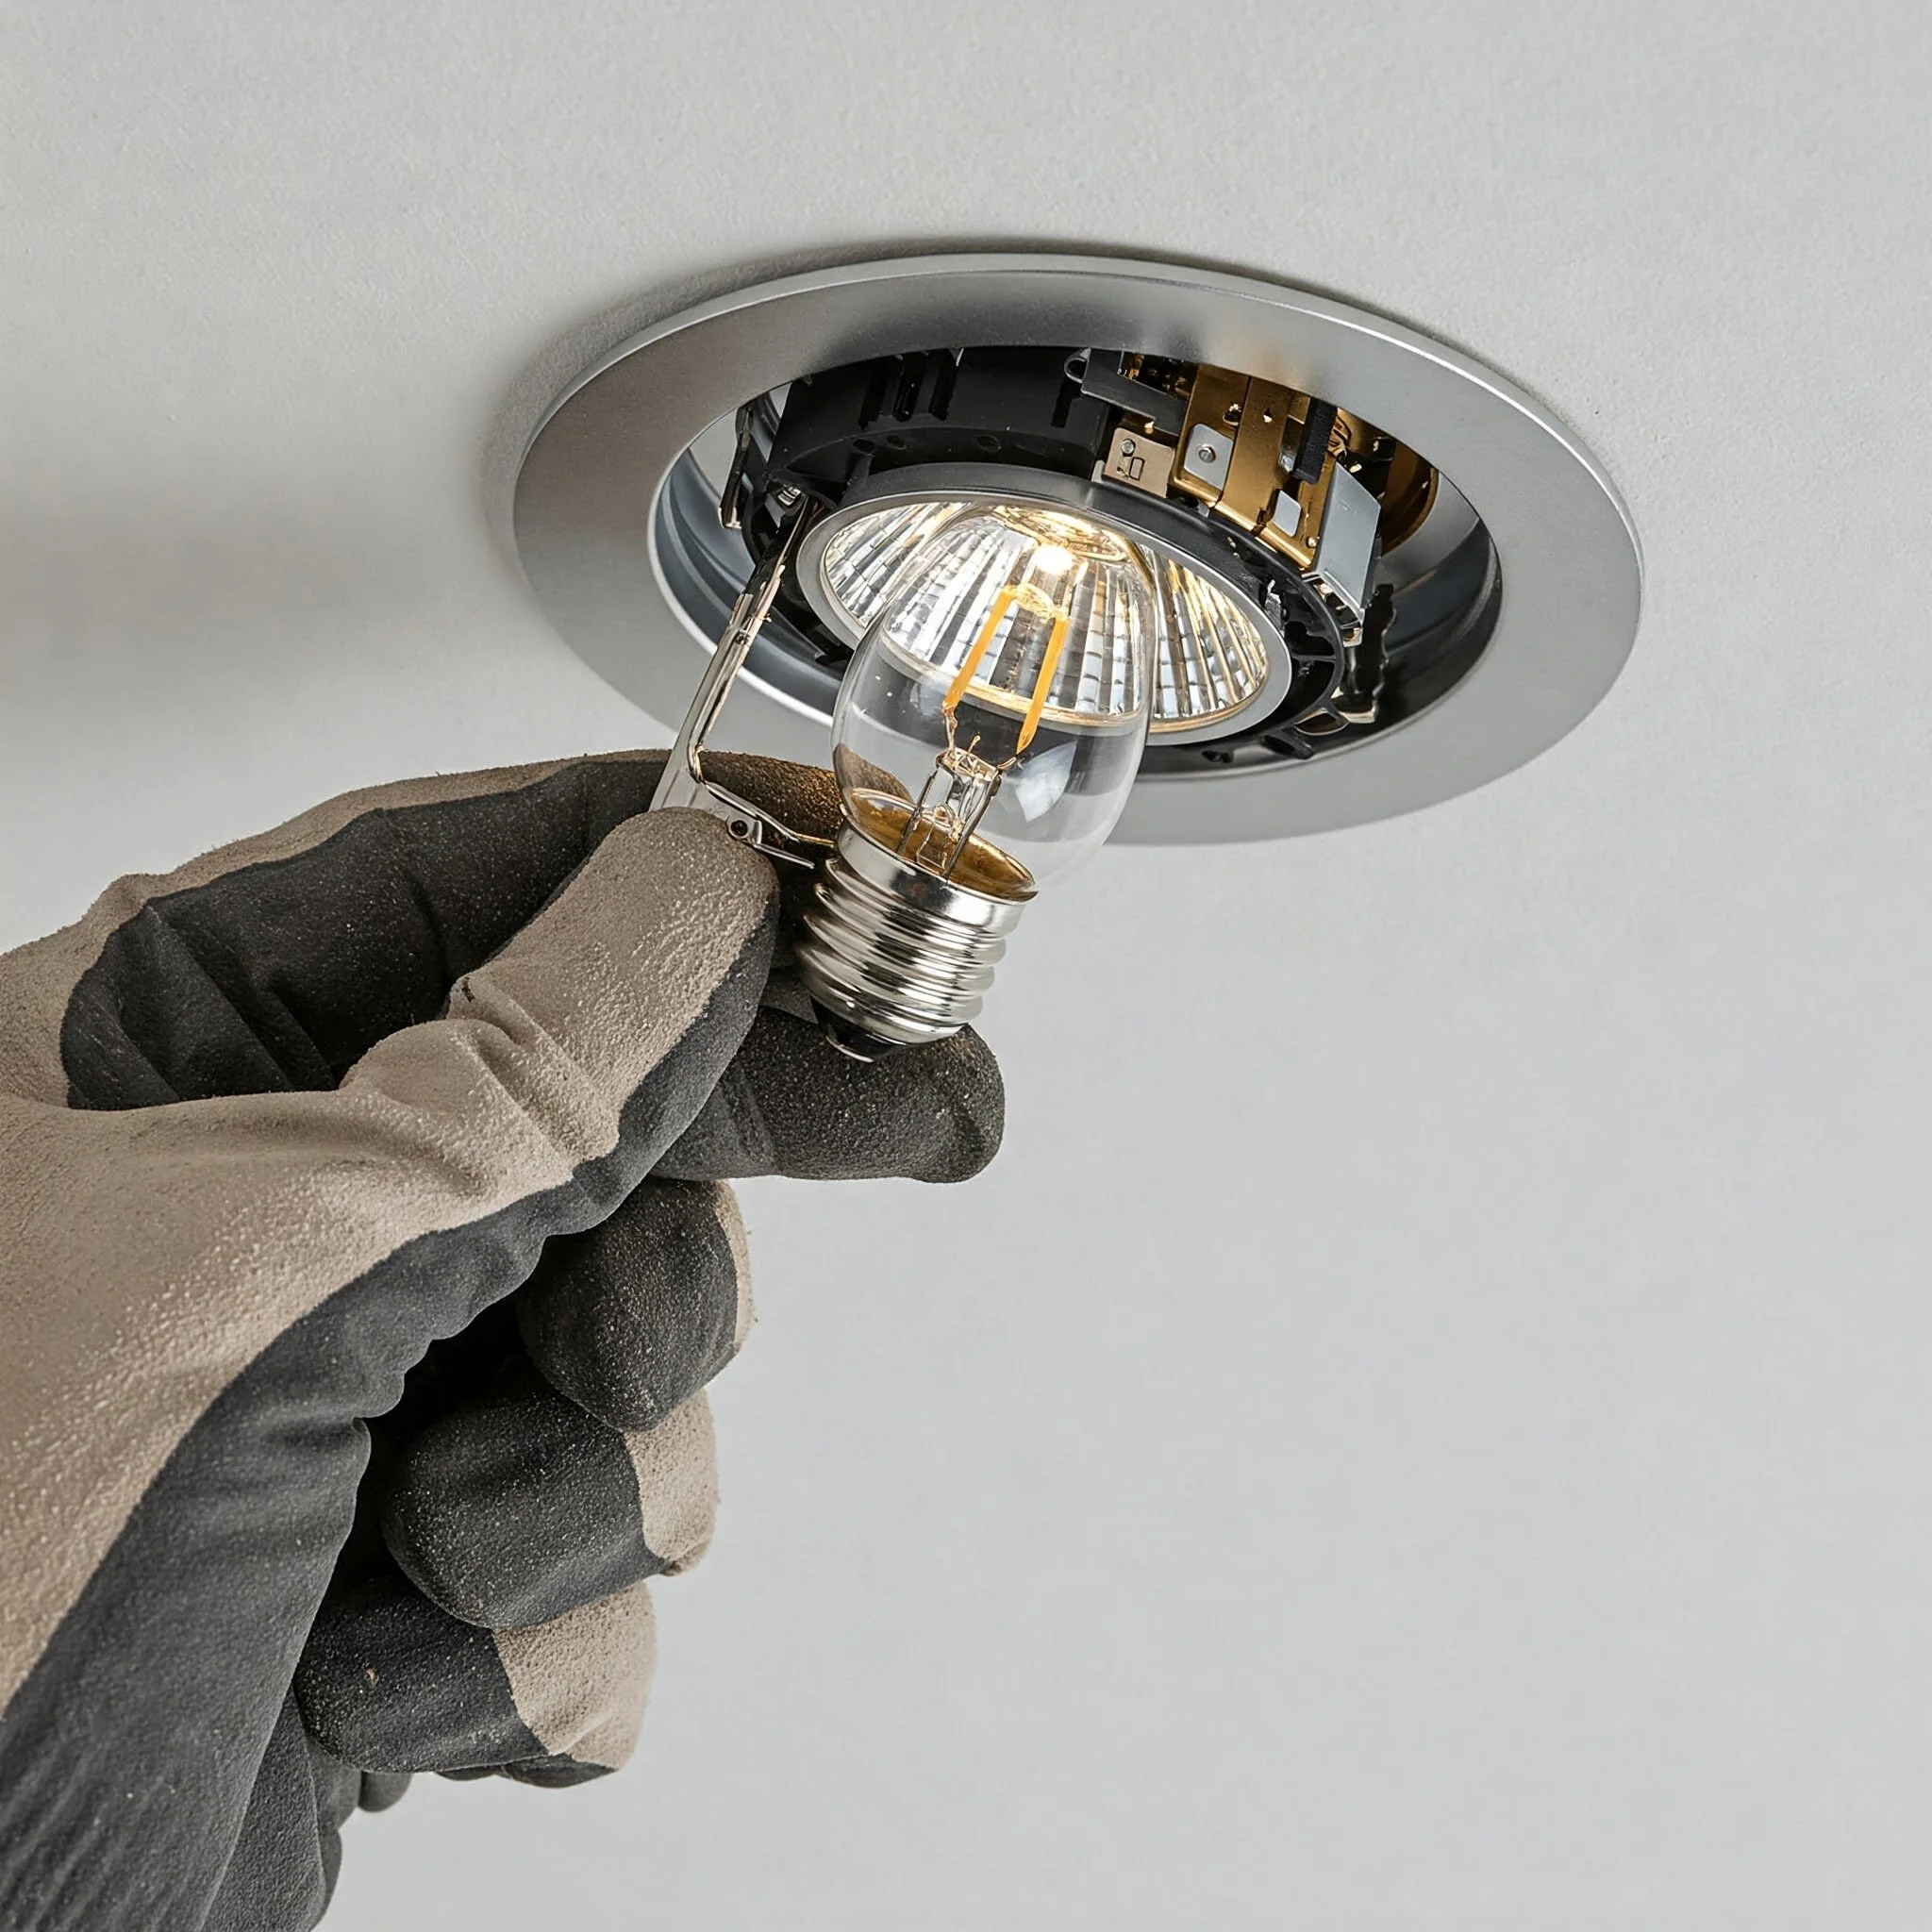
Step 5: Extract the Bulb
Now comes the moment you’ve been waiting for. Here’s how to carefully remove the bulb:
For Screw-In Bulbs:
Firmly grasp the bulb.
Twist counterclockwise. If it feels too tight, use a cloth for extra grip and apply steady pressure.
For Alternative Mechanisms:
Some fixtures feature a twist-lock or spring-loaded mechanism. Follow the specific instructions in your fixture’s manual.
Gently lift, twist, or press the release button as required.
Handle with Care: Remember, recessed bulbs can be fragile. Take your time to avoid any accidental breakage.
Step 6: Inspect and Clean the Fixture
With the bulb safely out, it’s a great time to give the fixture a little TLC.
Dusting Off: Use a microfiber cloth to wipe away any dust or debris.
Clean the Trim: If you removed a cover, clean it gently with a damp cloth.
Check for Damage: Look for any signs of wear or potential hazards that might need professional attention before installing a new bulb.
Pro Tips and Extra Insights
A few extra pointers can make the process even smoother. Here are some insider tips:
Take a Breather: If the process gets frustrating, step back, relax, and then try again. Sometimes a moment of calm can make all the difference.
Improve Your Grip: Wrapping a cloth around a stubborn or hot bulb can provide extra traction.
Keep a Flashlight Handy: Even with the power off, extra light can help you see every little detail of the fixture.
Consult the Manual: If your fixture has a unique design, don’t hesitate to refer back to the manufacturer’s instructions.
Enlist Help: Two pairs of hands can often solve a tricky situation much faster than one, and it’s always safer too.
The DIY Spirit: Embracing Home Improvement Challenges
There’s something incredibly satisfying about conquering a home project on your own. Tackling tasks like removing a recessed light bulb not only saves you money but also boosts your confidence and hones your DIY skills. Every little victory builds up your ability to handle more complex projects down the road.
Remember, every time you face a seemingly insurmountable home improvement challenge, you’re not just fixing a light—you’re building a repertoire of practical skills and a sense of accomplishment that no store-bought service can match. Whether you’re a DIY newbie or a seasoned pro, each project is a step toward a more self-sufficient and empowered lifestyle.

How to Remove a Recessed Light Bulb: Step-by-Step Guide - Recap
Let’s quickly run through the entire process one more time with a handy recap of our "How to Remove a Recessed Light Bulb: Step-by-Step Guide."
Gather Your Tools: Assemble your ladder, safety gear, screwdriver/utility knife, flashlight, cleaning supplies, and replacement bulb.
Switch Off the Power: Ensure the circuit breaker is off and double-check with a voltage tester.
Let the Bulb Cool: Give it a few minutes to cool down before touching.
Remove the Cover: Carefully remove the fixture’s cover or trim by following its attachment method.
Extract the Bulb: Gently unscrew or release the bulb, using extra grip aids if necessary.
Inspect and Clean: Clean the fixture and inspect it for any signs of damage before installing a new bulb.
Conclusion
In a nutshell, removing a recessed light bulb might sound like a daunting task, but with the right tools, careful planning, and our trusty "How to Remove a Recessed Light Bulb: Step-by-Step Guide," you can tackle it with confidence. Every step—from turning off the power to gently twisting out the bulb—plays a crucial role in ensuring that your DIY project is both safe and successful.
DIY projects are about more than just getting the job done; they’re about embracing challenges, learning new skills, and gaining the satisfaction that comes with handling things on your own. Each small project builds your confidence and prepares you for the next home improvement adventure. So, the next time you find yourself facing a recessed light fixture, remember that you’ve got all the tools and knowledge to handle it like a pro.
Taking on projects like these might seem intimidating at first, but remember: practice makes perfect, and every challenge is an opportunity to learn and grow. With a little patience and a whole lot of DIY spirit, you can transform even the trickiest home maintenance tasks into victories that brighten up your day—quite literally.
So, what’s stopping you? The next time that pesky recessed light needs a change, ask yourself, "Am I ready to take on this challenge?" With our detailed guide by your side, the answer should be a resounding "Yes!" Embrace the process, trust your skills, and let your home shine brighter with each successful project.
Happy DIY-ing, and here’s to many more brilliant home improvement adventures. May every bulb you remove and replace light up not only your room but also your confidence in taking on new challenges!
Frequently Asked Questions
Q: What should I do if the bulb is really stuck?
A: If the bulb seems immovable, try wrapping a cloth around it to enhance your grip and twist gently. If it still won’t budge, consult your fixture’s manual for any special removal techniques.
Q: Is it truly necessary to turn off the circuit breaker even if the light is off?
A: Absolutely. Even if the light appears off, stray currents can pose a serious risk. Always shut off the power to ensure your safety.
Q: Can I work on removing the bulb in damp or rainy conditions?
A: It’s best to avoid any electrical work when conditions are wet. Safety should never be compromised, so wait until you’re in a dry environment.
Q: What should I do if the bulb shatters during removal?
A: Immediately switch off the power, then carefully clean up the broken glass with gloves and a vacuum. Make sure no shards are left behind before proceeding with any further work.
Q: How often should I inspect or clean my recessed light fixtures?
A: Regular cleaning—about every few months—is a good practice. This not only keeps your fixtures looking sharp but also ensures they operate efficiently.
Stay up to date with our latest ideas!