15 Quick DIY Home Repairs Ideas for Instant Fixes
Discover 15 innovative DIY home repair ideas that save you time and money. From leaky faucets to drafty windows, learn simple, step-by-step fixes to instantly refresh your living space.
Have you ever felt frustrated by that constant drip from your faucet or the annoying squeak of a door that just won’t close properly? You’re not alone—and the solution is often right at your fingertips. With a bit of creativity, the right tools, and some elbow grease, you can tackle many common home repairs on your own without breaking the bank. In this article, we’re diving into 15 quick and effective DIY home repair ideas that promise instant fixes for everyday issues. Get ready to roll up your sleeves, feel empowered, and transform your home into a more comfortable and efficient space—one repair at a time!
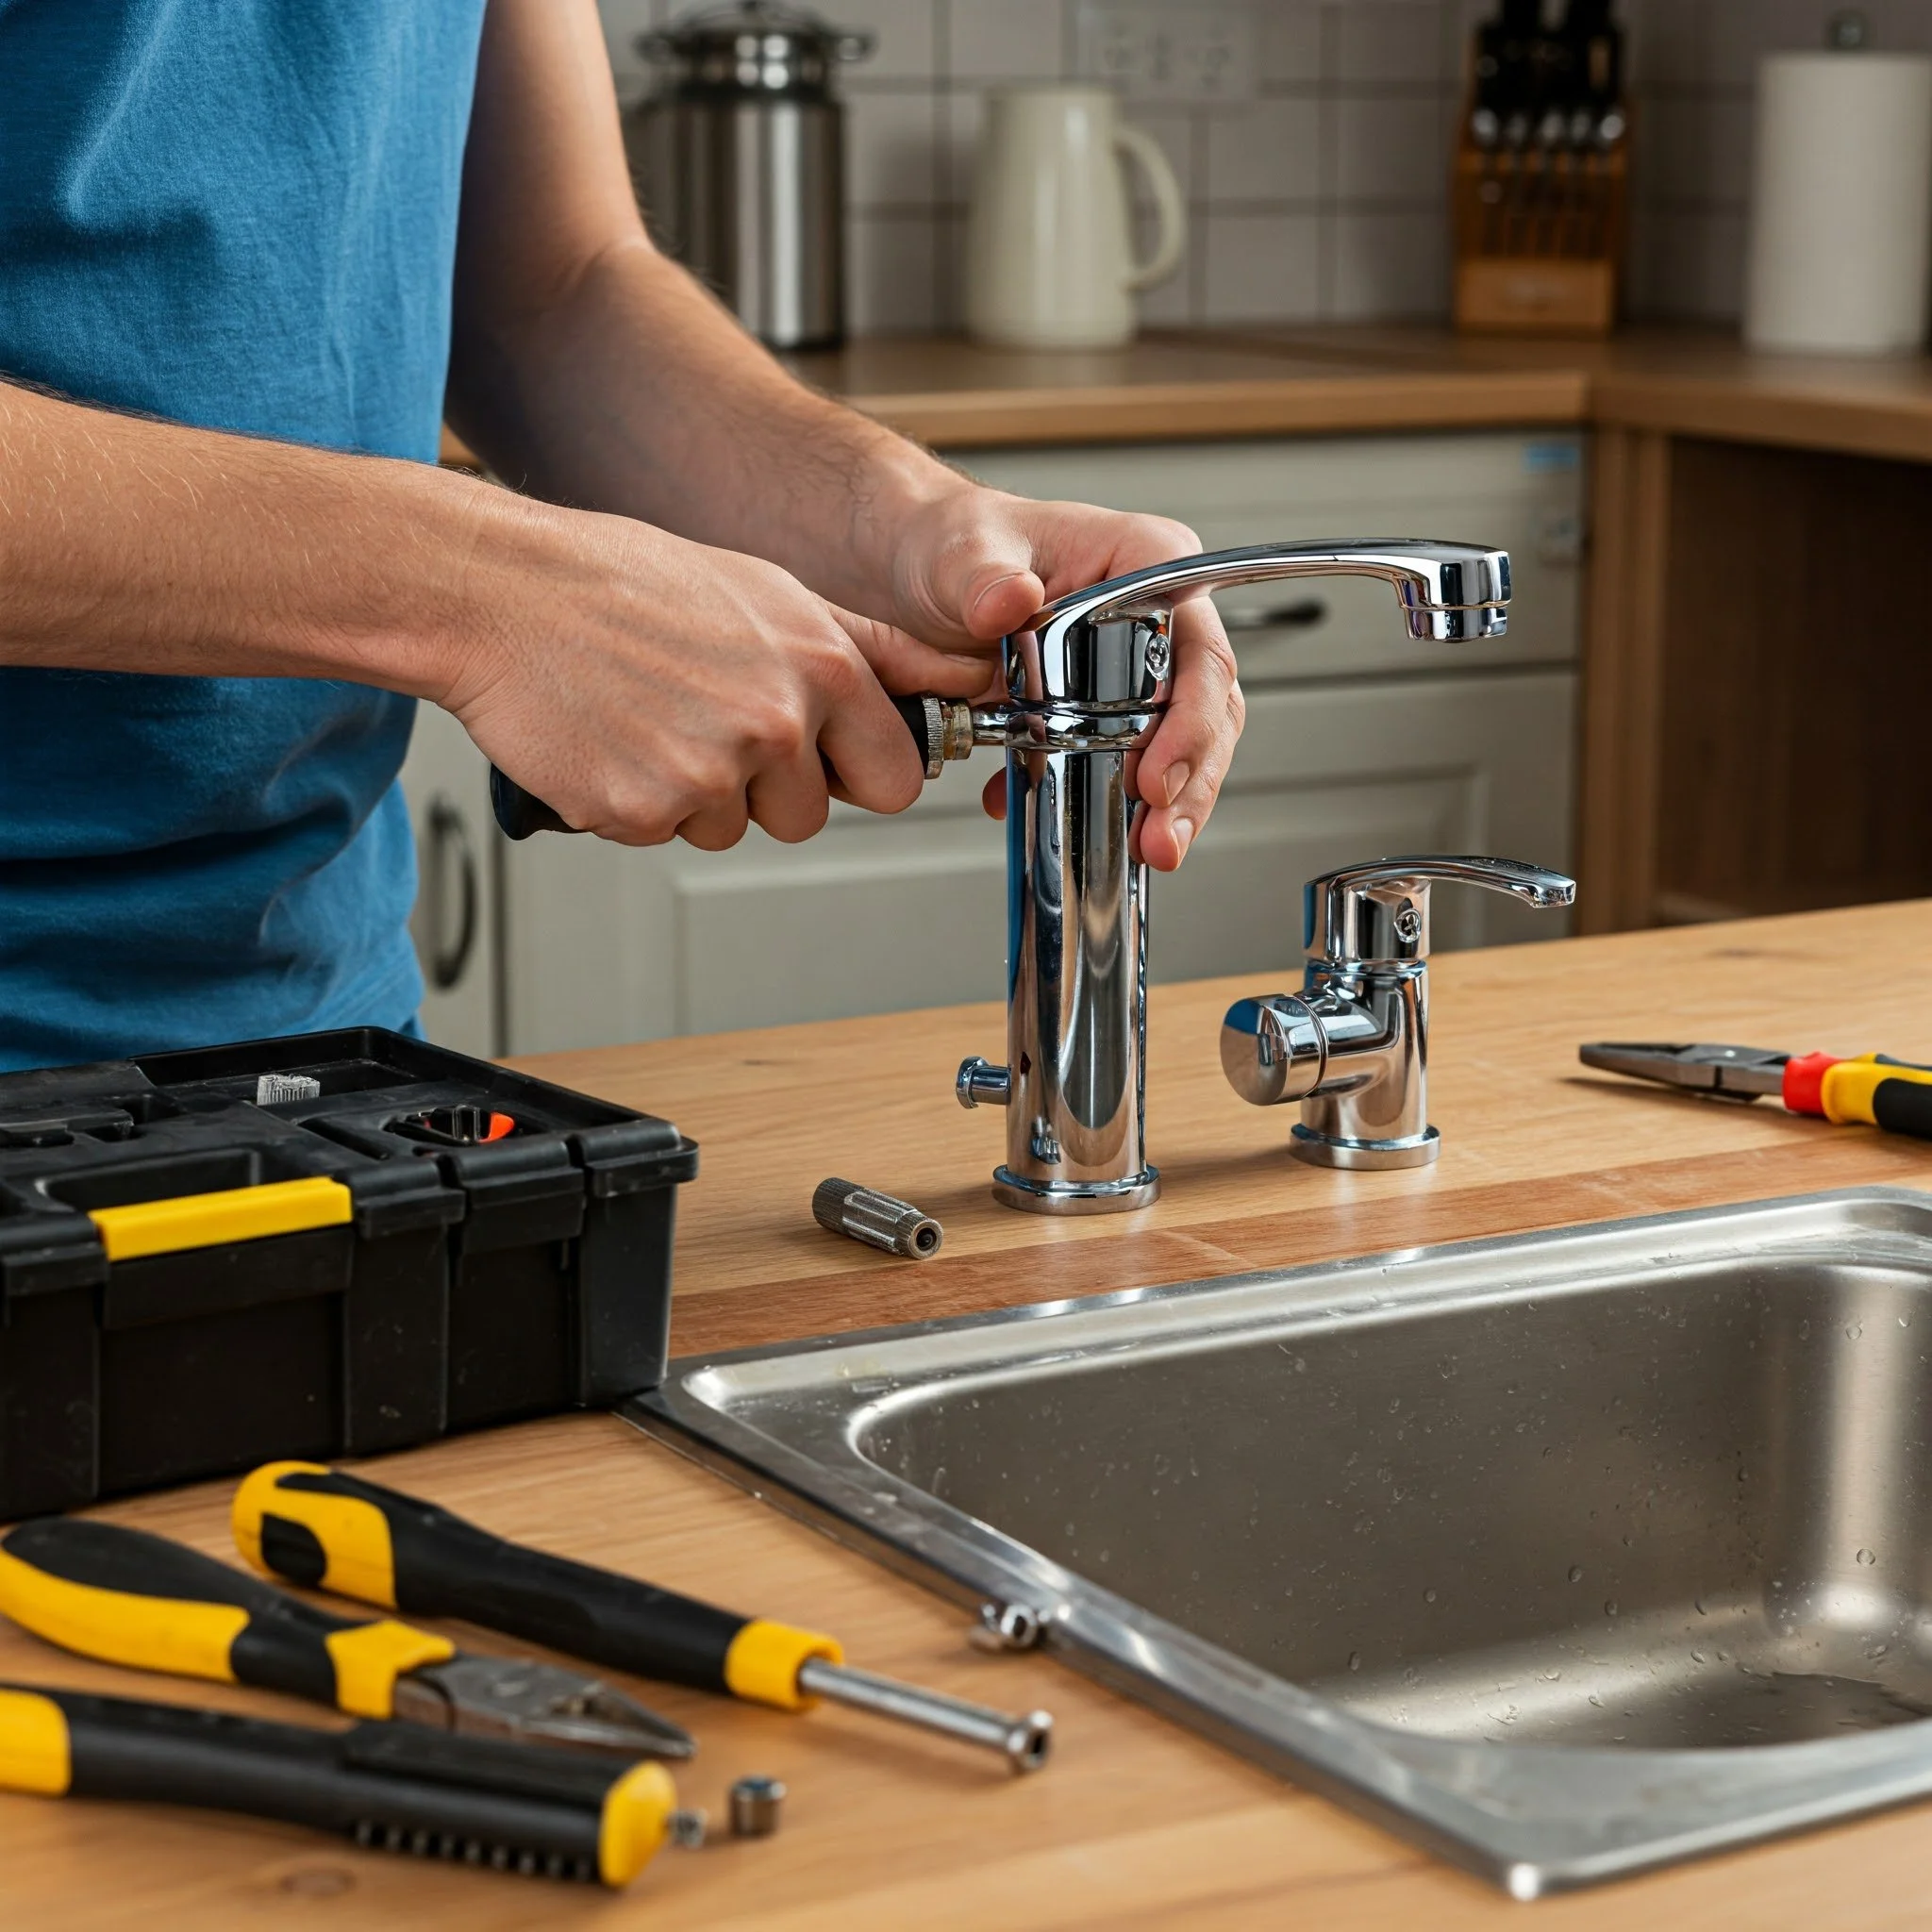
1. Fixing Leaky Faucets
A leaky faucet might seem like a minor nuisance, but it can waste gallons of water and spike your bills over time. The first step is to shut off the water supply, then disassemble the faucet using the right wrench. Often, a worn-out washer is the culprit behind that persistent drip. With some basic cleaning and a new replacement, you can restore the steady flow and eliminate the drip. Think of it as giving your faucet a quick tune-up that not only saves money but also contributes to environmental conservation. The process is surprisingly straightforward—almost like performing a mini surgery on a household item. Have you ever marveled at how a simple twist of a tool can transform a minor annoyance into a well-oiled fixture? This repair is a perfect example of how small fixes can yield big results.

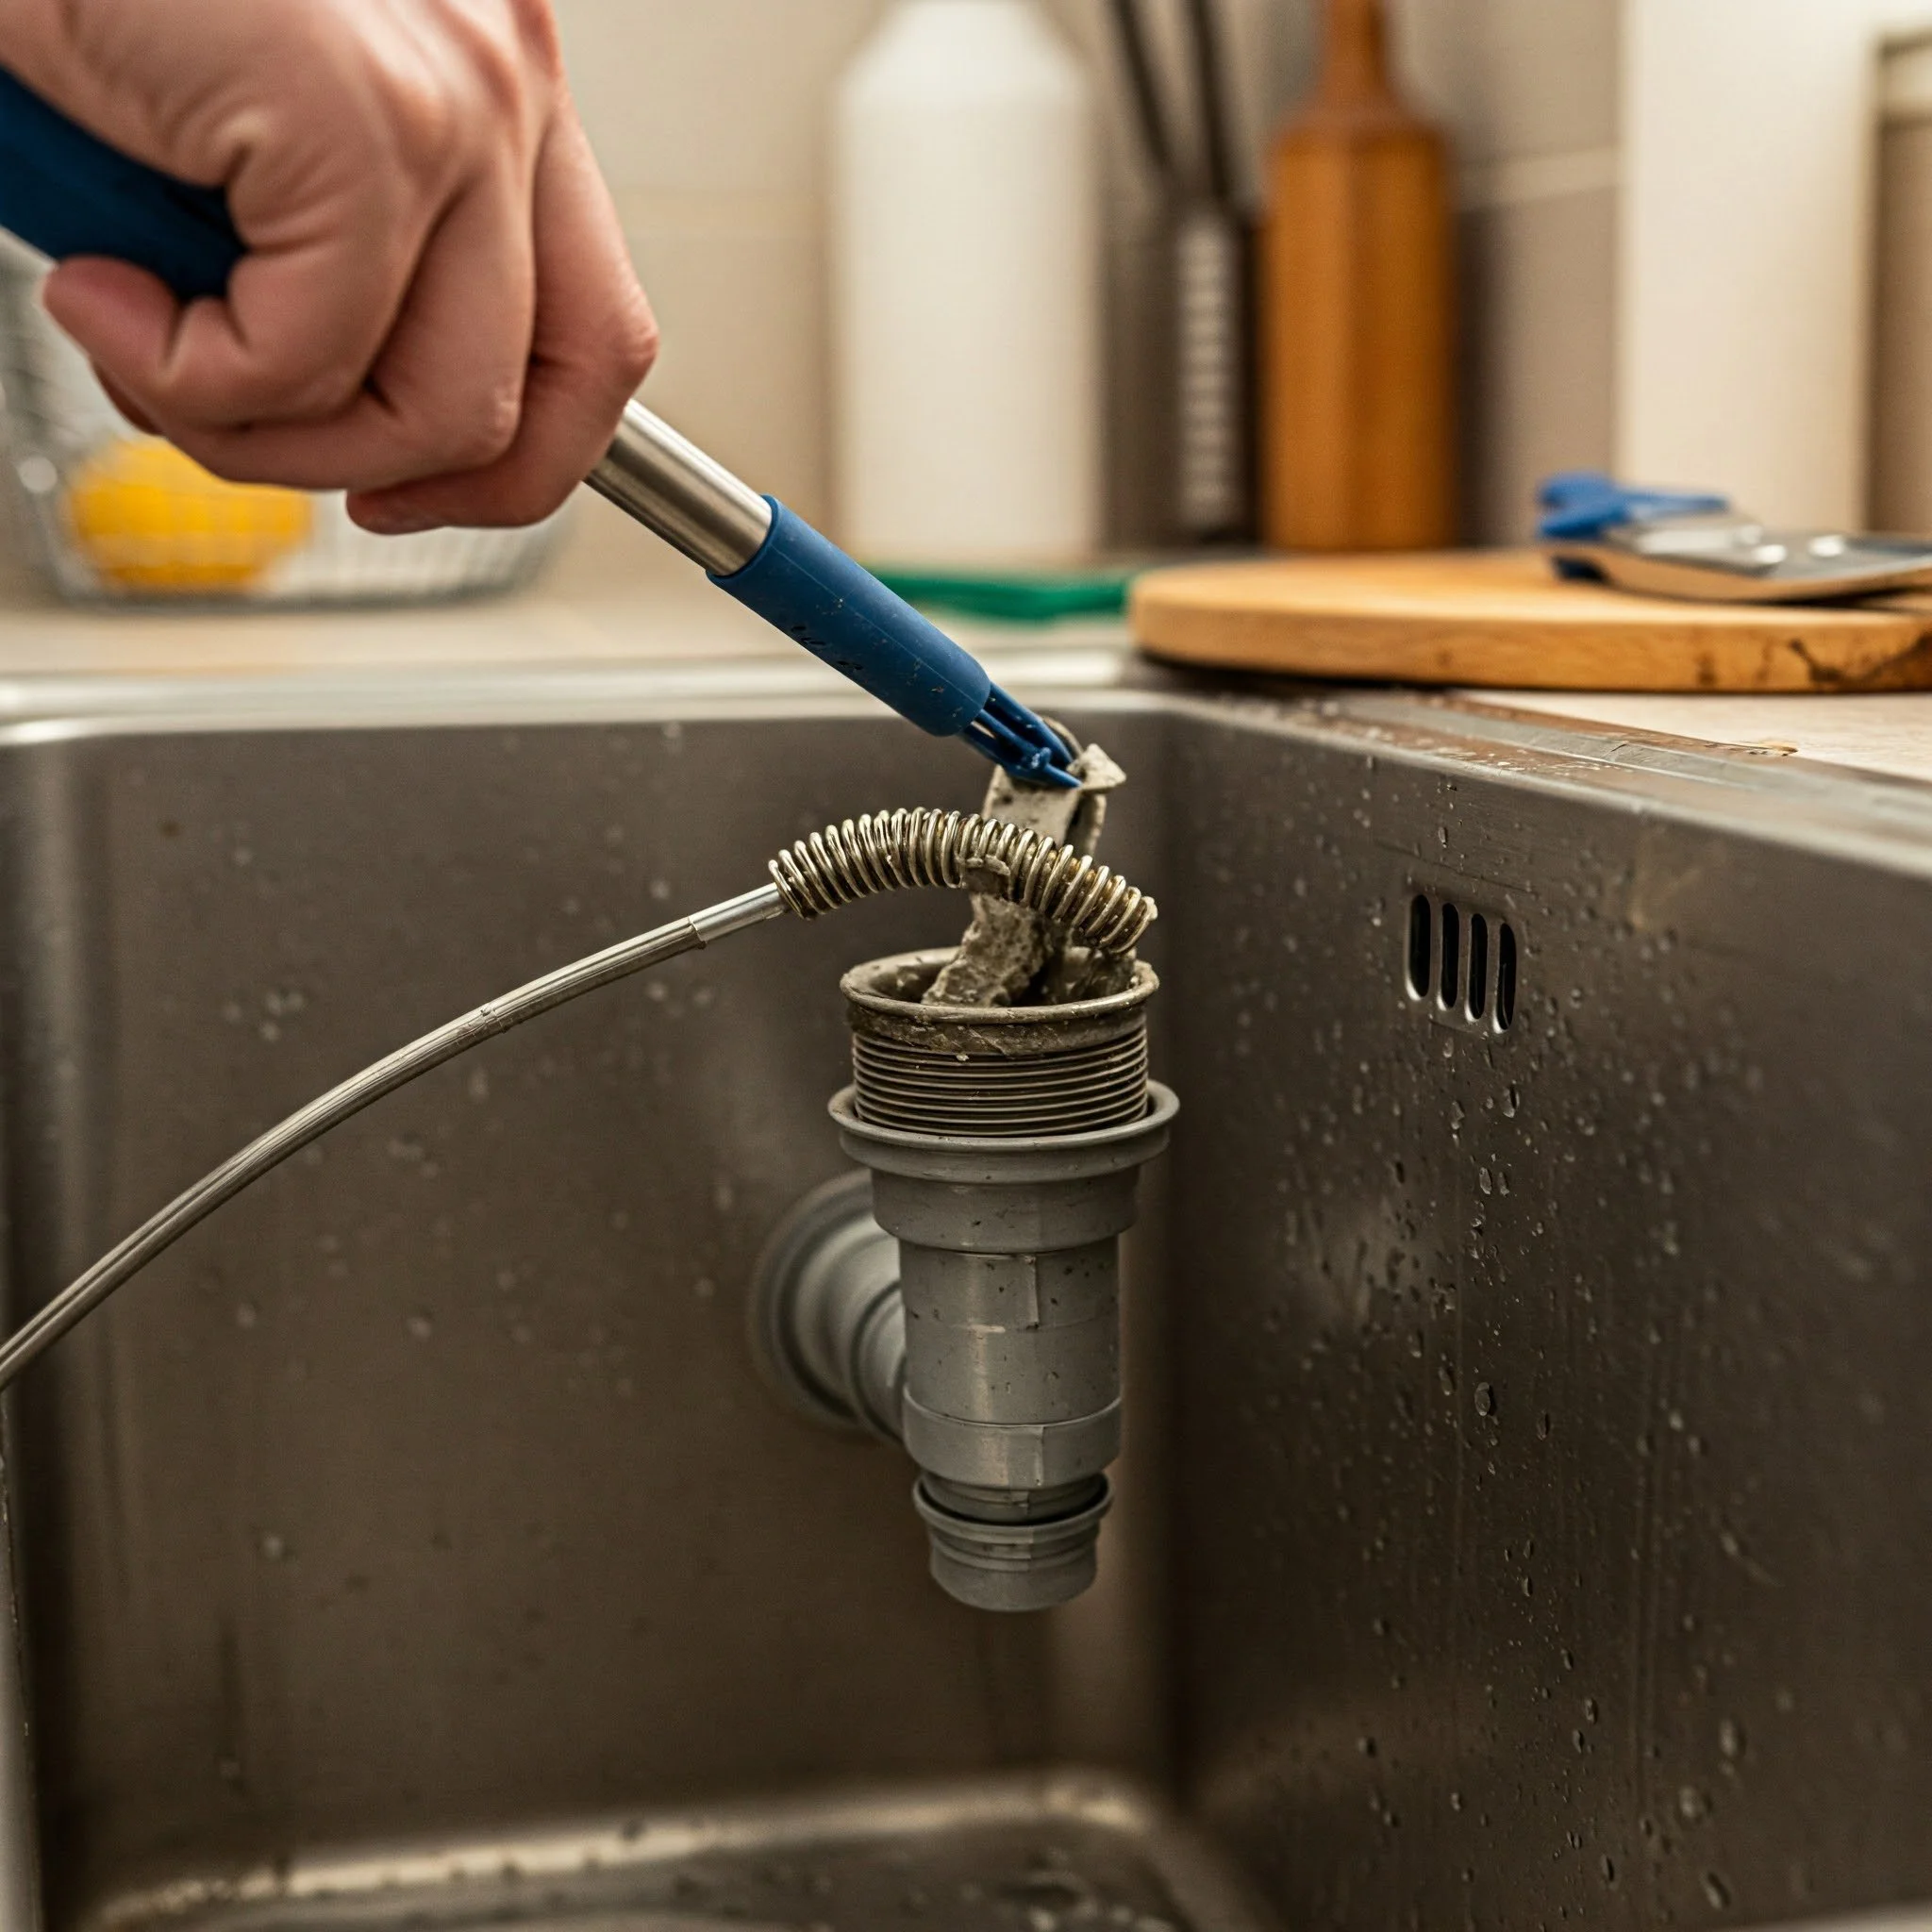
2. Unclogging Drains
Nobody likes a clogged drain that turns routine chores into a messy ordeal. When faced with a slow-draining sink or tub, start with a plunger to create suction that dislodges the blockage. If that doesn’t do the trick, consider using a drain snake—a flexible tool that reaches deep into the pipes to break up stubborn clogs. For a more natural approach, a mixture of baking soda and vinegar can work wonders, fizzing away the debris before you flush with hot water. Not only does this method help maintain clear pipes, but it also prevents the buildup of grime over time. Imagine your drain as a congested highway: clearing it paves the way for smooth, continuous flow. With these simple yet effective techniques, you’ll be back to enjoying the ease of unclogged drains and a more efficient home environment.
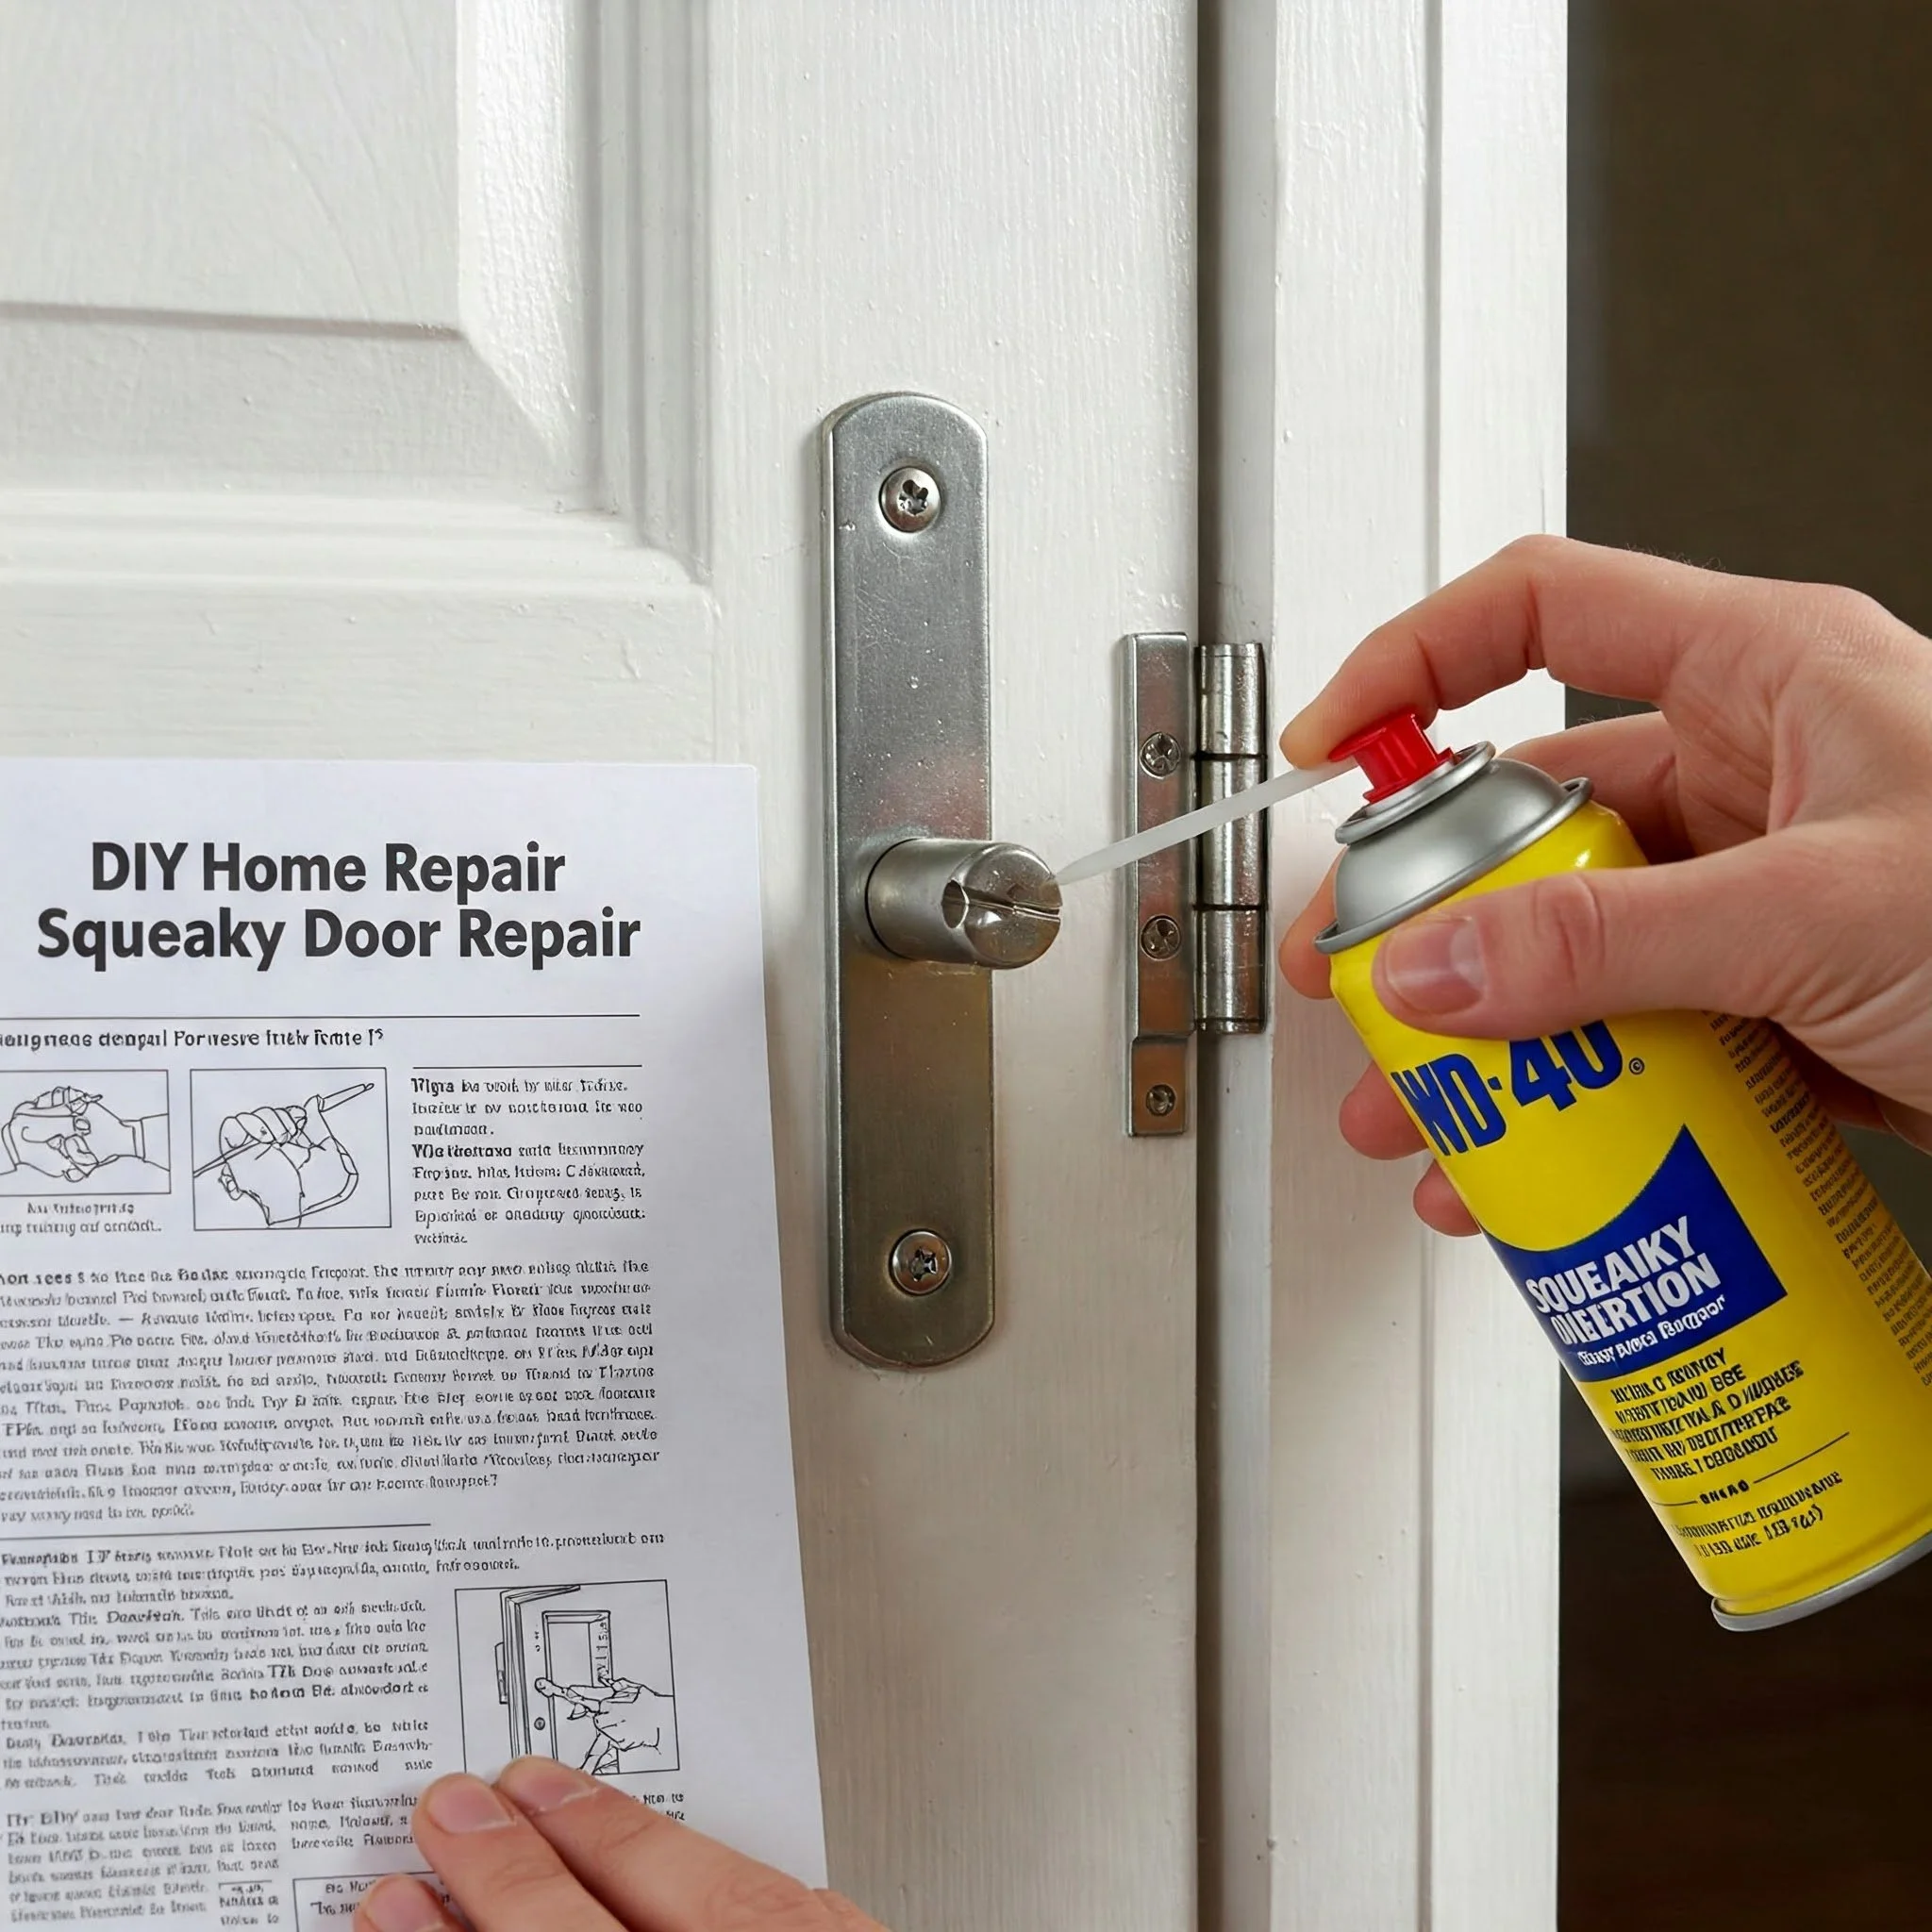
3. Squeaky Door Repair
Ever wonder why your door insists on squeaking every time you open it? This annoying sound is often due to worn-out hinges or the accumulation of dirt and grime. A quick fix involves cleaning the hinge thoroughly and then applying a generous amount of lubricant—think silicone spray or even a dab of household oil—to ensure a smooth glide. This process not only silences the persistent squeak but also prolongs the life of the door’s mechanism. Imagine giving your door a spa treatment, where a little pampering transforms a noisy, problematic fixture into a smoothly operating piece of your home. With just a few minutes of effort, you can enjoy a more peaceful environment and the satisfaction of solving a common household issue with ease. Isn’t it amazing how a simple squirt of oil can make all the difference?
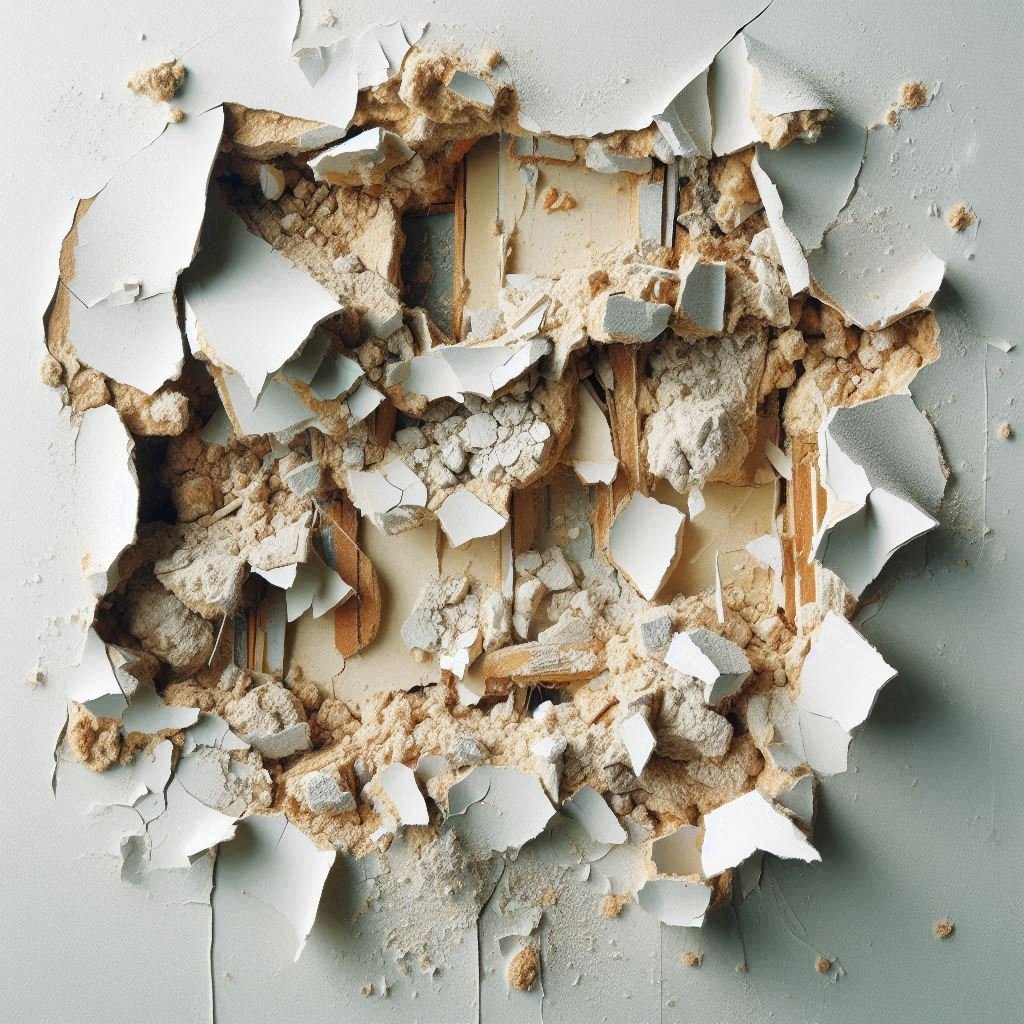
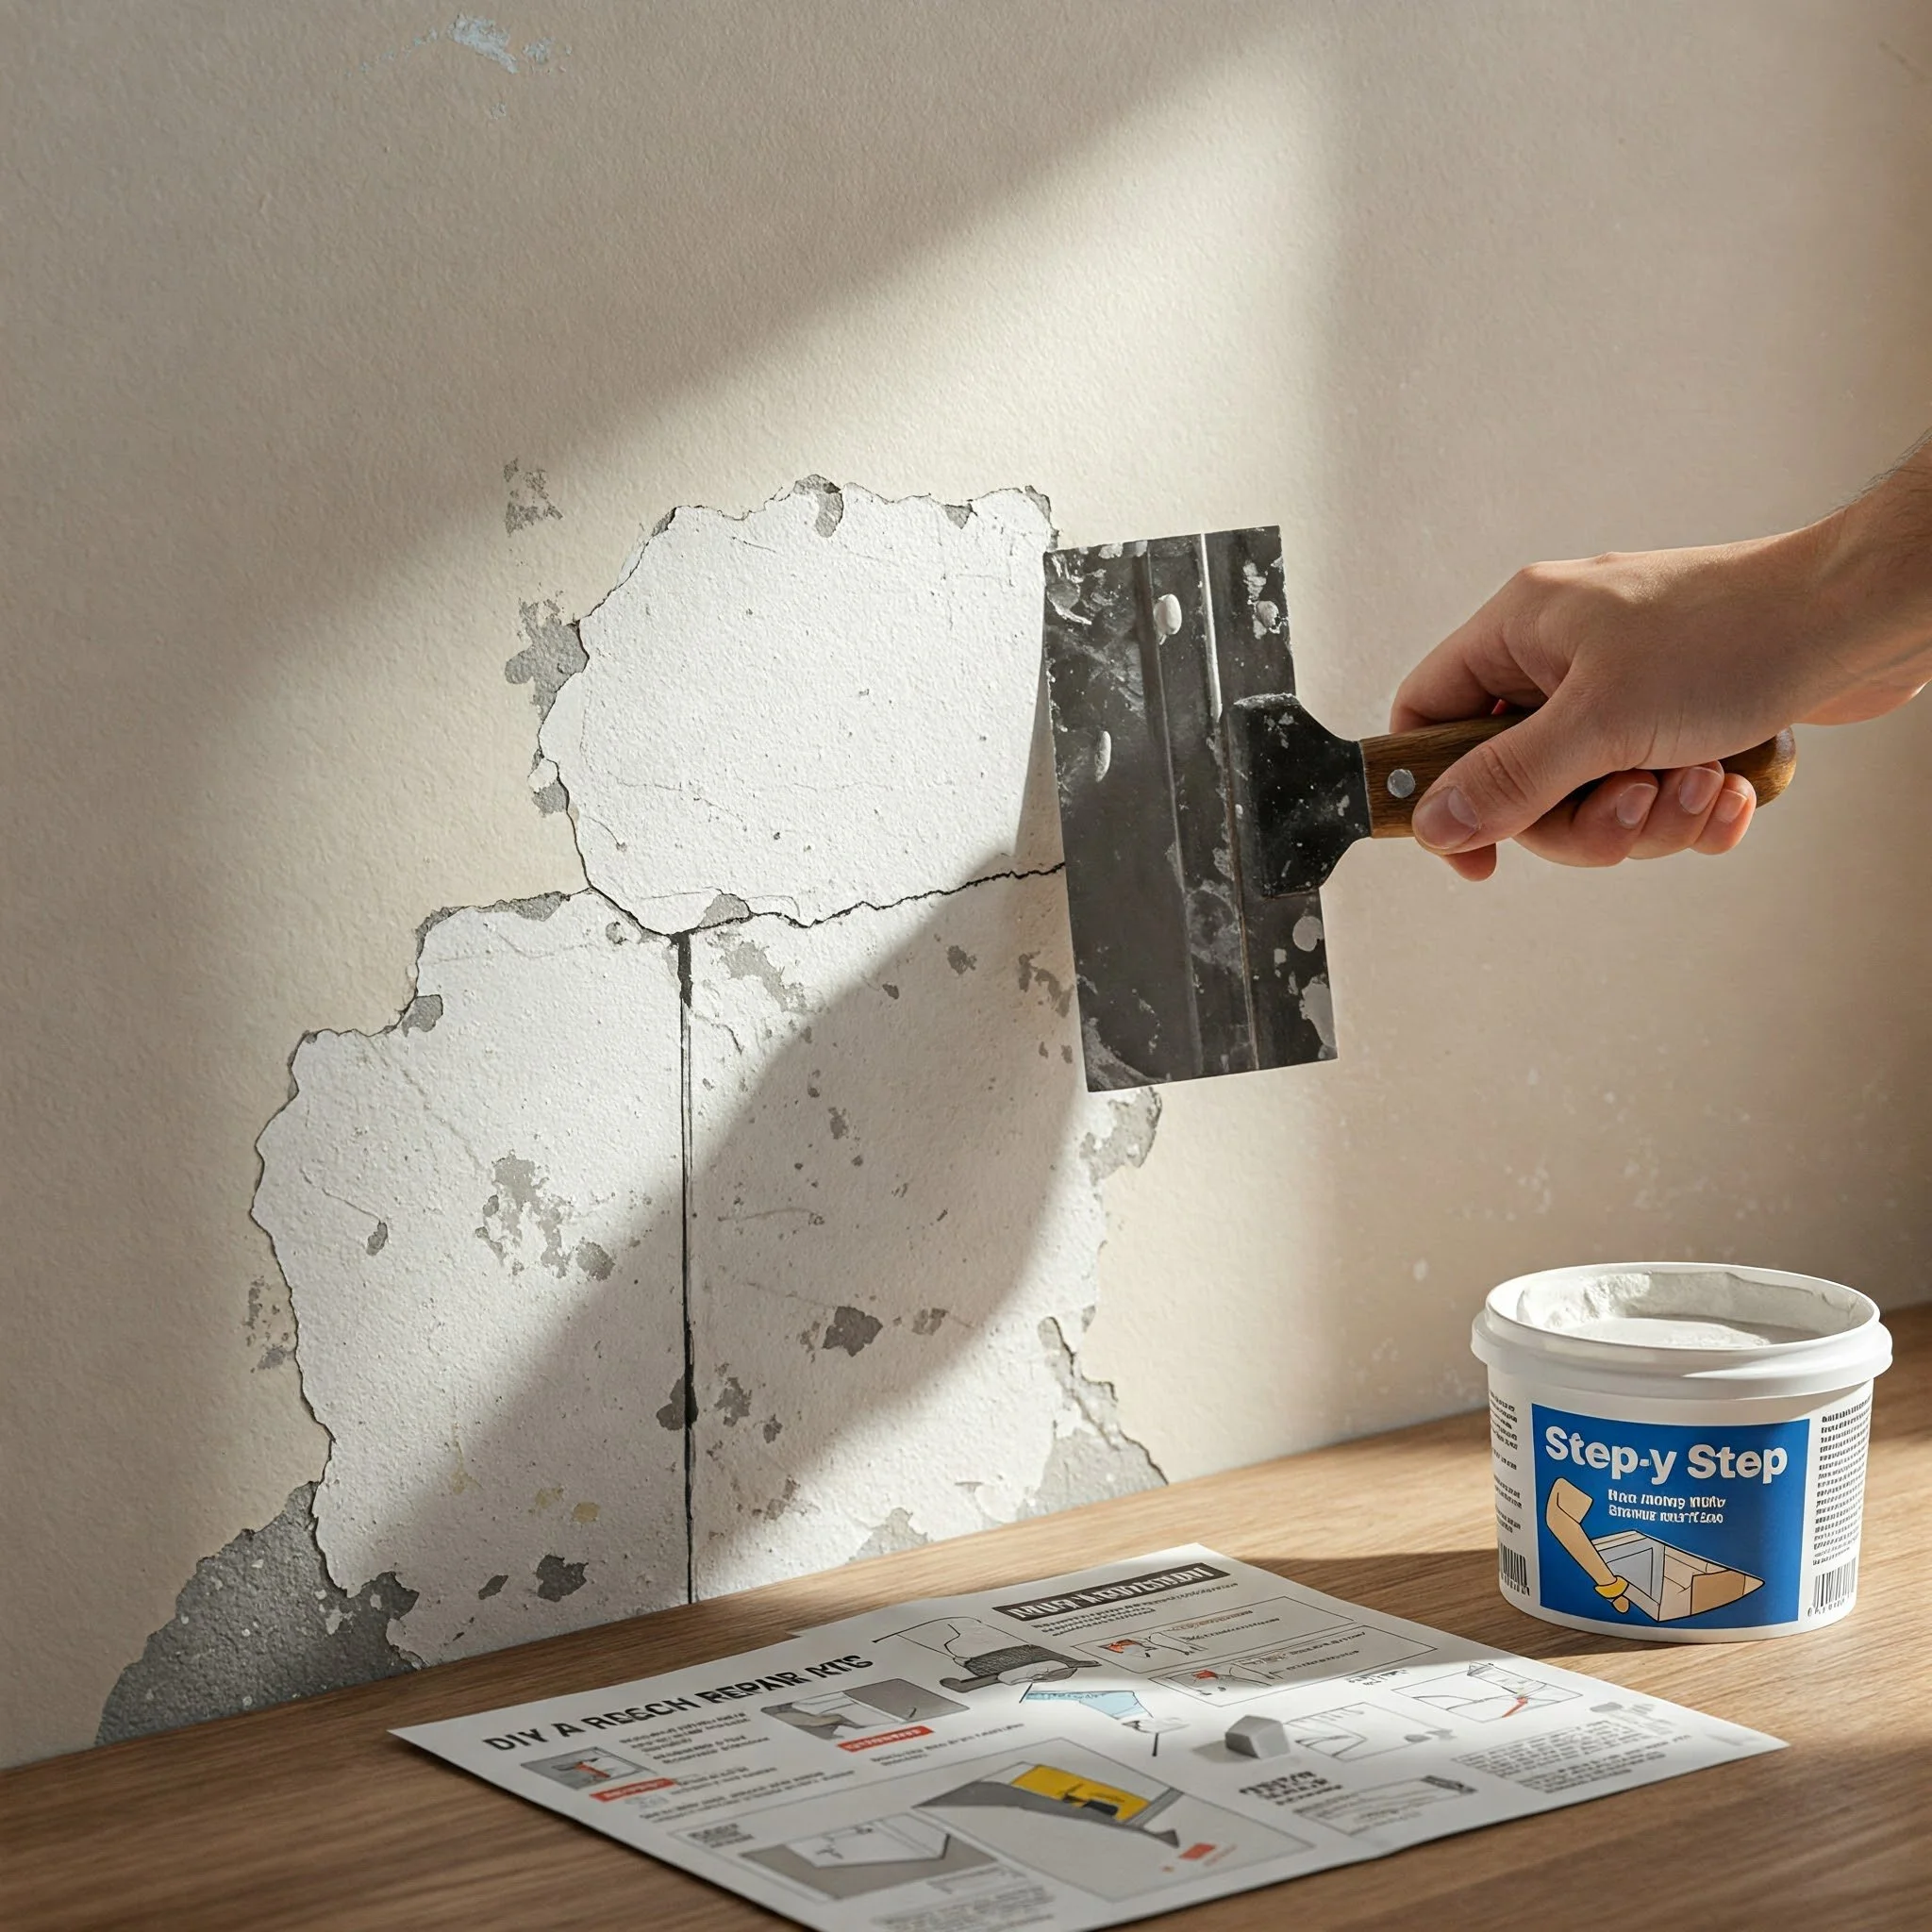
4. Cracked Wall Repair
Cracks in your walls may seem like a sign of deeper issues, but they often stem from minor settling or temperature changes. To repair these imperfections, start by cleaning the area to remove loose debris and dust. Then, apply a spackle or joint compound with a putty knife, filling in the gap evenly. Once it dries, sand it smooth and touch up with matching paint to restore a flawless finish. This process is similar to patching a favorite pair of jeans—taking a small tear and making it as good as new. Not only does this repair improve the overall appearance of your room, but it also helps maintain the structural integrity of your walls. By dedicating a bit of time and care, you can easily eliminate those unsightly cracks and feel confident in your ability to handle home maintenance like a pro.
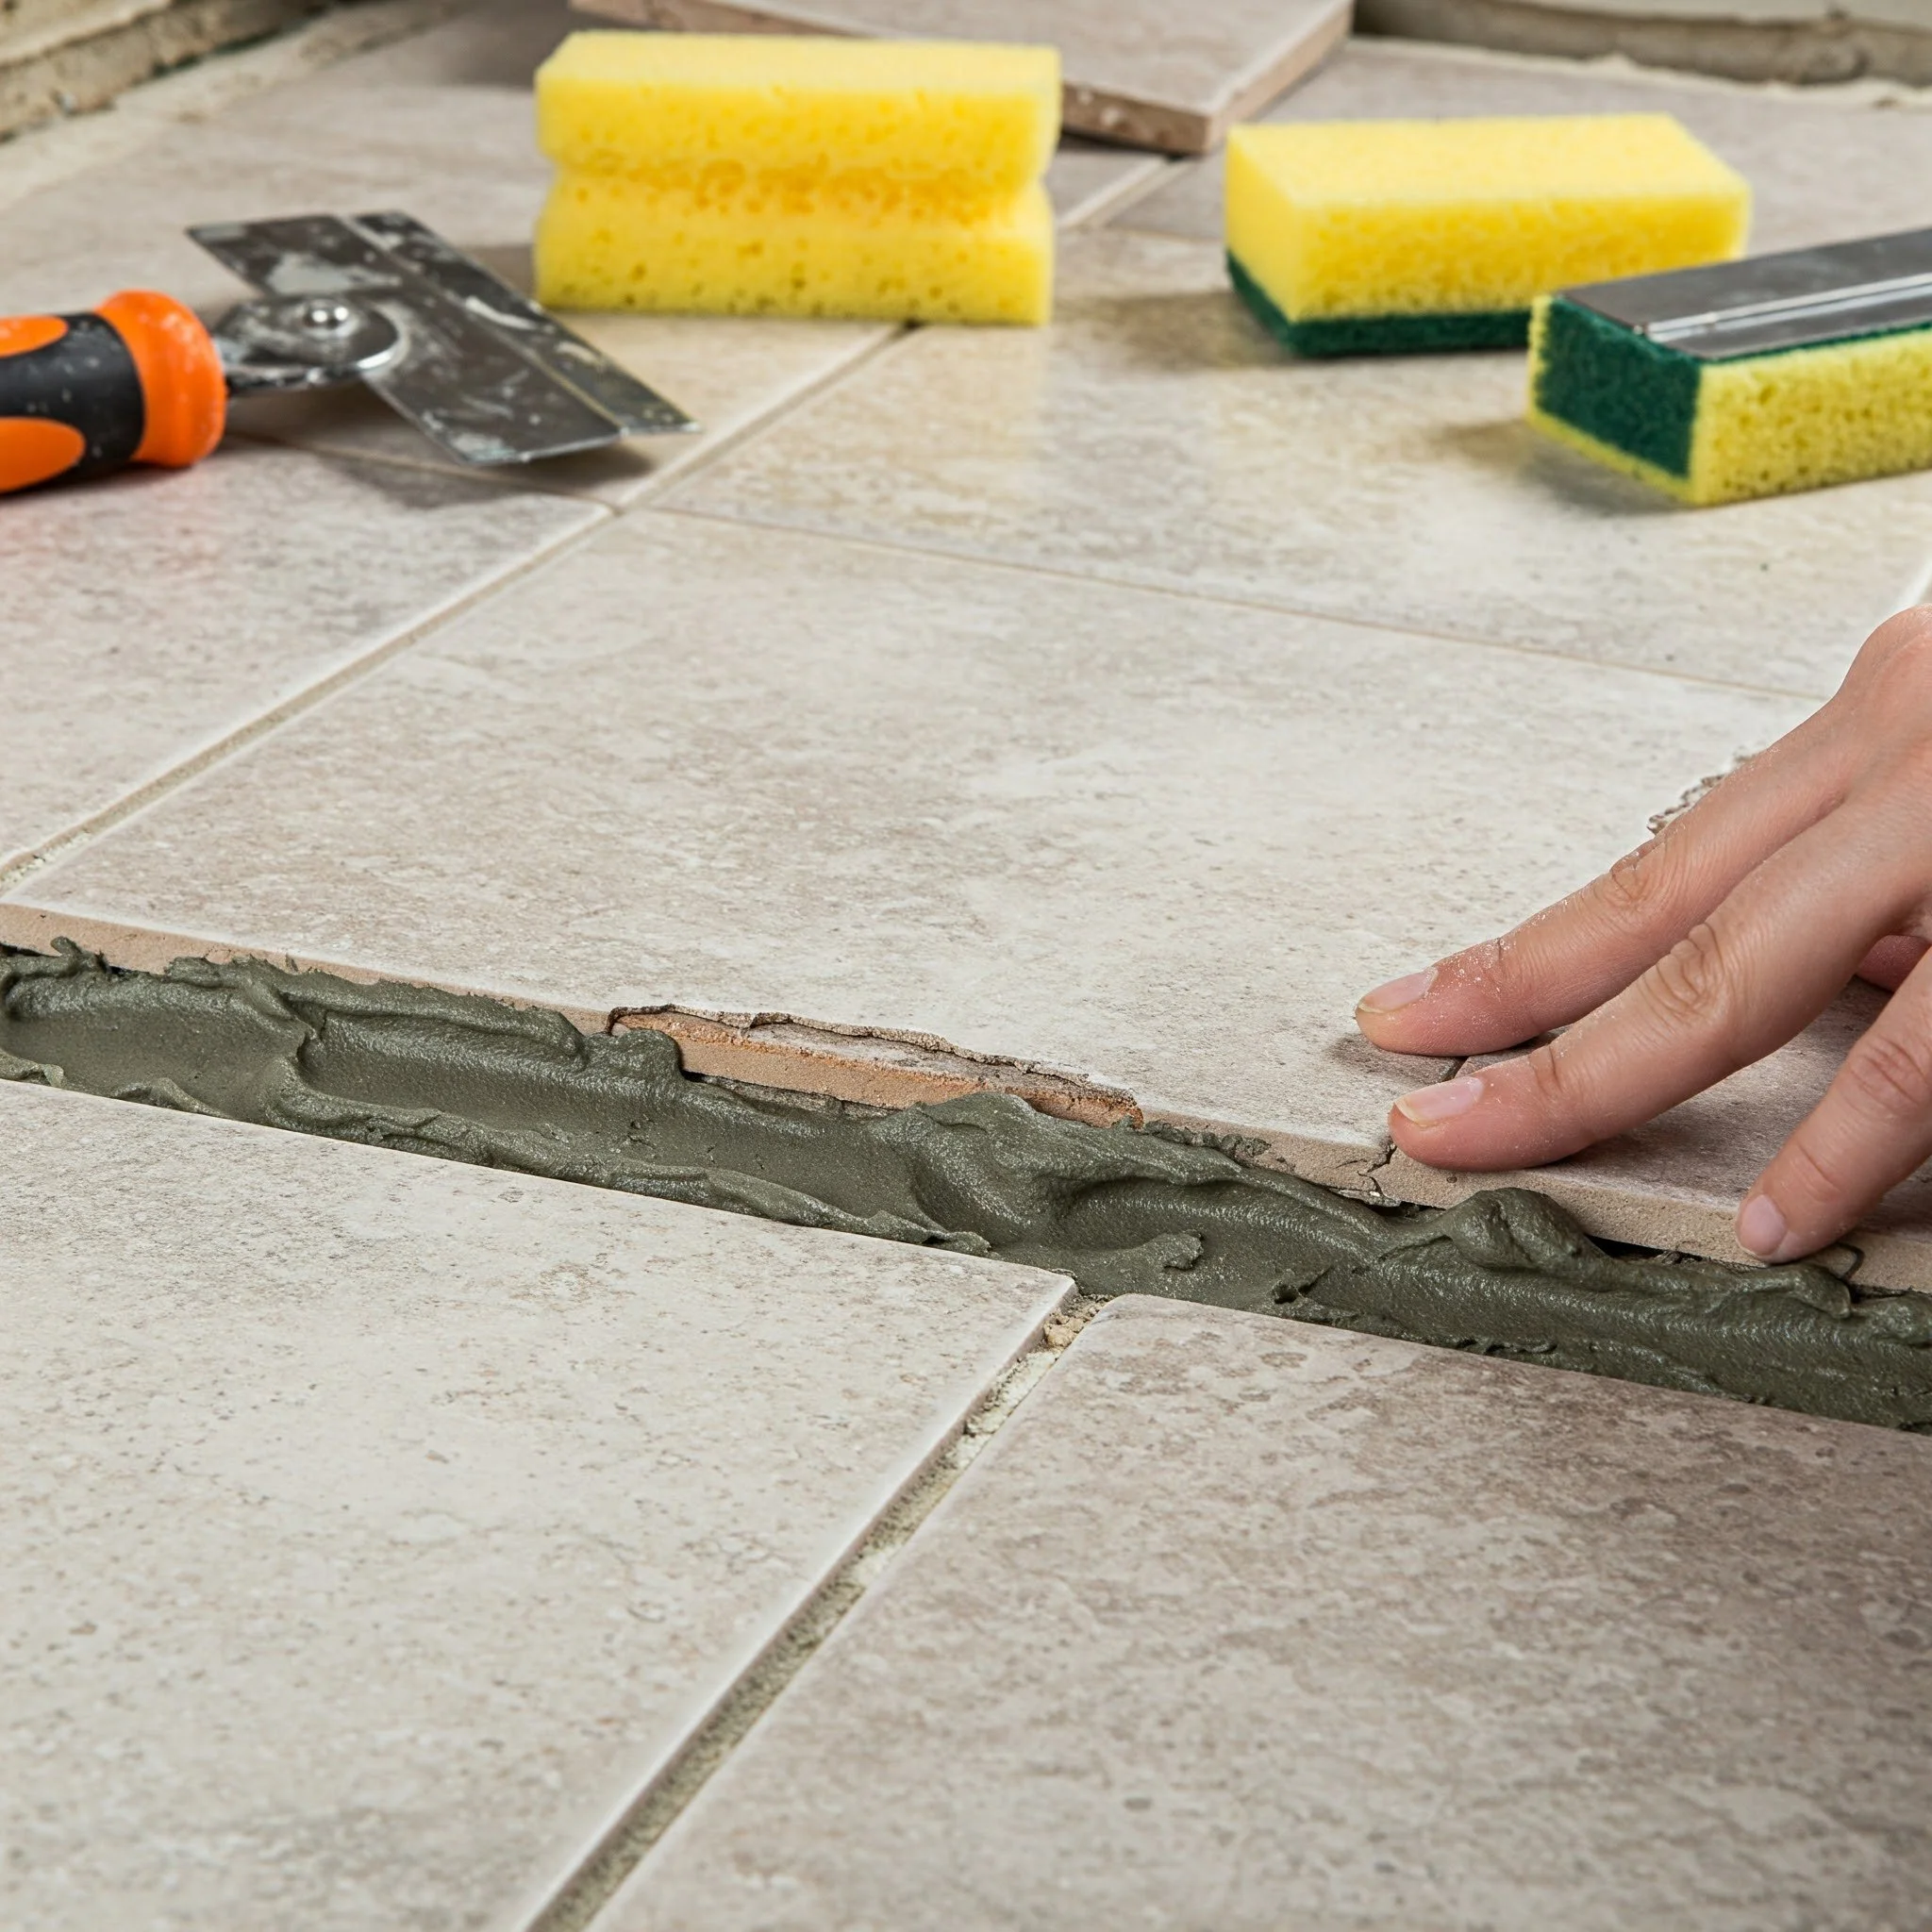
5. Damaged Tile Patching
Tiles can get chipped or cracked from everyday wear and tear, yet replacing them entirely might seem daunting. Instead, consider patching the damaged area with a special adhesive or epoxy designed for tile repair. Begin by cleaning the tile thoroughly to ensure the patch adheres properly, then apply the repair compound with precision. Smooth it out to blend seamlessly with the surrounding surface, and allow it to cure completely before using the area again. This method is like putting together a jigsaw puzzle—you fix the missing piece so the whole picture stays intact. Not only does this approach save you money, but it also preserves the character of your home. With a little patience and careful attention, you can achieve a near-invisible repair that keeps your floors or walls looking beautiful and functional.
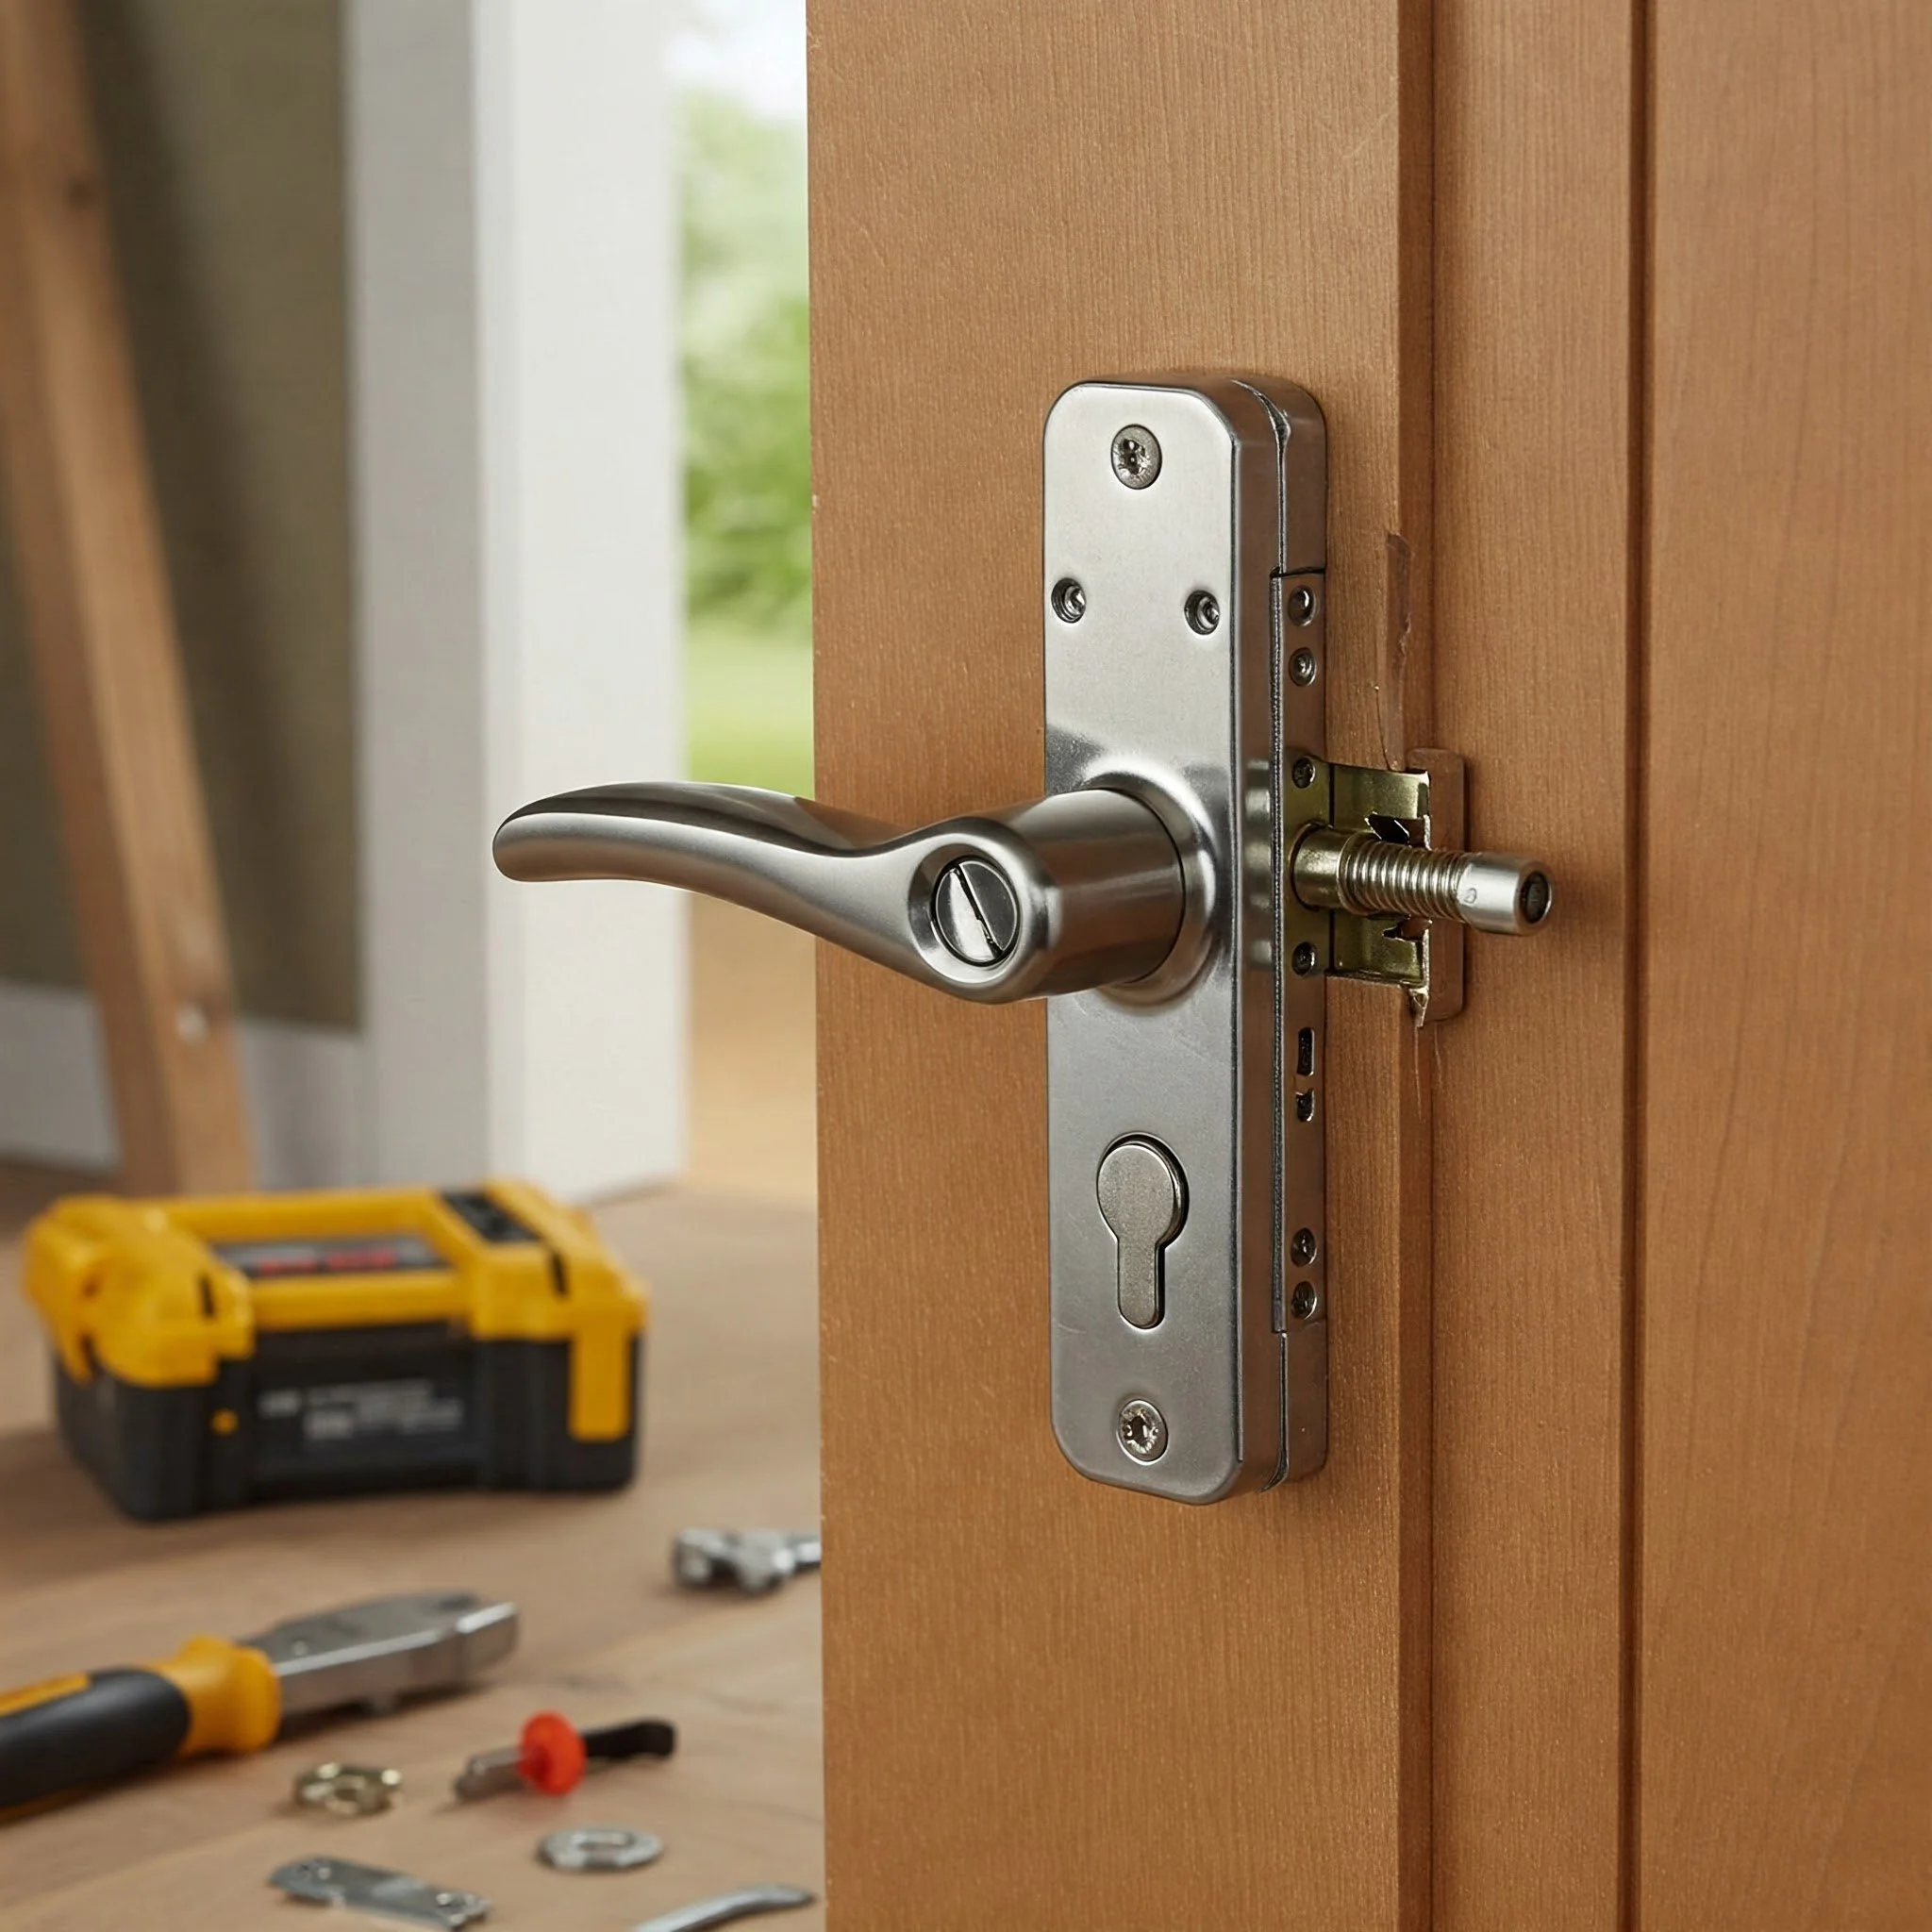
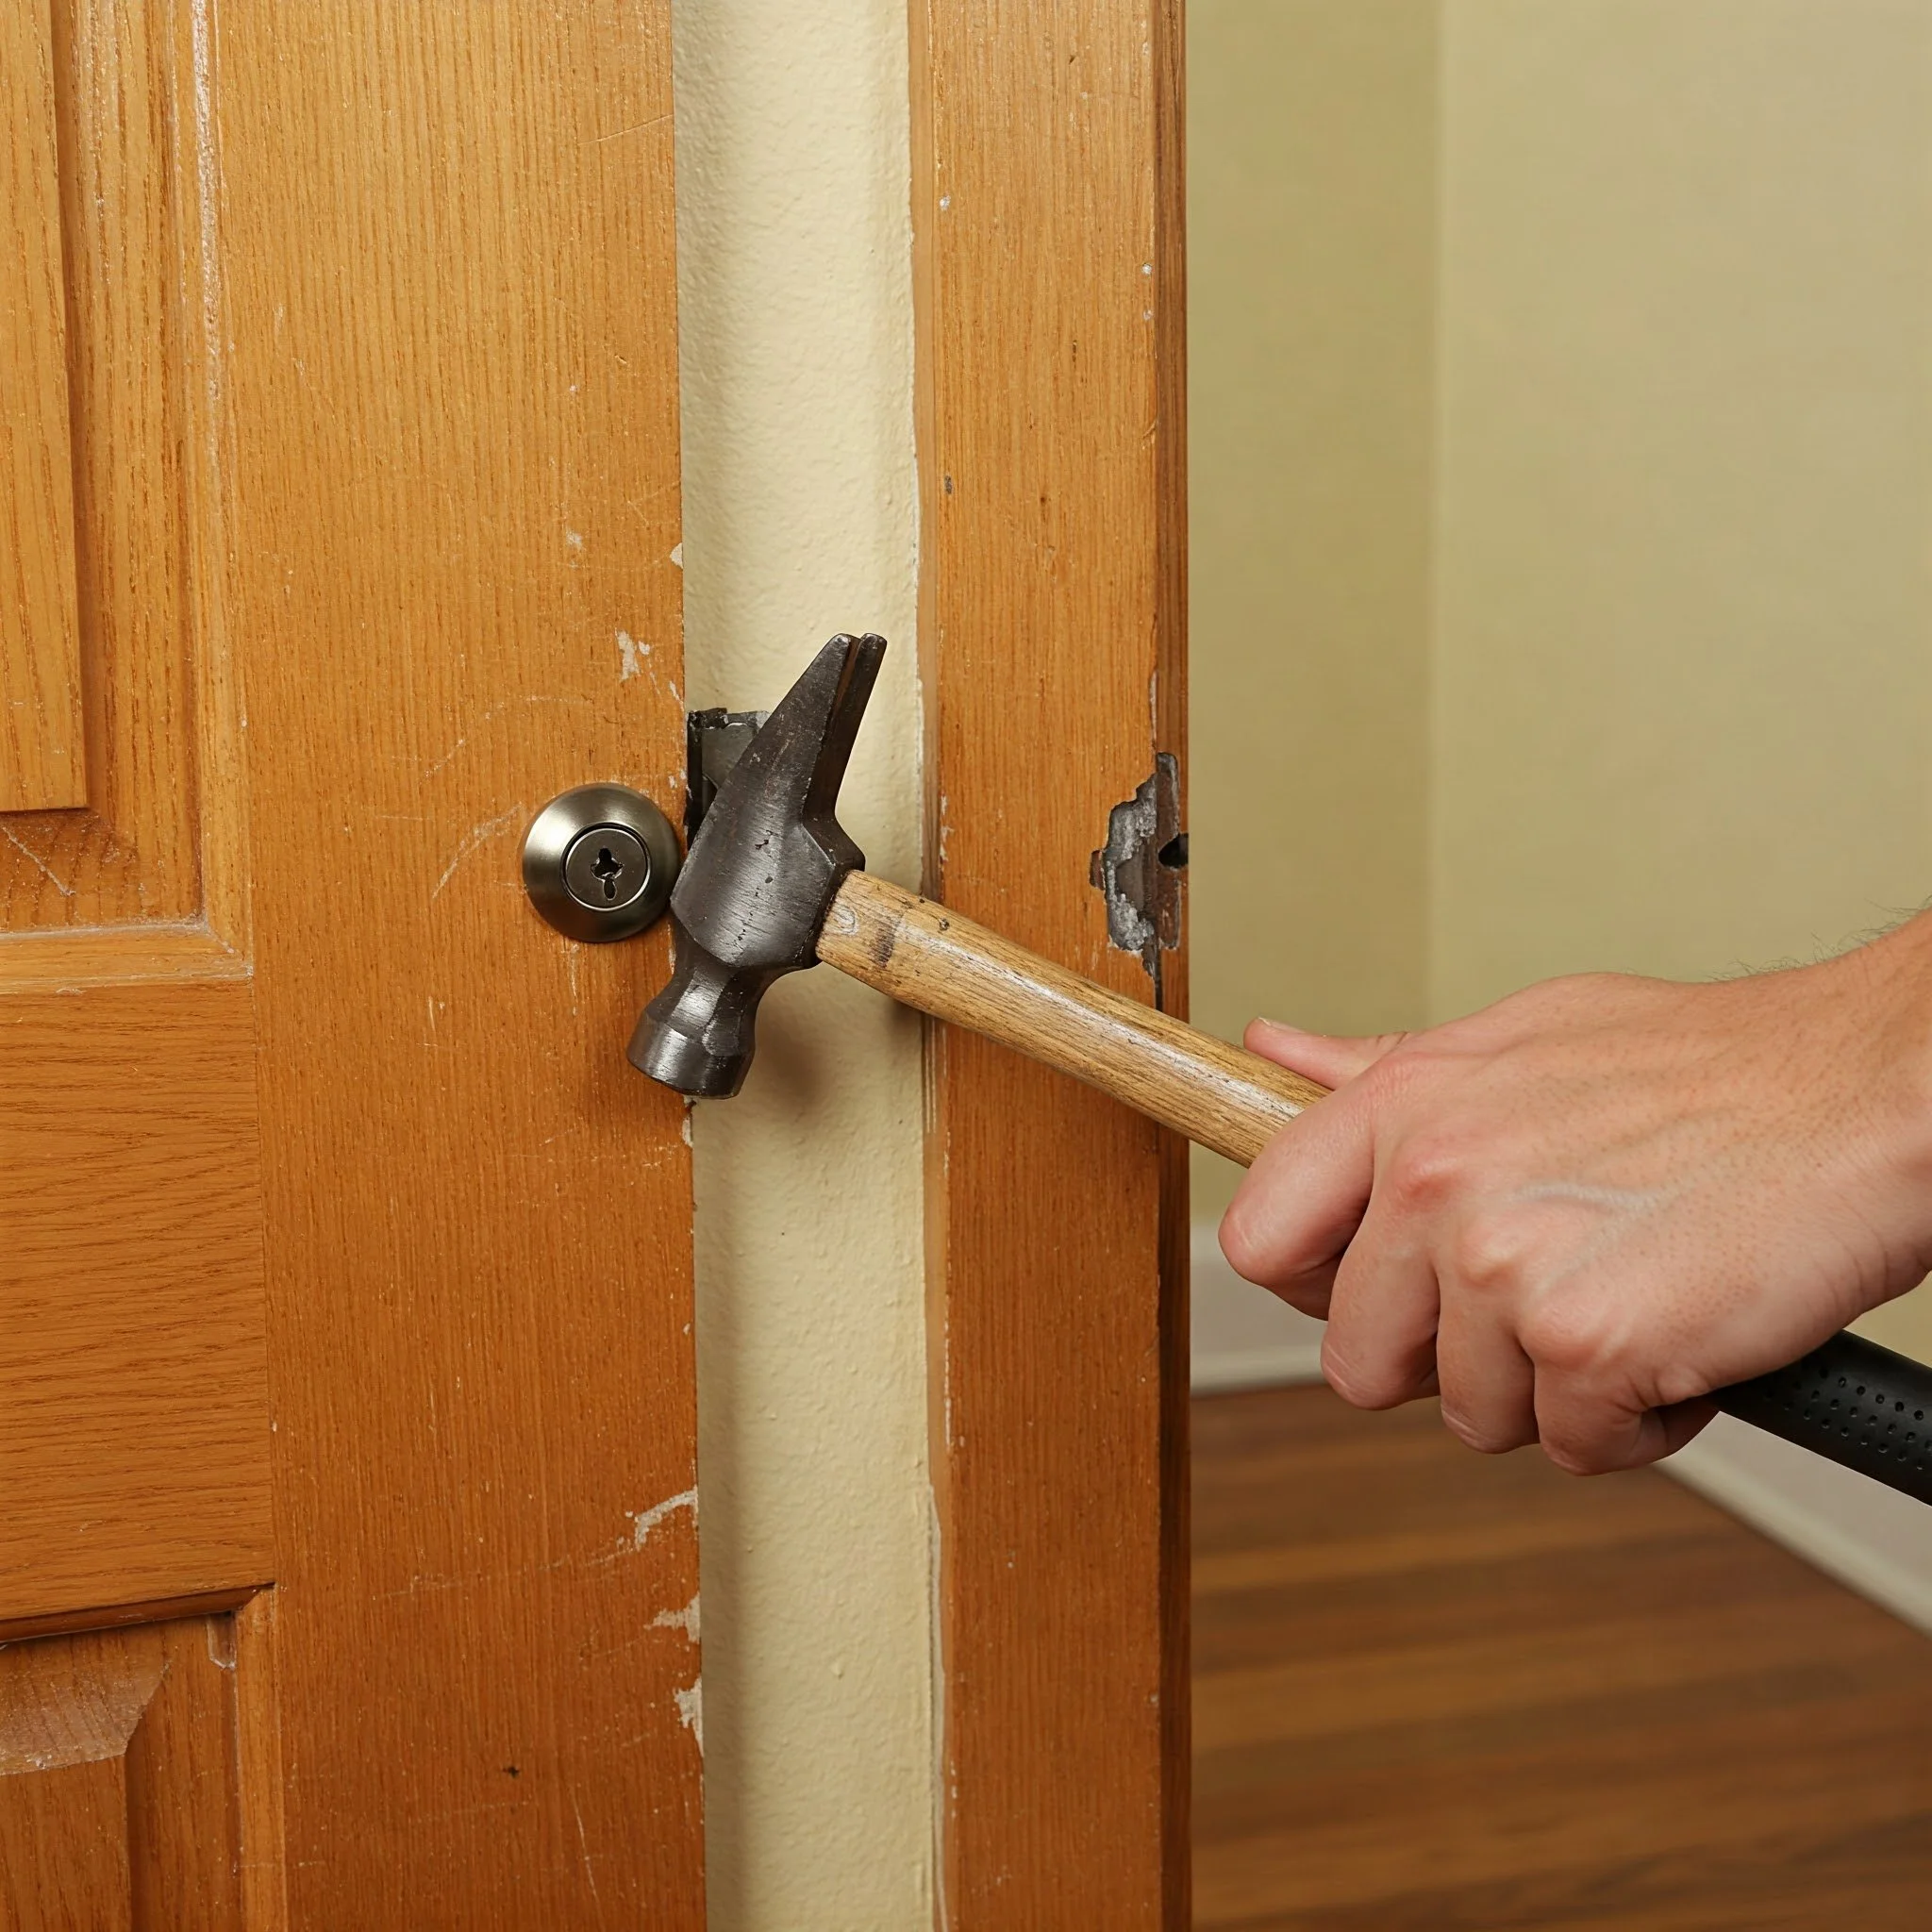
6. Door Lock Replacement
Upgrading your door lock might seem intimidating, but it’s one of those repairs that can significantly boost your home’s security. Start by removing the existing lock, which typically involves unscrewing the faceplate and detaching the mechanism. Once the old lock is out, compare it with your new replacement to ensure all parts match up correctly. Installation is usually as simple as reversing the removal process—secure the new lock in place and test it several times to confirm smooth operation. Think of it as a mini home upgrade that not only enhances safety but also adds a touch of modern style. With clear instructions and a few basic tools, you’ll feel like a seasoned handyman in no time. Isn’t it satisfying to know that with a few simple steps, you can fortify your home and protect what matters most?
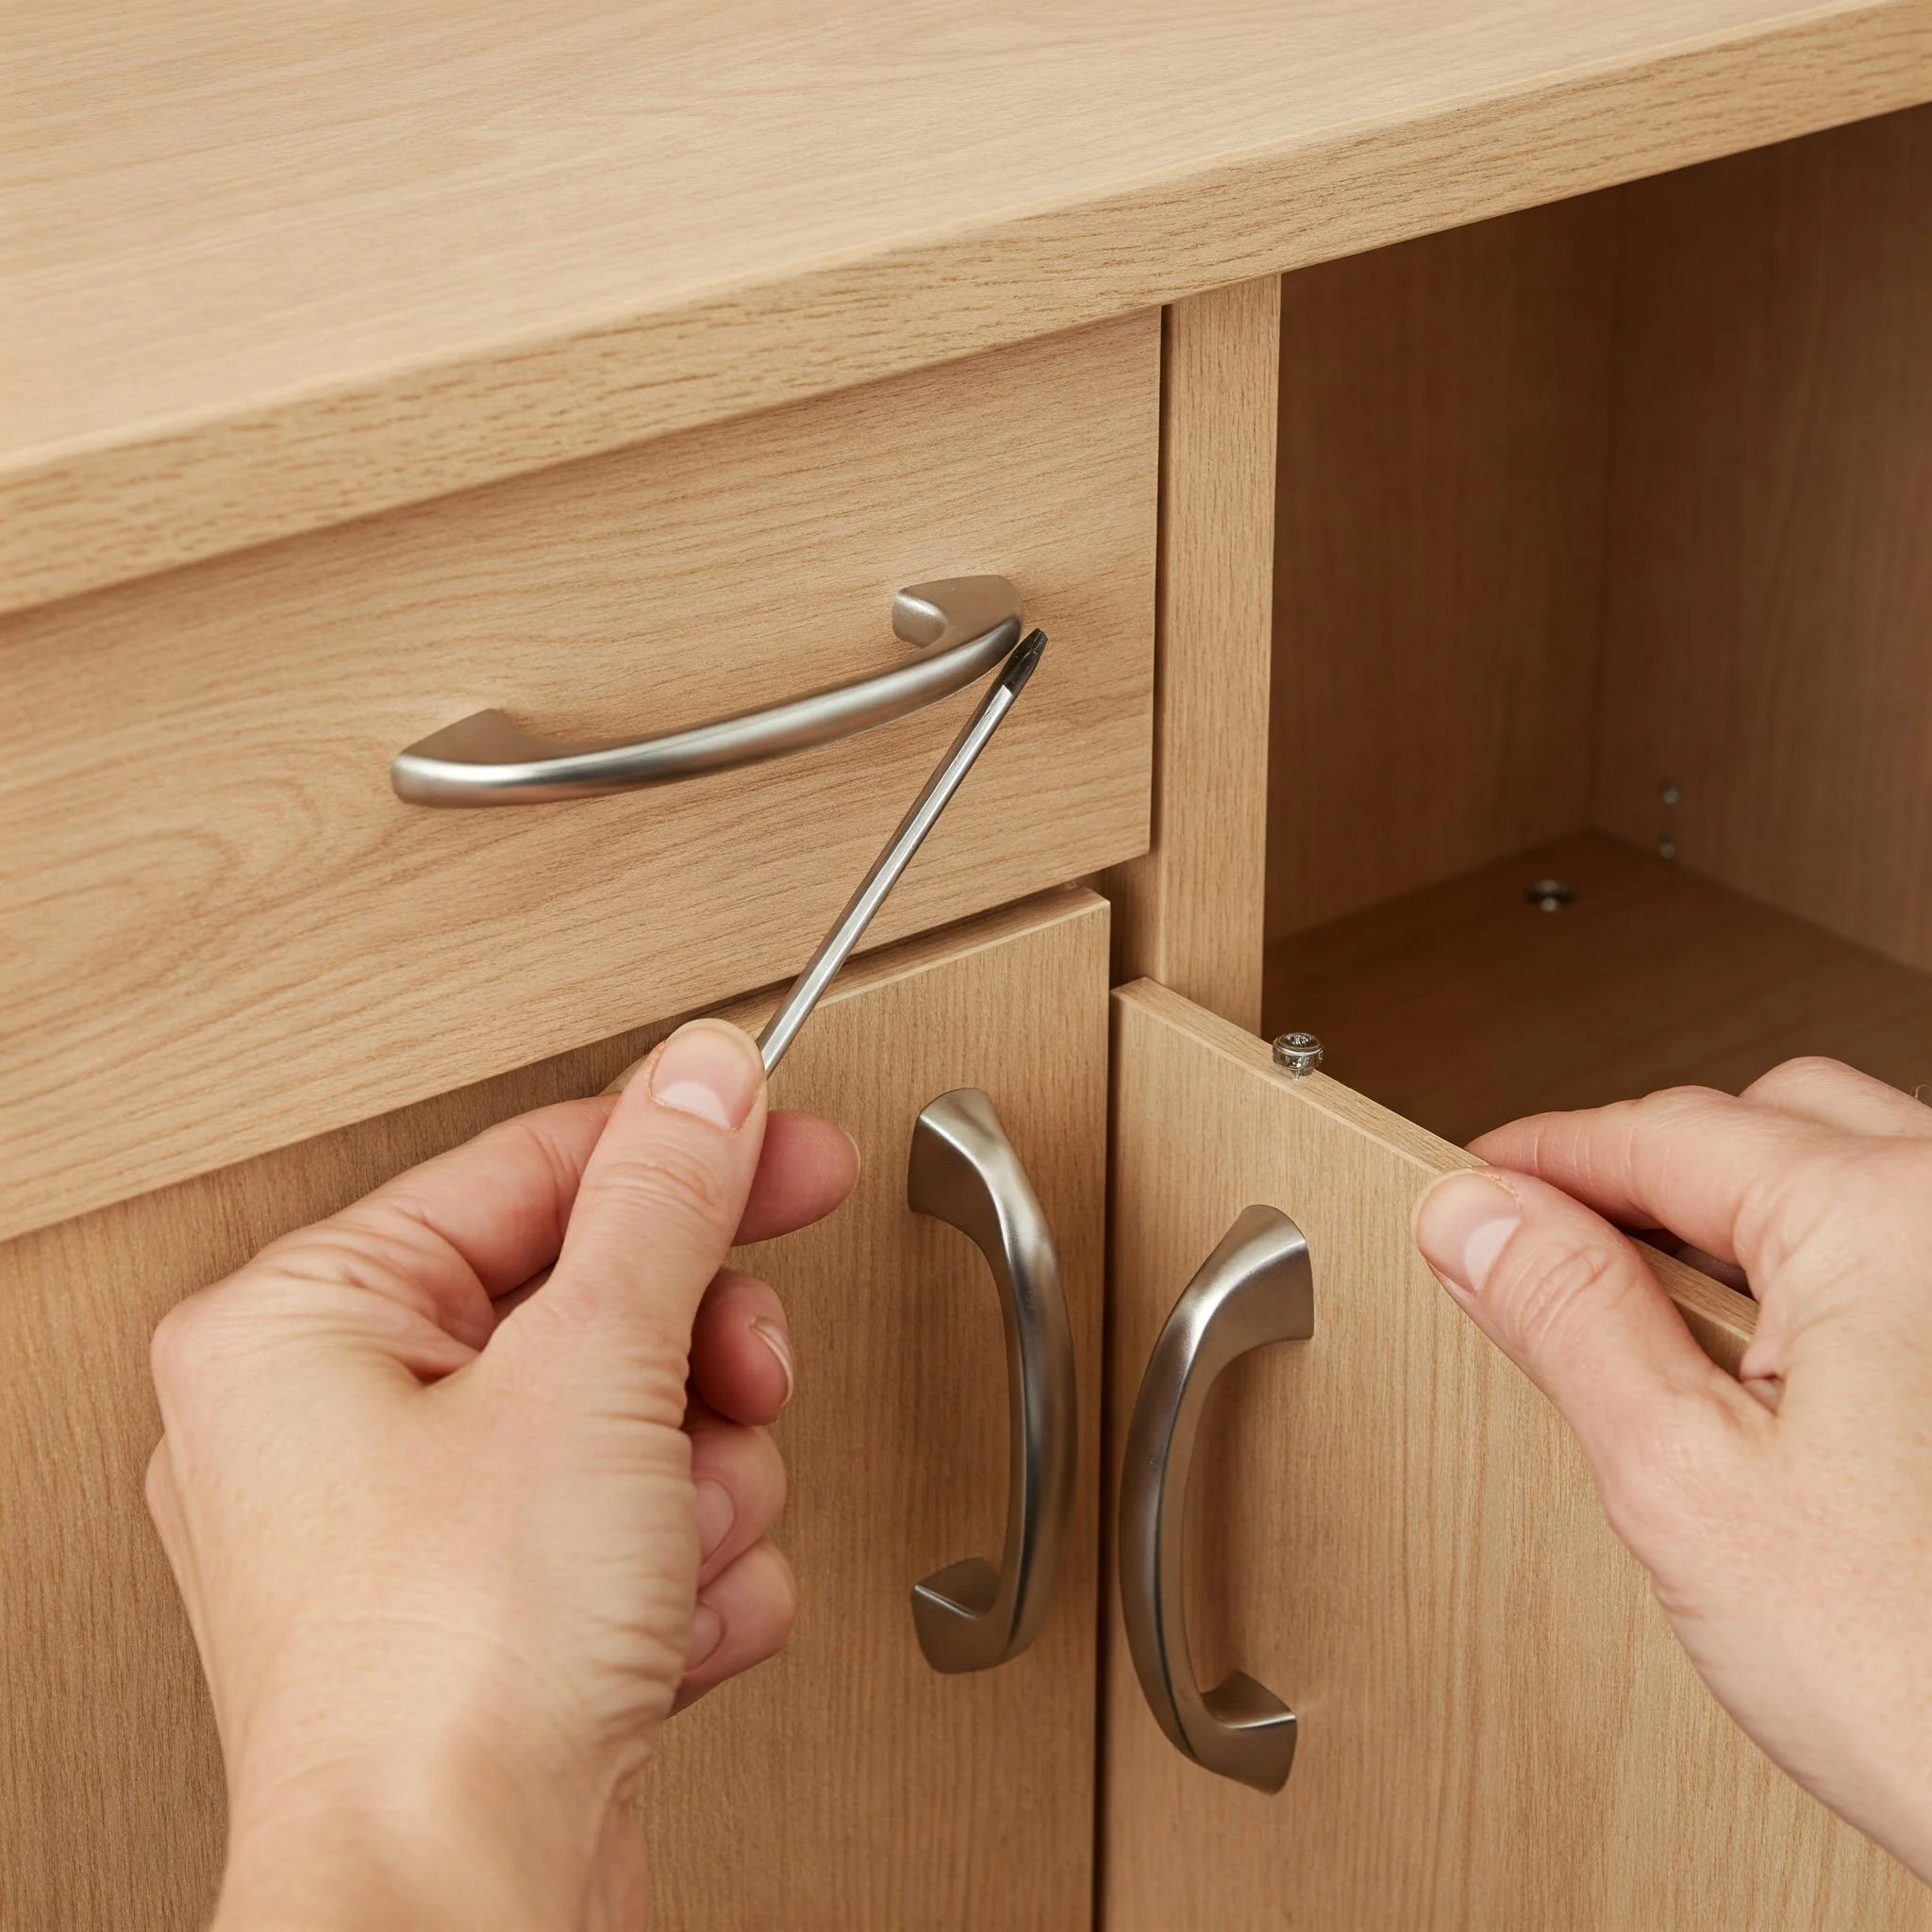
7. Fixing Loose Cabinet Handles
Loose cabinet handles can be more than just an annoyance; they might indicate underlying issues with your furniture. Start by inspecting the handle and the screw holes—sometimes, the screws simply need tightening, while other times the holes might require a bit of repair with wood filler. Once the area is prepped, secure the handle firmly in place using a screwdriver. This small repair can dramatically improve the functionality and appearance of your cabinets, making them feel sturdier and more reliable. Imagine your cabinets as a trusted pair of shoes: a little maintenance keeps them comfortable and dependable. With these simple steps, you’ll not only eliminate the wobble but also add a touch of finesse to your storage solutions. This quick fix is a perfect example of how minor adjustments can yield significant improvements in your home’s everyday use.
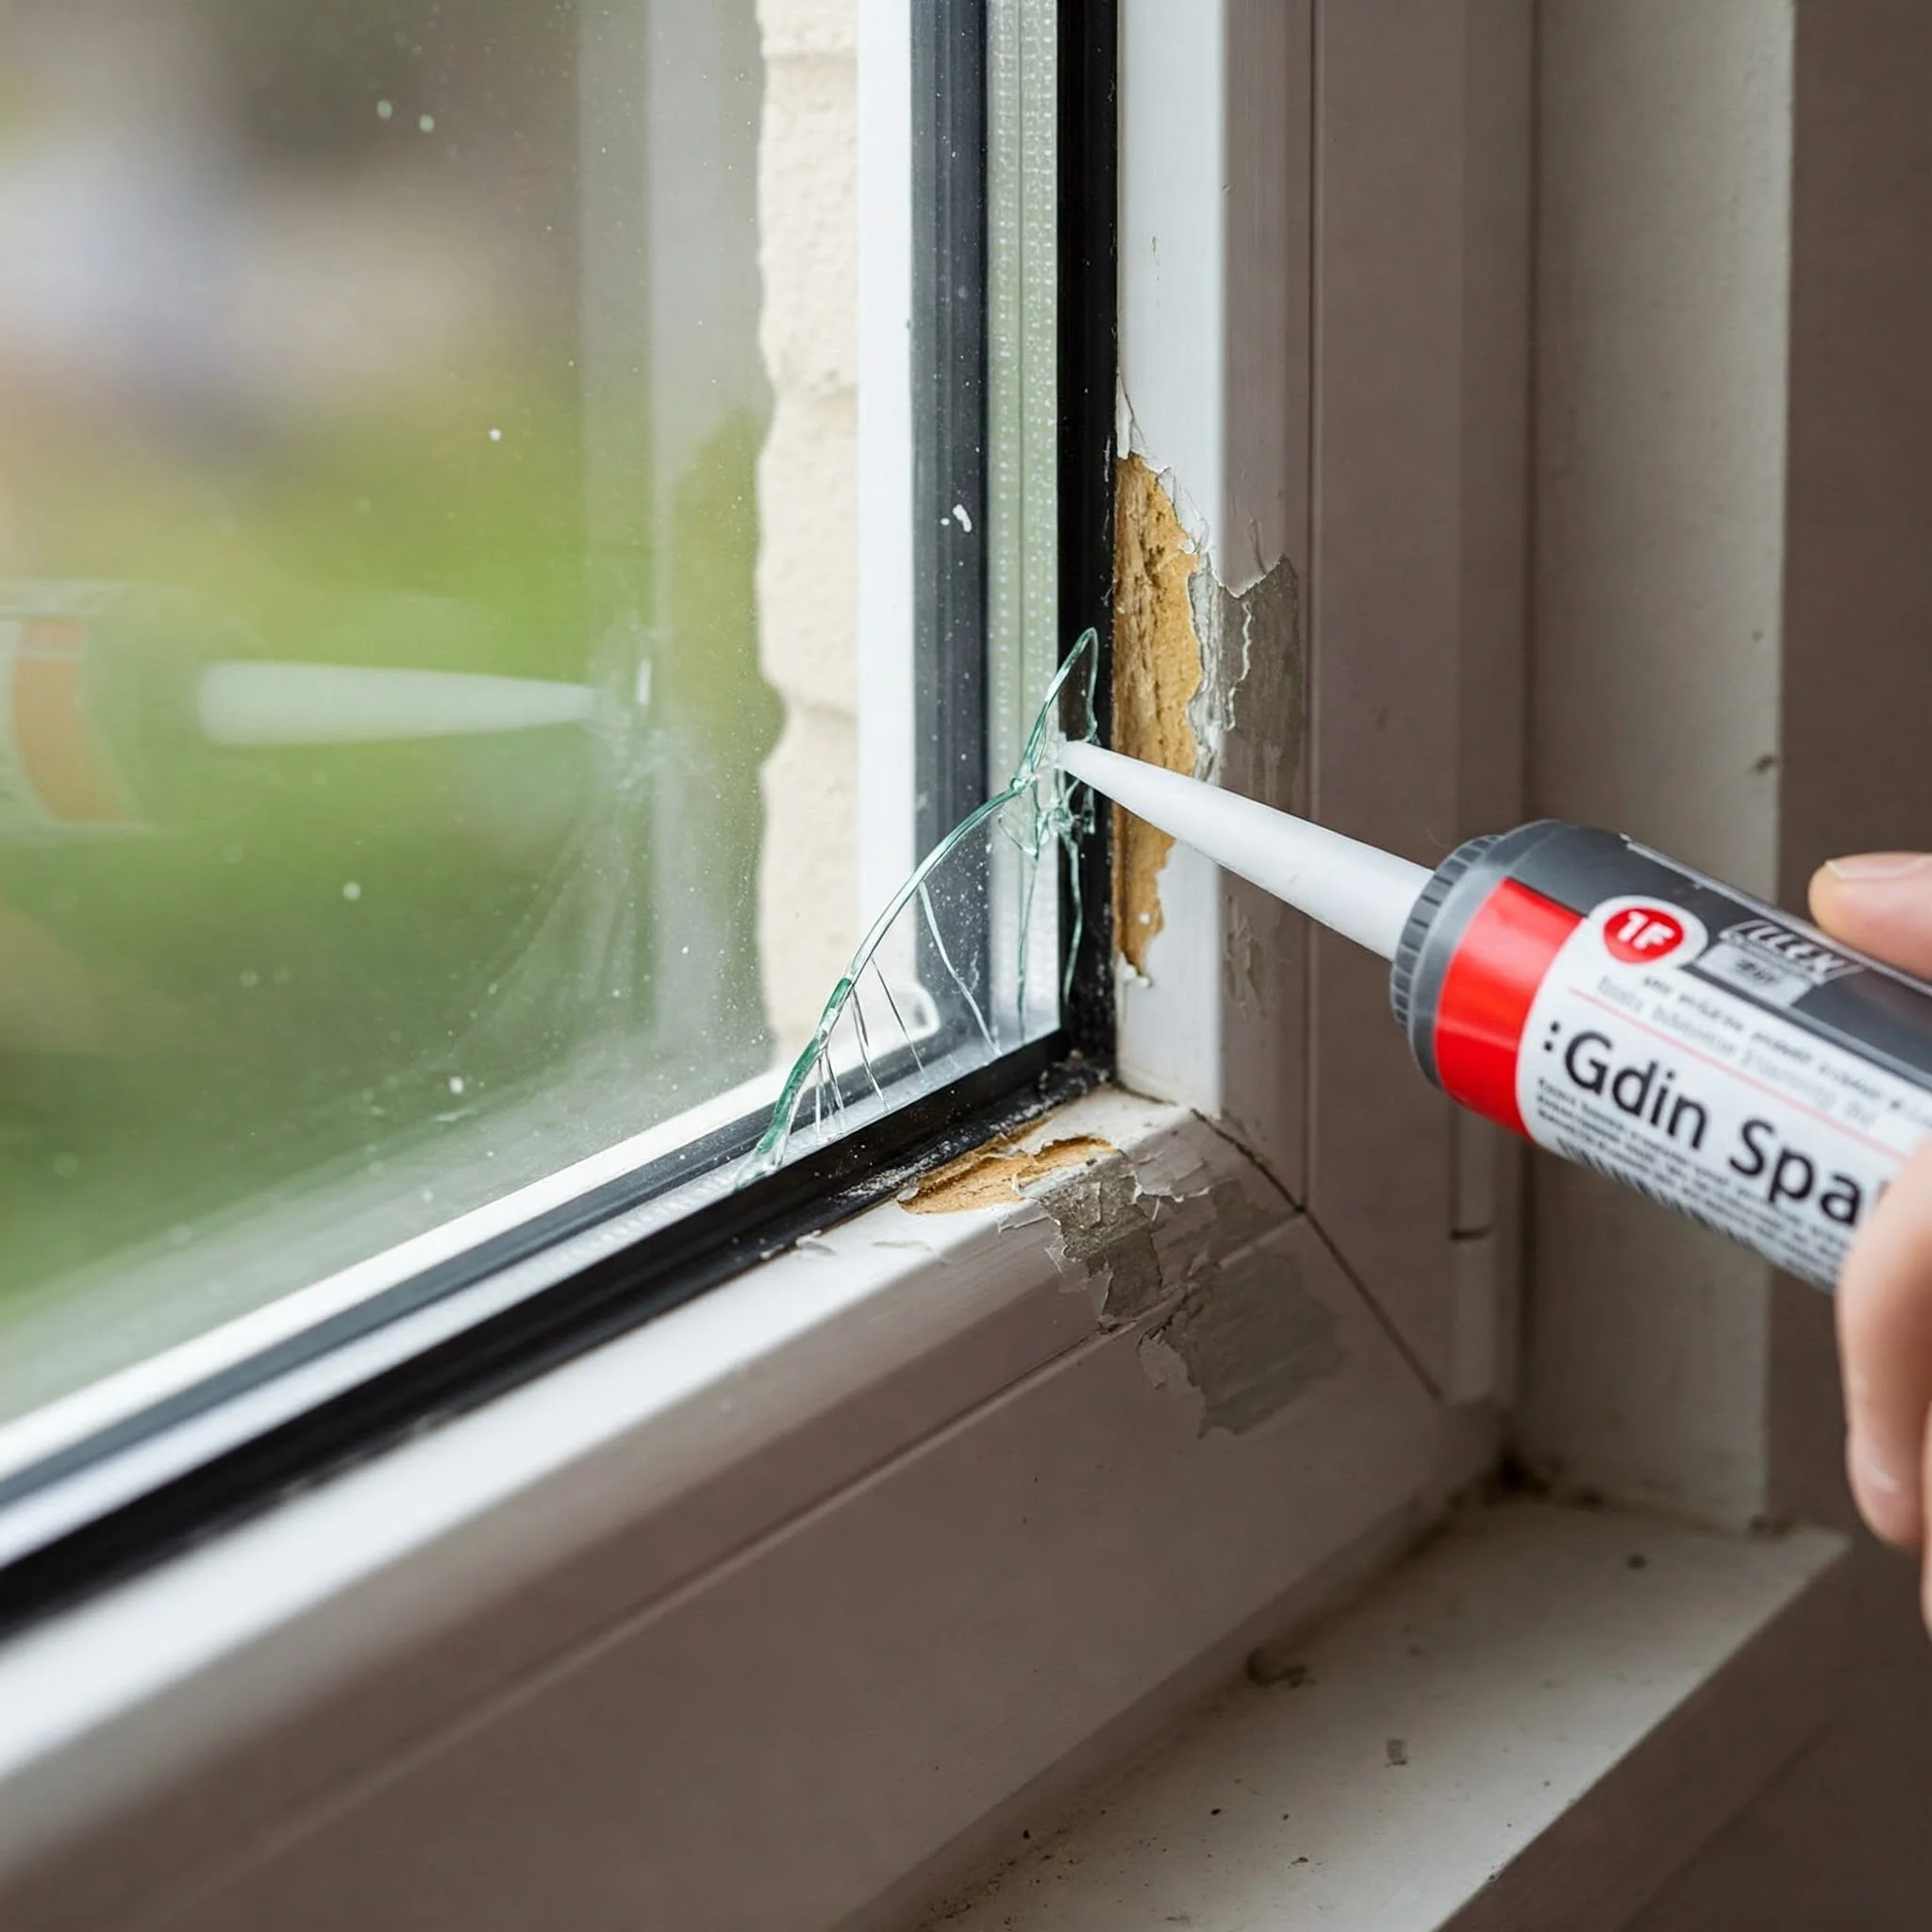
8. Repairing Broken Window Seals
A broken window seal can lead to unwanted drafts and energy inefficiency, especially during extreme weather. Begin by carefully removing any old sealant from around the window frame. Clean the area thoroughly so that the new sealant adheres properly. Then, apply a high-quality, weather-resistant sealant evenly along the gap, smoothing it out with a caulking tool or your finger for a neat finish. This repair not only improves your home’s insulation but also helps reduce noise and energy bills. Think of it as giving your window a cozy sweater that keeps the elements at bay. By taking a few moments to fix the seal, you ensure that your living space remains comfortable and efficient throughout the year. It’s a small investment of time that pays off in enhanced comfort and lower energy costs.
9. Fixing Flickering Light Fixtures
Flickering lights can be both frustrating and a potential sign of electrical issues. Before you start, always switch off the power at the circuit breaker for safety. Once the power is off, check the bulb and socket for any loose connections or corrosion. In many cases, simply tightening the bulb or cleaning the socket can resolve the issue. If the problem persists, inspect the wiring for any signs of wear and consider replacing outdated components. This repair is like troubleshooting a gadget that just isn’t working right—small adjustments can make a huge difference in performance. With careful attention to detail and a focus on safety, you can restore a steady, bright light to your space. Embrace the challenge and enjoy the satisfaction of turning a flicker into a reliable glow with your own two hands.

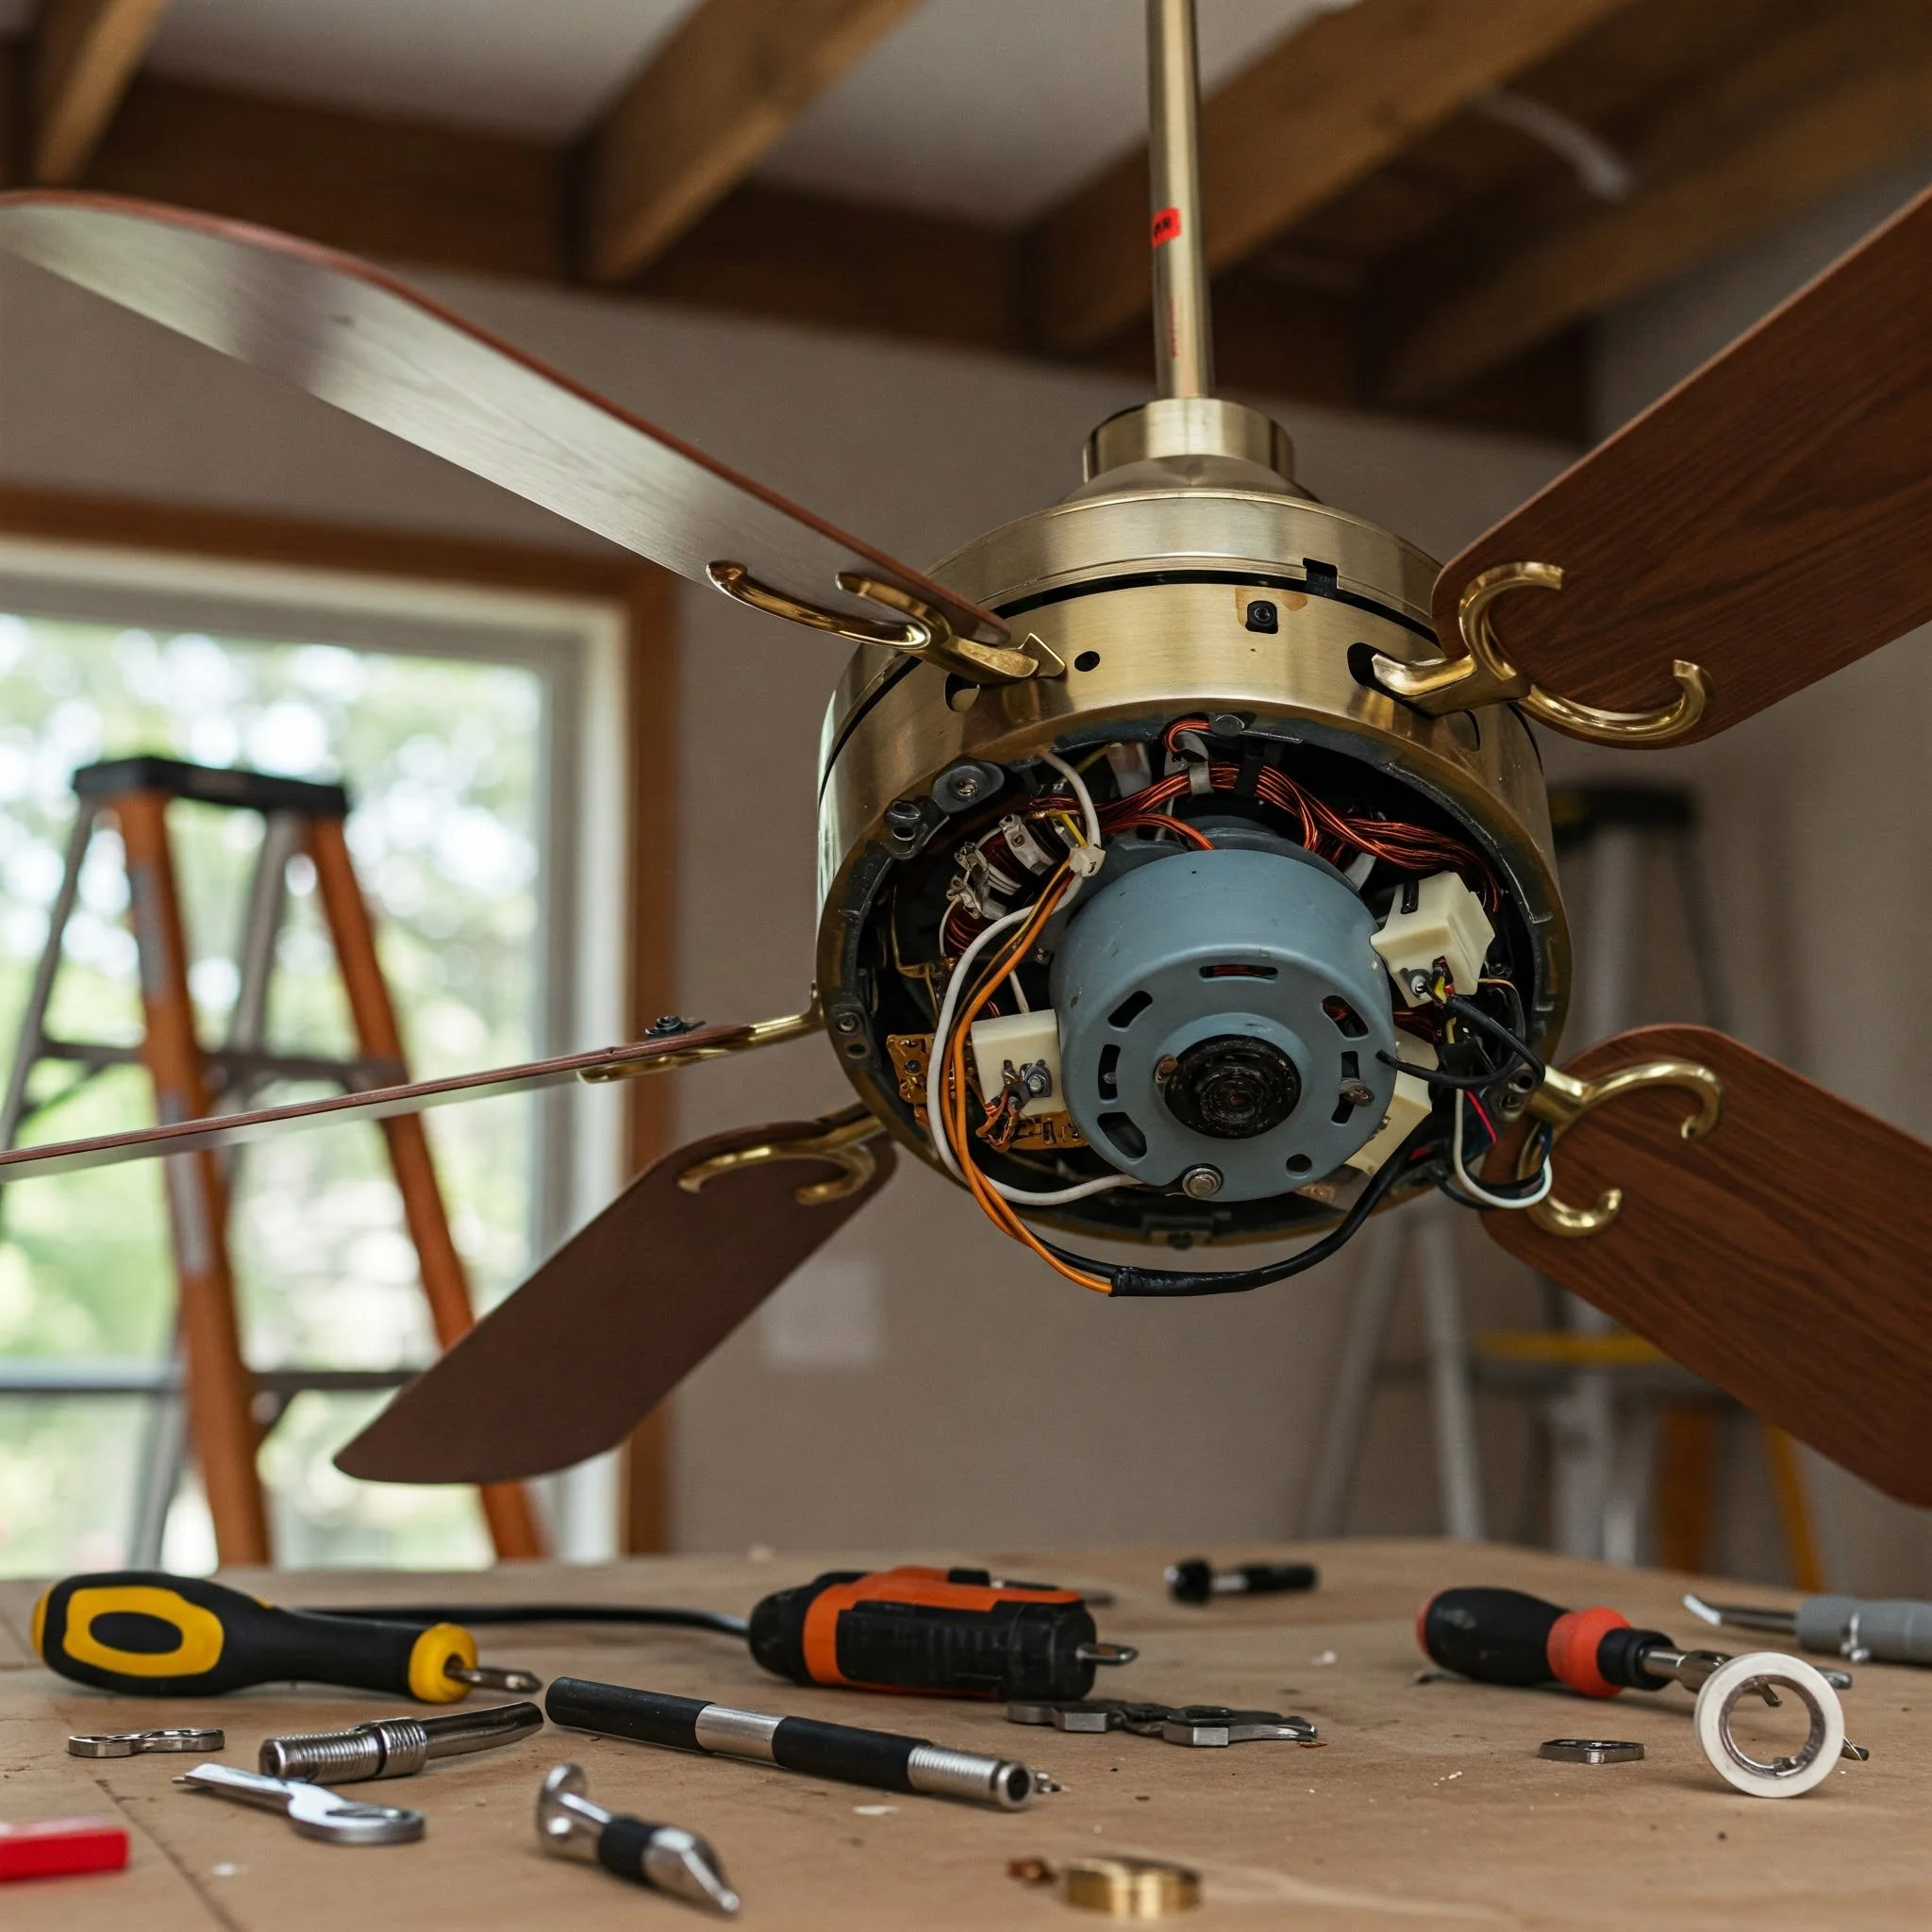
10. Ceiling Fan Maintenance
A wobbly or noisy ceiling fan can disrupt the harmony of your living space, but a little routine maintenance can set things right. Start by turning off the fan and gently cleaning the blades with a soft cloth to remove accumulated dust. Check for loose screws or imbalance issues; sometimes, a slight readjustment of the blades is all it takes to restore smooth operation. Tighten any loose components and consider using a bit of lubricant on the moving parts to ensure quiet, efficient performance. Picture your ceiling fan as a well-tuned orchestra—each blade playing its part to create a harmonious flow of air. With just a few simple steps, you can transform a bothersome noise into a subtle, comforting hum that enhances your room’s ambiance. This maintenance task is a perfect blend of practicality and peace of mind for any homeowner.
11. Unjamming Stuck Doors
A door that refuses to open or close smoothly can disrupt your day and raise your frustration levels. Often, the issue lies in misaligned hinges or accumulated dirt along the tracks. Begin by inspecting the door and its hardware, then apply a lubricant to the hinges and any moving parts. Sometimes, a minor adjustment of the door’s alignment is all that’s needed to eliminate the jam. Think of it as recalibrating a well-worn machine—each component must work in sync for seamless operation. With a few simple tweaks and a little patience, you’ll find that even the most stubborn door can be coaxed back into smooth, effortless movement. This repair not only improves functionality but also enhances the overall look and feel of your home, turning everyday inconveniences into small victories you can be proud of.
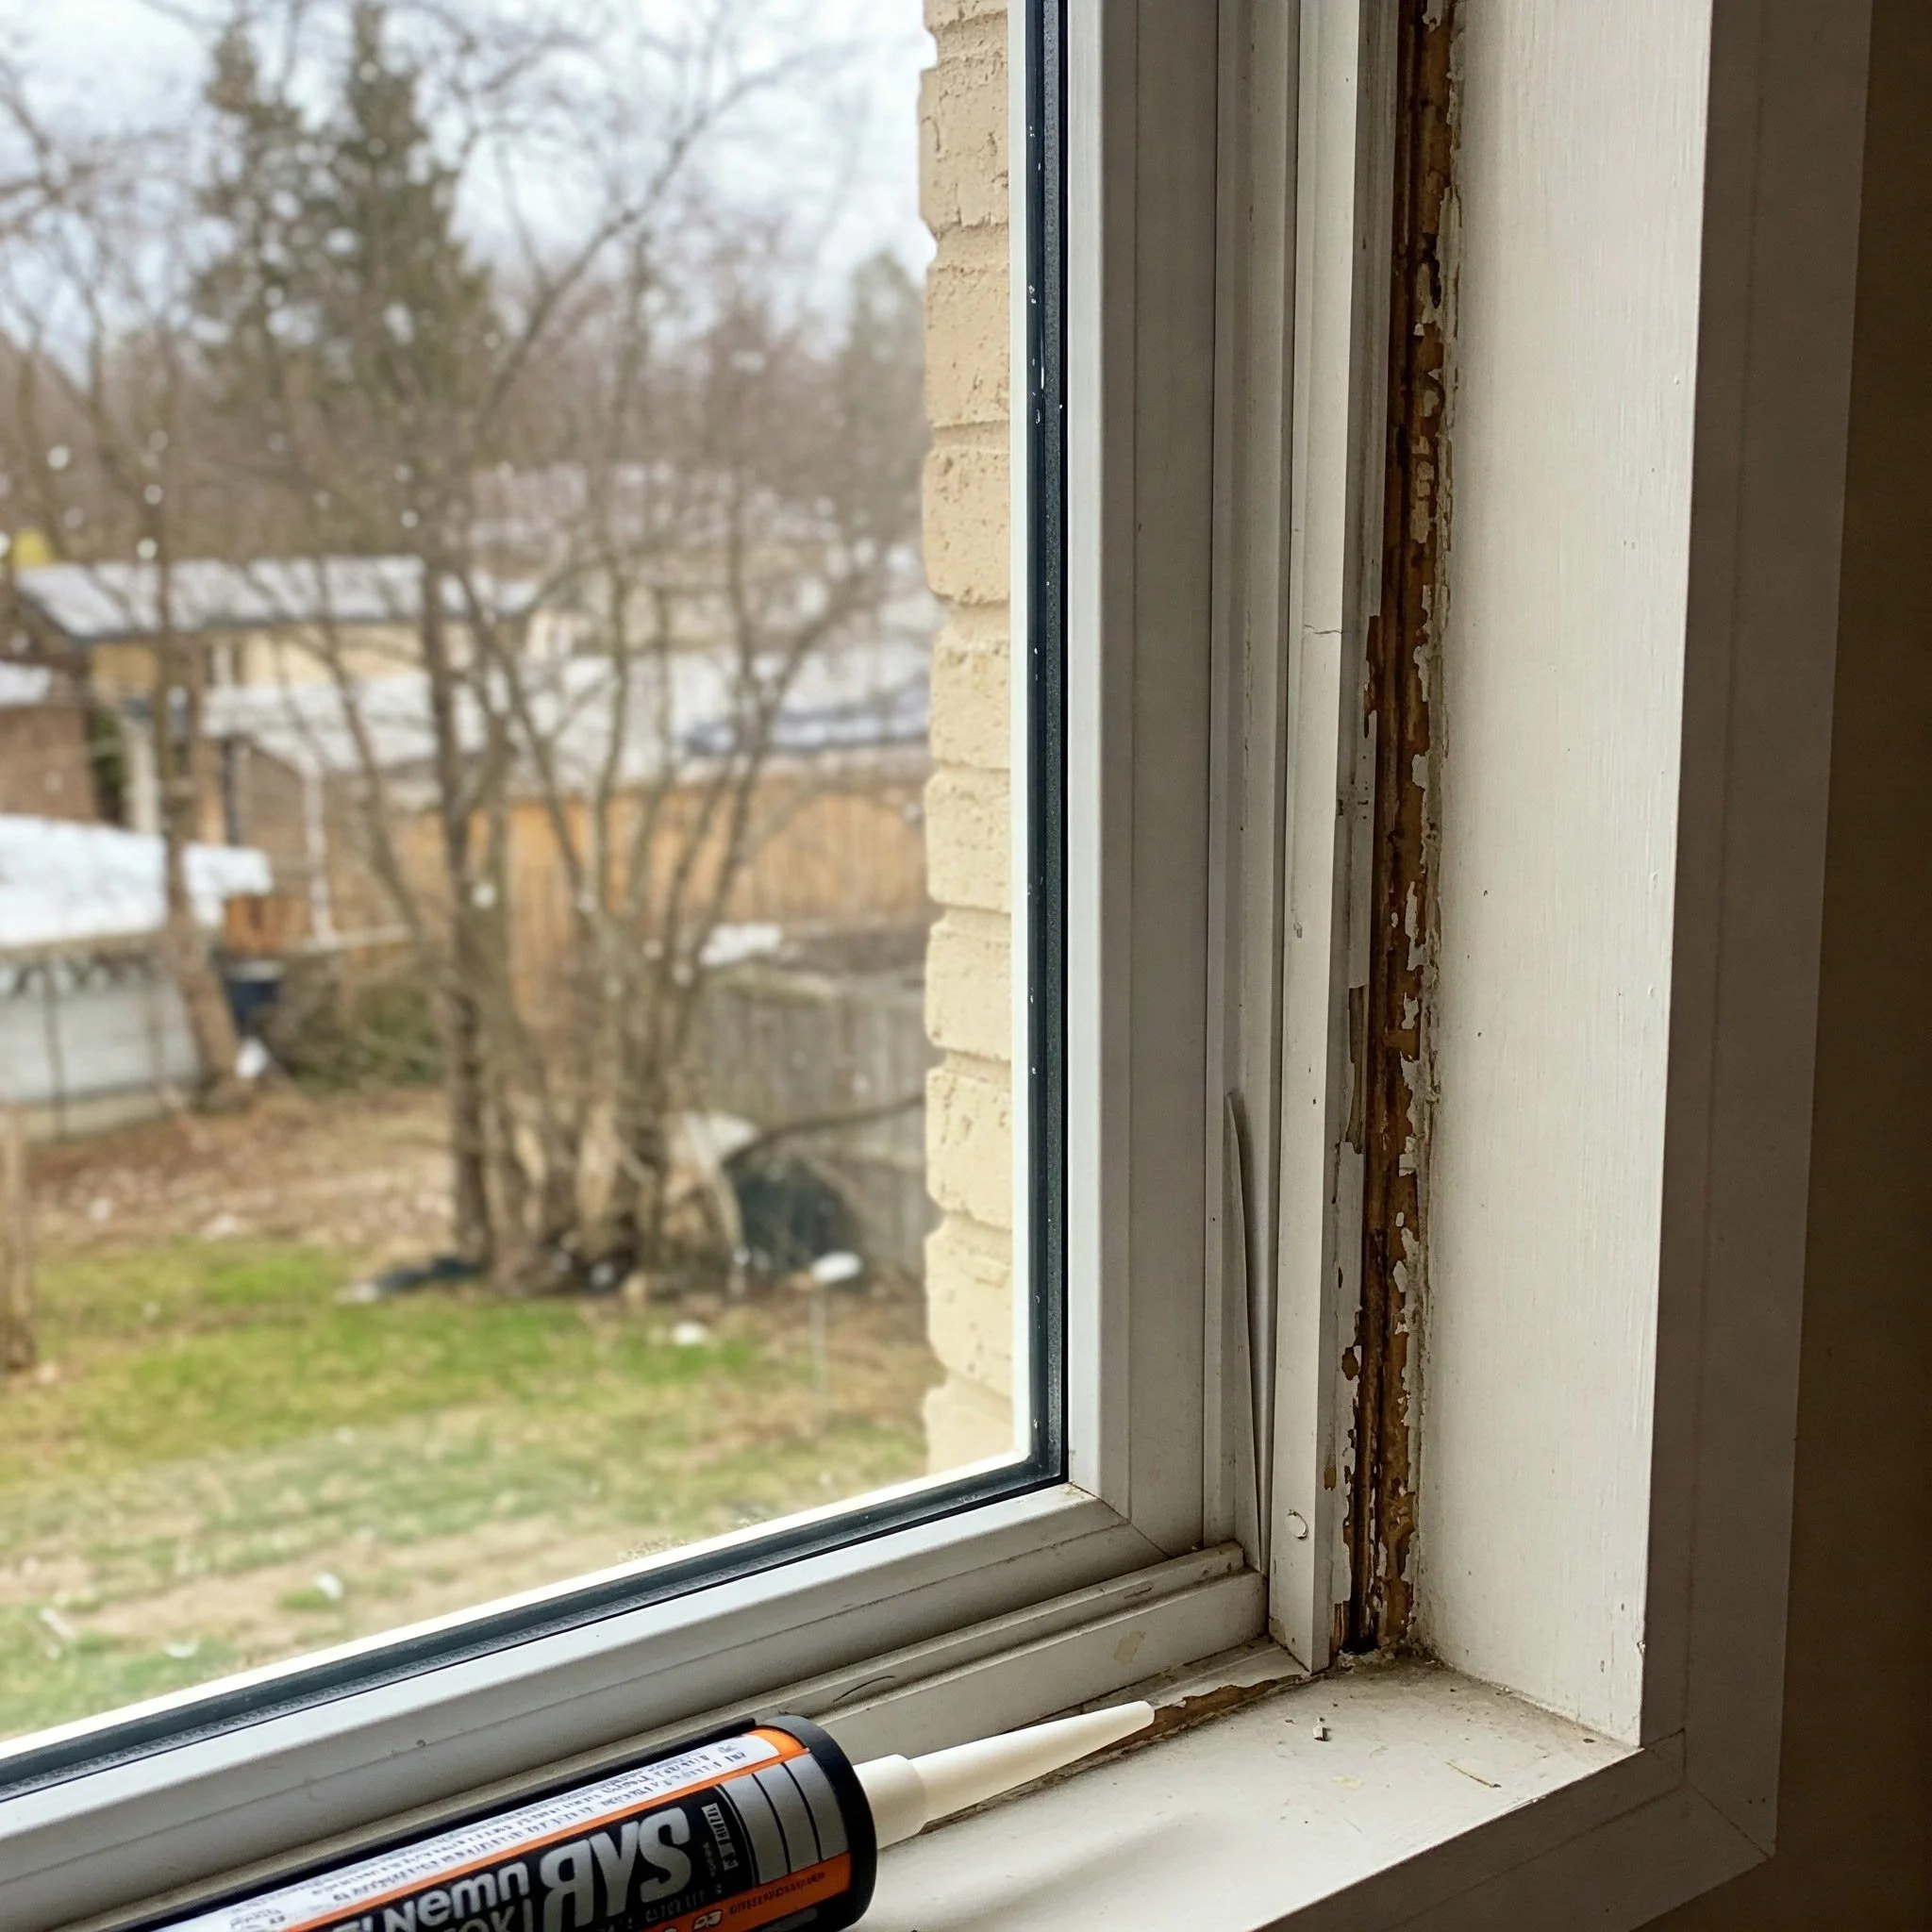
12. Fixing Drafty Windows
Drafty windows can make your home feel chilly and lead to higher energy bills, but you can tackle this issue with some simple DIY methods. Start by inspecting the window frame for gaps or old, deteriorated caulk. Remove any debris and apply a fresh layer of weatherproof caulk or insulation foam to seal off unwanted drafts. This step-by-step approach works like a warm blanket, keeping the cold at bay and ensuring your home remains cozy throughout the year. Not only does sealing drafty windows improve comfort, but it also contributes to energy efficiency and can even reduce noise. With a bit of careful attention and the right materials, you can easily transform your windows from a source of discomfort into a strong line of defense against the elements. It’s a smart fix that pays off both in savings and in comfort.
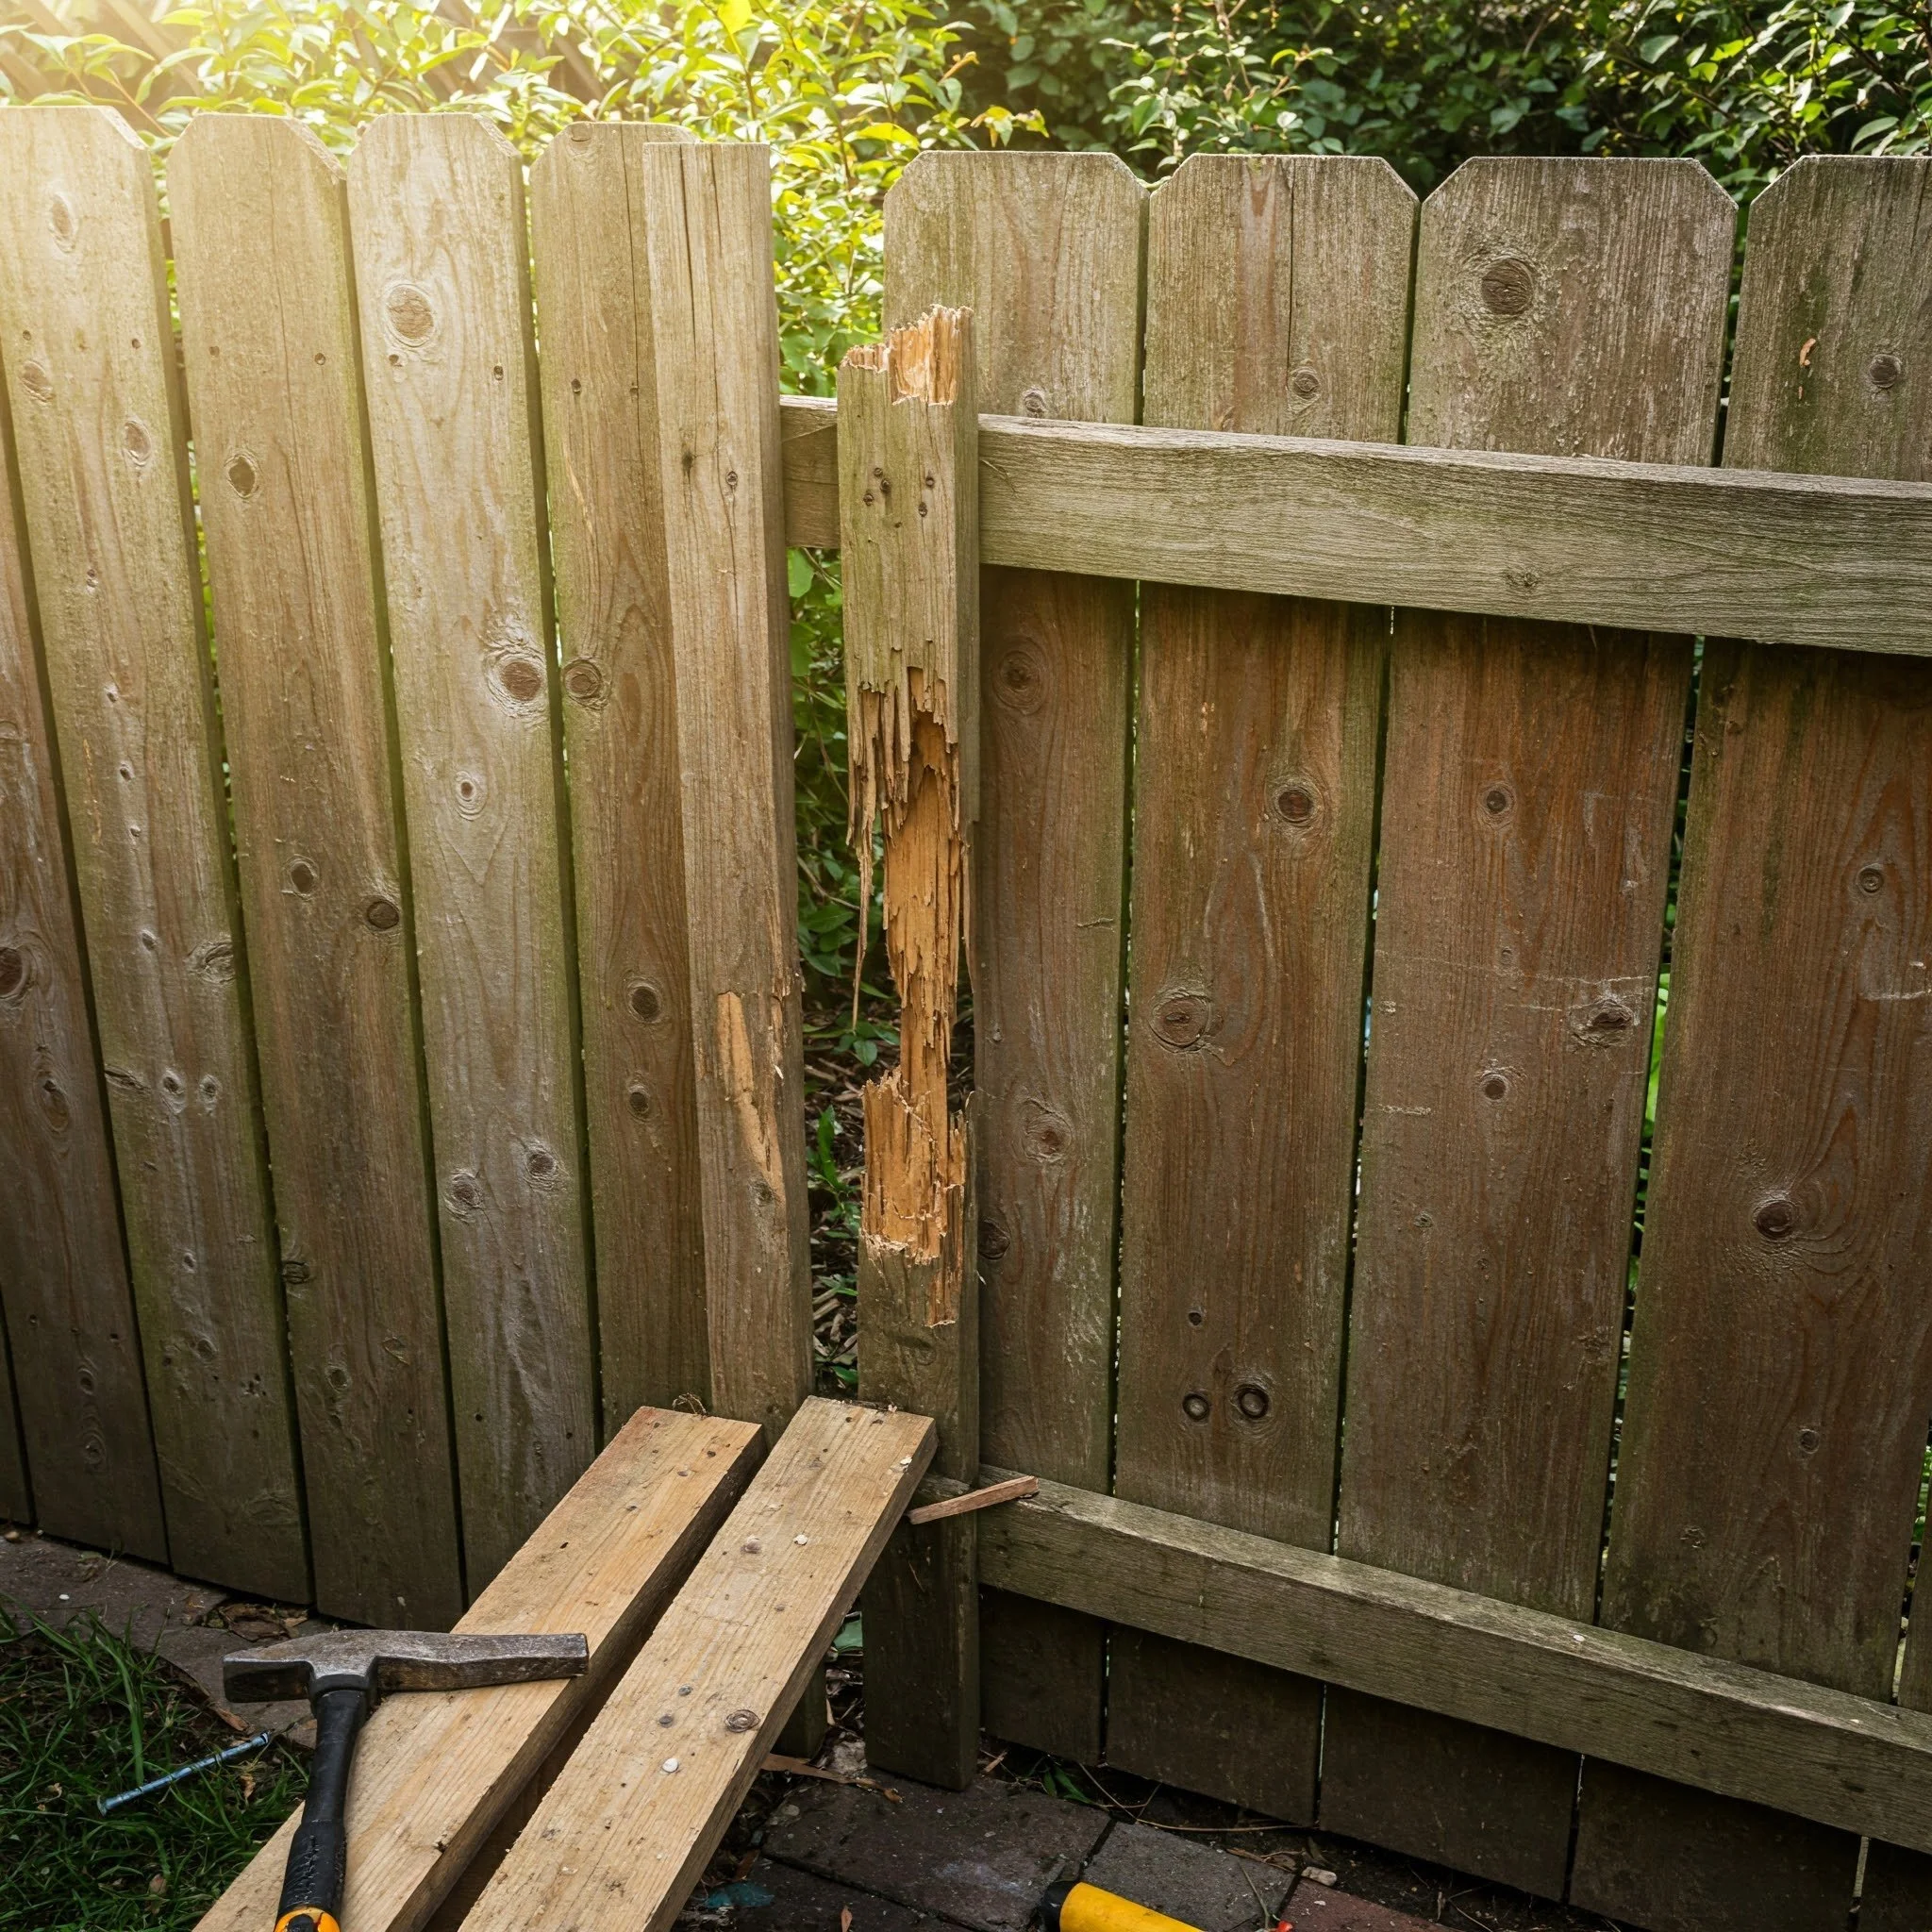
13. Garden Fence Repairs
Your garden fence not only defines your outdoor space but also adds to your home’s curb appeal. When you notice loose boards, splintered edges, or rusted nails, it’s time for a quick repair. Start by examining the damaged areas and removing any loose or broken parts. Use wood filler or replacement panels to mend small gaps, then secure everything firmly with nails or screws. Think of your fence as the guardian of your garden—a small repair today can prevent bigger issues tomorrow. This DIY project is both practical and rewarding, offering you the chance to enhance your outdoor area without extensive work. By investing a little time and care, you can ensure your garden fence stays strong and visually appealing, creating a safe, inviting space for family and friends.
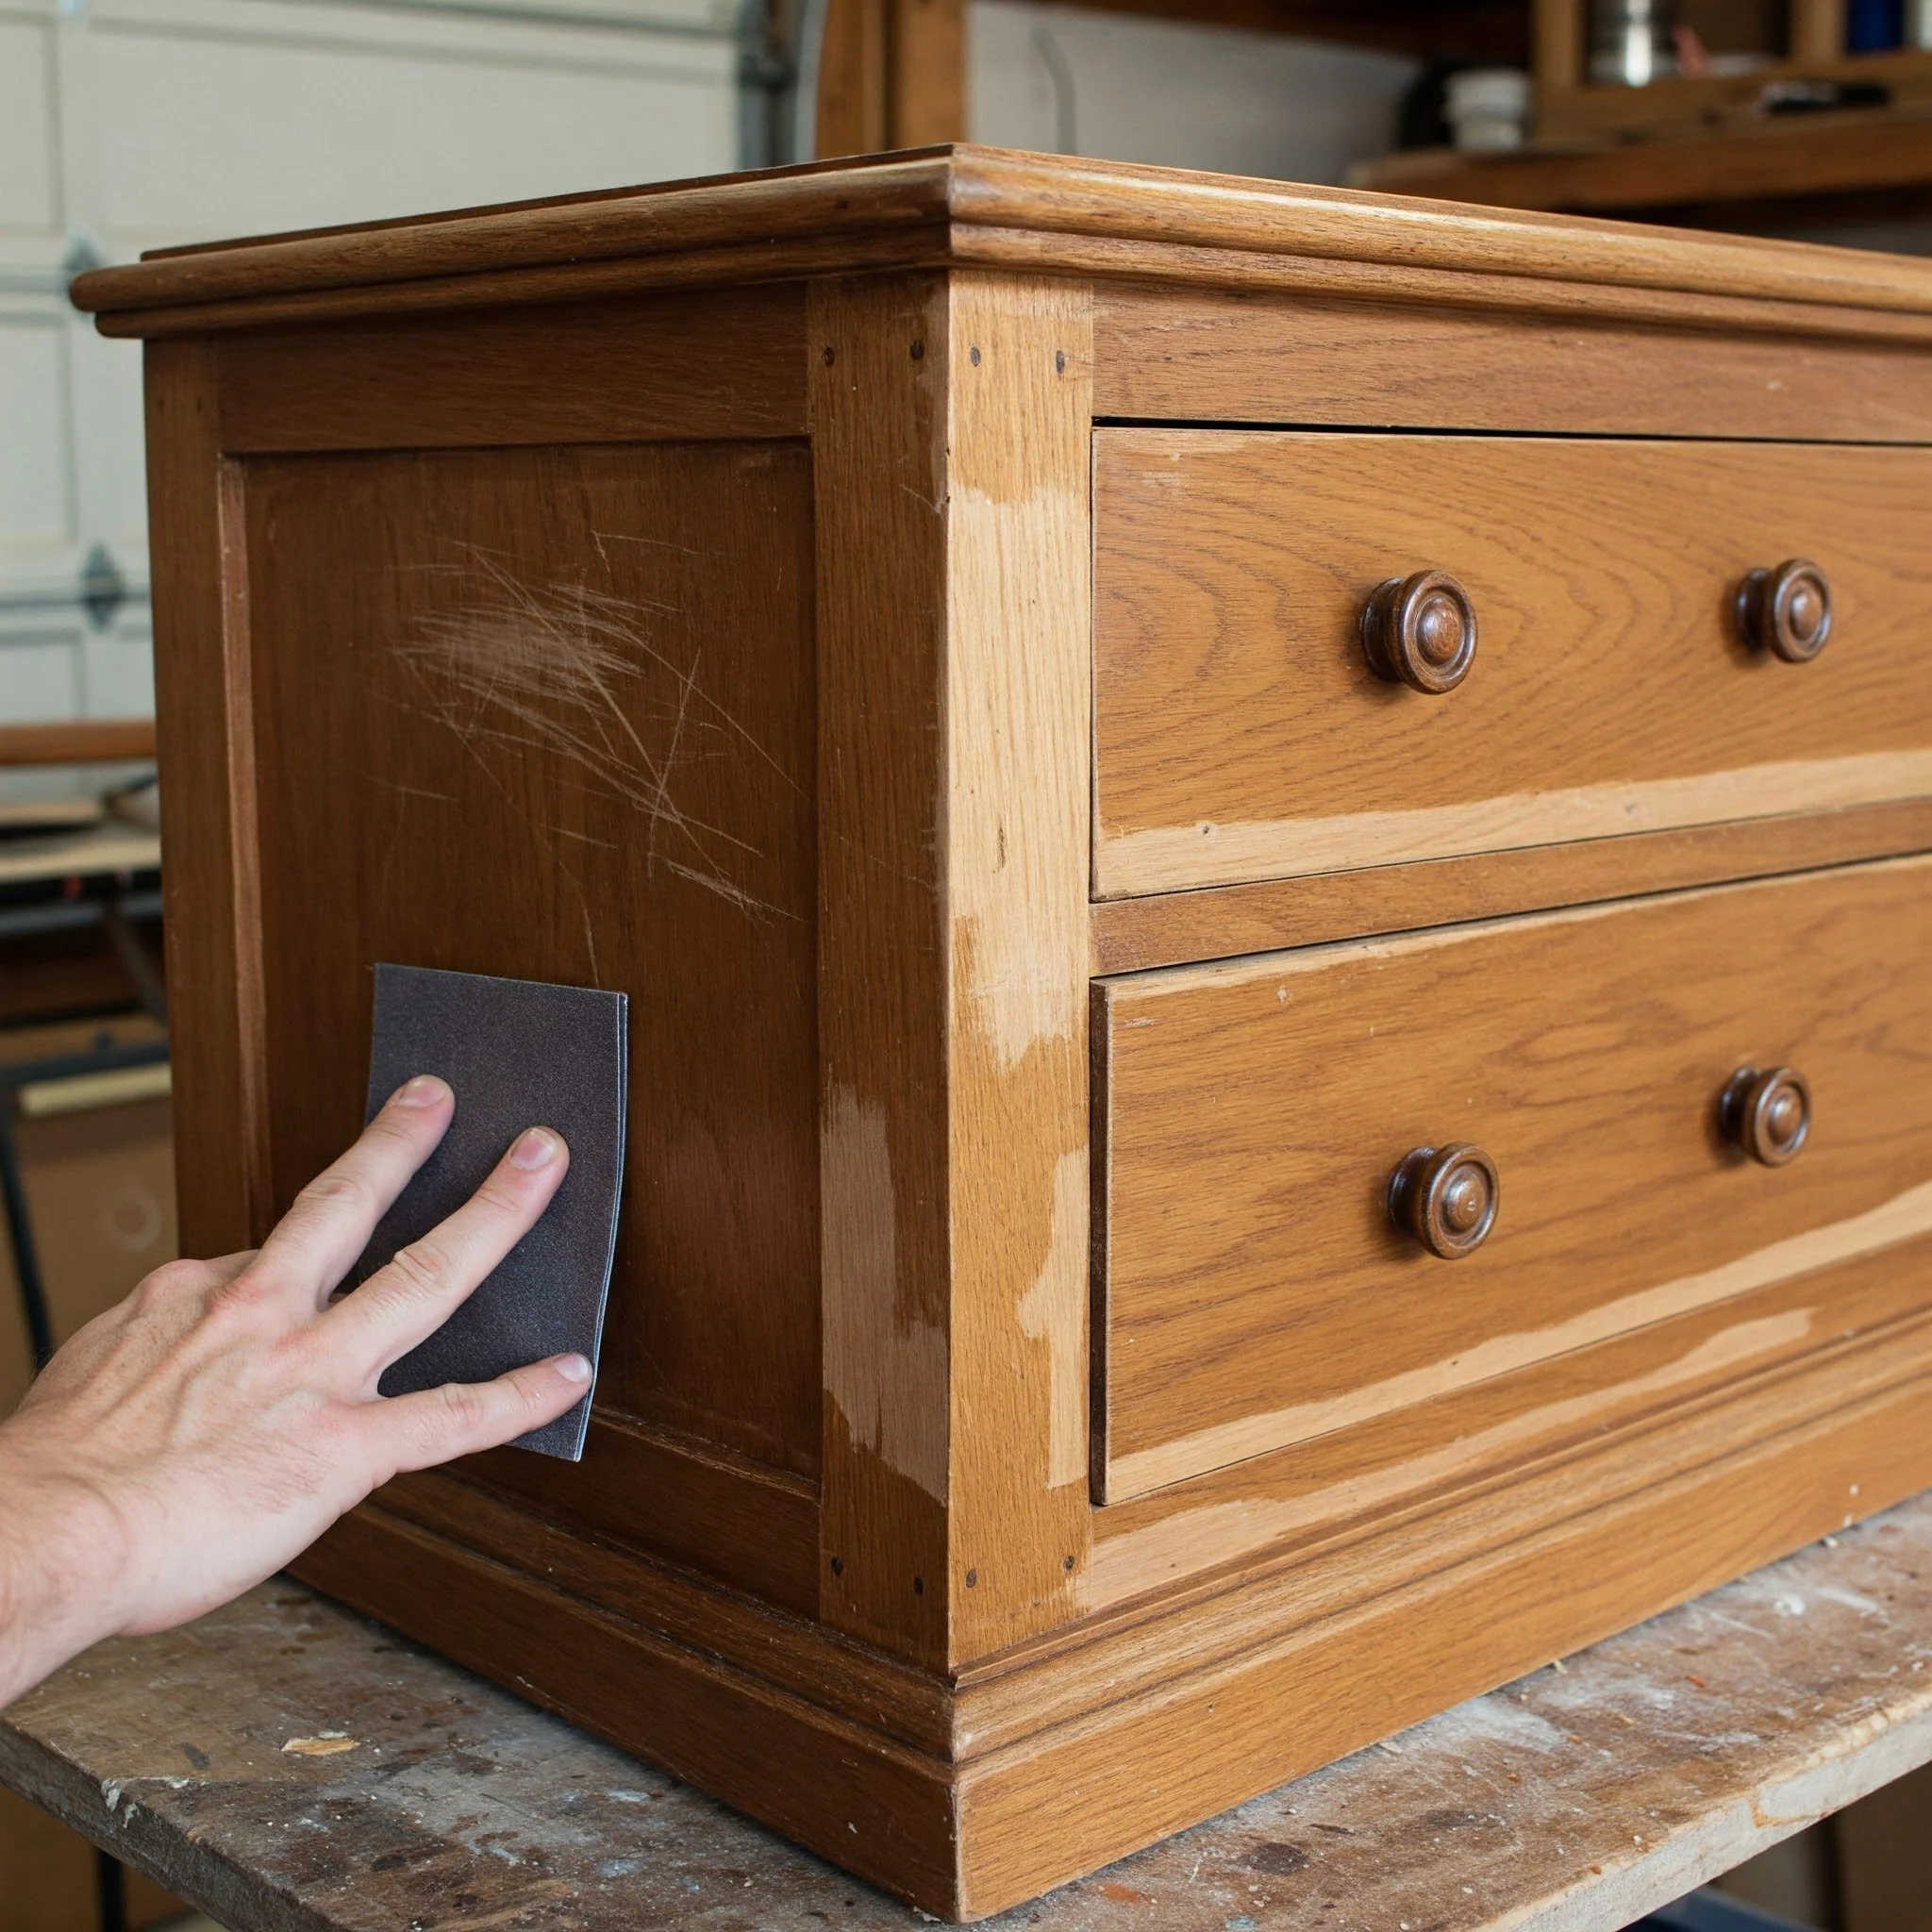
14. Scratched Furniture Refinishing
Scratches on your furniture can detract from its beauty, but refinishing is a surprisingly simple fix. Begin by cleaning the surface thoroughly to remove dust and grime. Use fine-grit sandpaper to gently smooth out the scratched area, then apply a matching stain or polish to blend the repair with the surrounding wood. It’s like giving your favorite piece of furniture a mini-makeover—restoring its original charm while adding a touch of personal care. This DIY project not only revives the appearance of your furniture but also extends its life. With a bit of patience and attention to detail, you’ll transform those unsightly scratches into barely noticeable marks, letting your cherished pieces shine once again. The satisfaction of breathing new life into old furniture can be as rewarding as any other home improvement task, making every effort worthwhile.
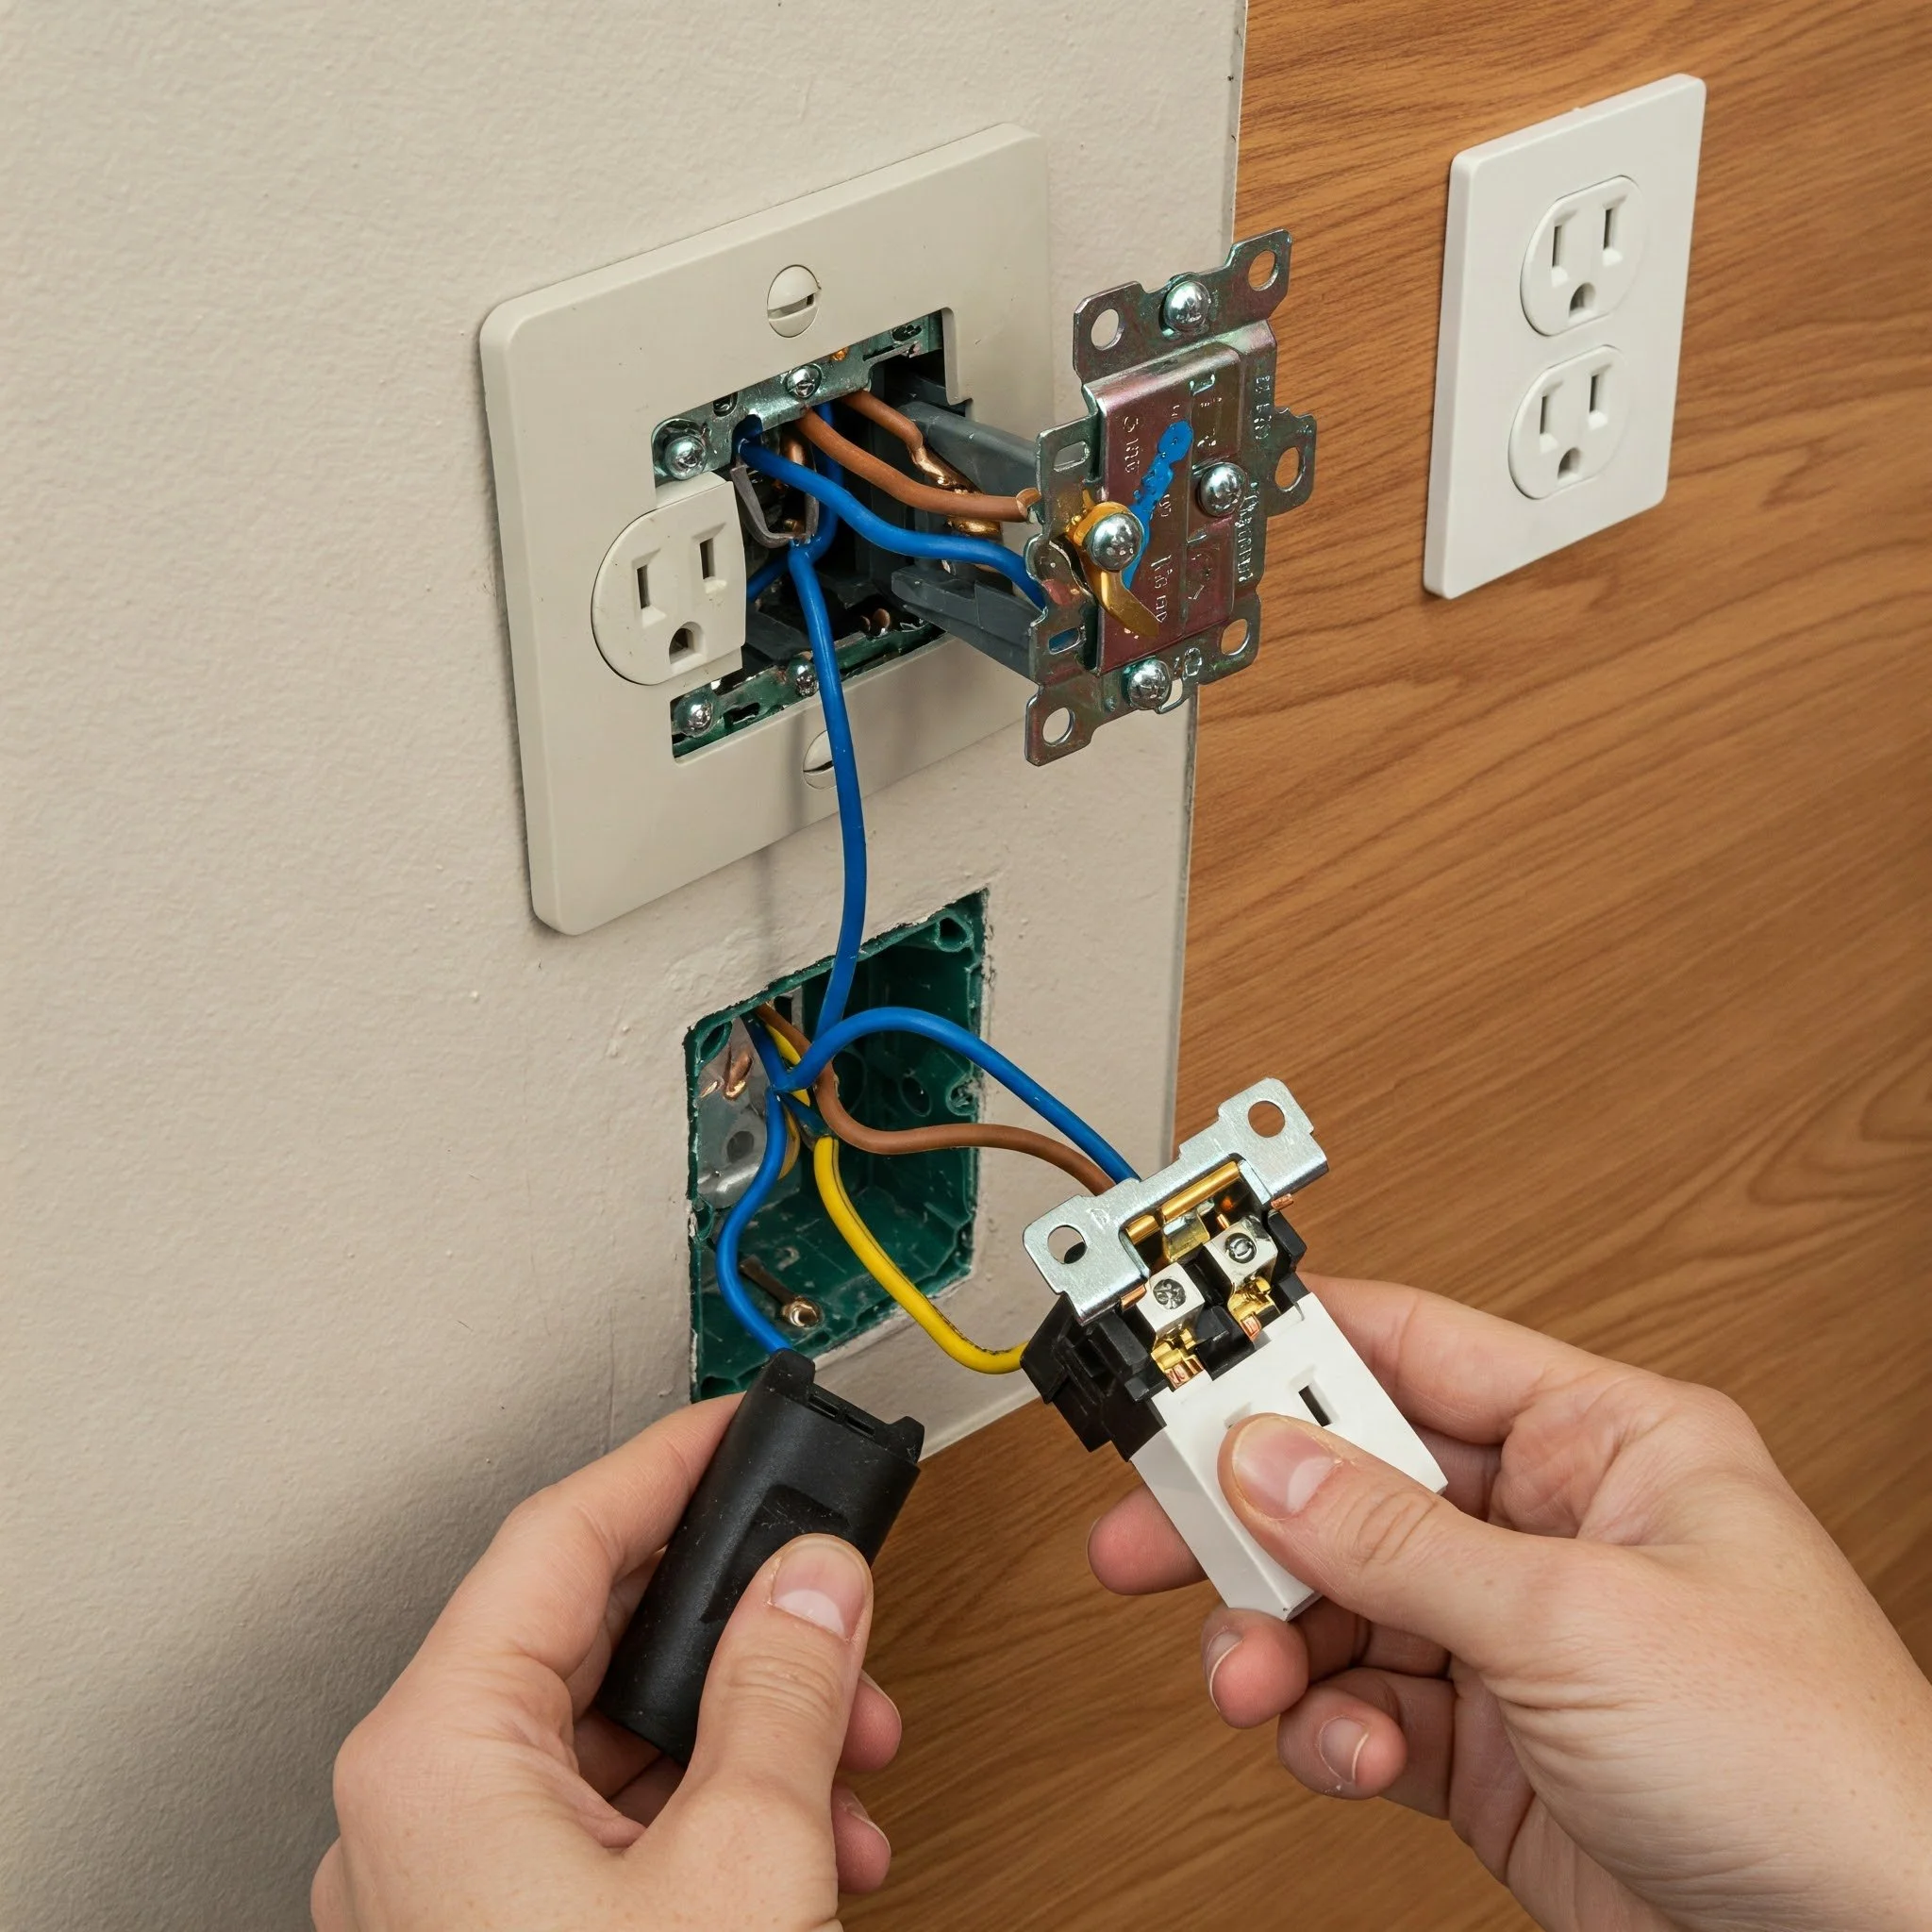
15. Replacing Electrical Outlets
Replacing electrical outlets might sound intimidating, but it’s a crucial repair to ensure your home’s safety and functionality. Begin by switching off the power at the circuit breaker and testing the outlet with a voltage detector to confirm it’s safe. Remove the faceplate and unscrew the old outlet, taking note of the wiring connections. Carefully disconnect the wires and attach them to the new outlet, following the manufacturer’s instructions. Secure the outlet in place, reattach the faceplate, and restore power to test your work. This repair is like upgrading an essential component in your car—it might seem small, but it plays a critical role in the overall performance and safety of your home. With clear steps and the right precautions, you can confidently replace outdated outlets and enjoy the peace of mind that comes with a safer electrical system.
Conclusion
In wrapping up our DIY journey, it’s clear that small home repairs can make a big impact. Each project, from fixing a leaky faucet to replacing an electrical outlet, offers not only immediate benefits but also long-term savings and increased comfort. Embracing these quick fixes empowers you to take control of your living space, turning everyday challenges into opportunities for creativity and self-reliance. Remember, every repair—no matter how small—contributes to a safer, more efficient home. So why wait for a professional when you have the skills and tools at hand? Get inspired, get started, and enjoy the rewarding feeling of saying, “I fixed it myself!”
Frequently Asked Questions
Q1: Can I complete these repairs without professional help?
Absolutely—most repairs are simple enough with basic tools and clear instructions.
Q2: How much time do these fixes usually take?
They generally require only a few minutes to a couple of hours, depending on complexity.
Q3: Are these DIY repairs safe for beginners?
Yes, with proper precautions and step-by-step guidance, even beginners can safely complete them.
Q4: Will fixing these issues lower my energy bills?
Many repairs, such as sealing windows and repairing drafts, can help reduce energy costs.
Q5: Do I need to buy expensive tools for these projects?
Not at all—most tasks require common household tools or affordable items found at local stores.
Stay up to date with our latest ideas!